

Guys, I baked An Apple Pie today! I just had its first slice and came running to my laptop to write about it. This buttery, cinnamon, apple-y (is that even a word!) aroma in my home.... wish I could trap it in a jar and tuck away in a shelf (away, from the world, in my secret corner)!

With the Holidays approaching and Thanksgiving looming around the corner and I am totally on a baking spree. Have you read my Stuffed Baked Apples or Salted Caramel Apple Crisp Bars or Cinnamon Apple Bread or Apple Pecan Cobbler recipe yet? If not, then please do. They are so so so good. 🙂
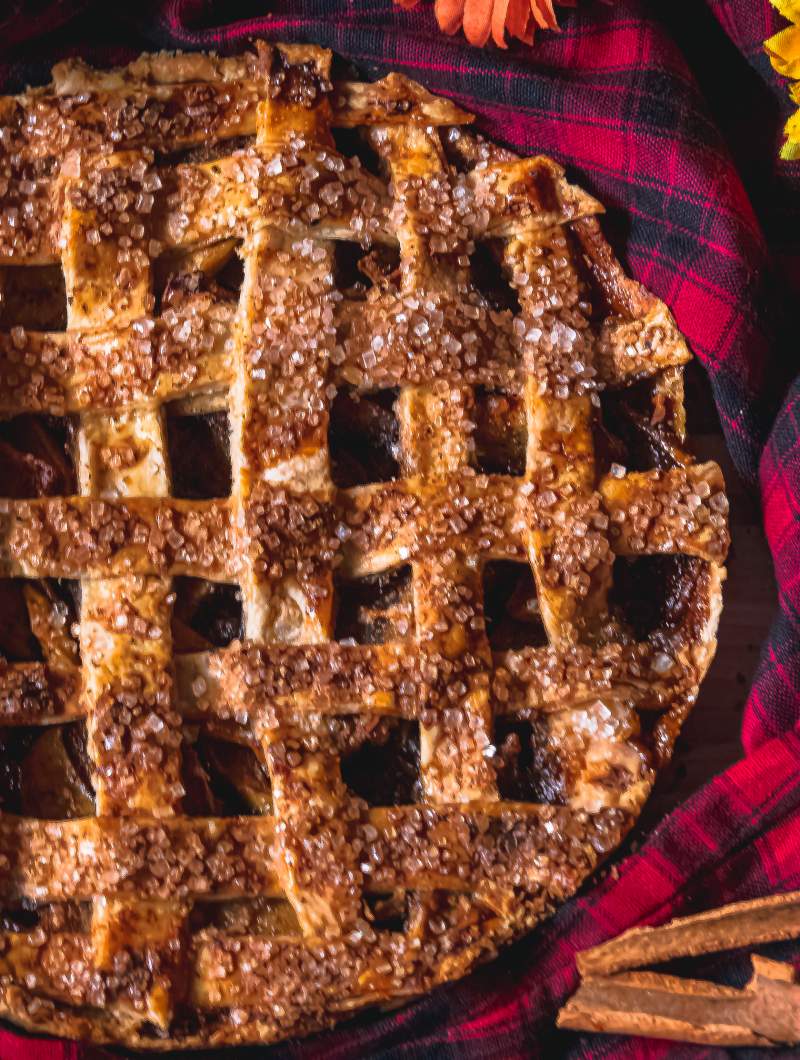
As I take the first bite of this classic Old fashioned Apple Pie, I feel a buttery, cinnamon-y, and nutmeg-y crust along with a sugary, sweet, fragrant, tender apple pie filling. If you haven't already made apple pie, you definitely should. The entire experience of baking it and having it is so good. It's like a complete journey in itself.

And, I love this journey. In fact, I love any journey where the pie is involved. Talking about pie, have you tried my Best Homemade Blueberry Pie
The Smell
Guys, please don't judge me! But, I seriously can't stop talking about this smell that is constantly hitting my nose from some corner of my room and making me talk about it. I literally feel like hanging Christmas lights around my home right now! This smell is talking to me! It's telling me, to write about it. All I can feel is the smell of warm cinnamon and nutmeg along with caramel and apples.
The Taste
The crispy, flaky crust with a tender, caramel-y, sweet Apple Pie filling feels like poetry. The spice especially ginger adds that little earthy tone to the pie. But, the star of the show is the crispy, flaky, buttery pie crust. As you take the first bite of this pie, the crusty pie crust welcomes you in. And, then introduces you to the queen of the show - the caramelized Apple Pie filling with a hint of spice in it. All in all, every bite of this Classic Old-fashioned apple pie is truly amazing.

Classic Apple Pie
Apple Pie starts with a Pie crust.
Yes! A buttery, flaky pie crust is the secret to a good Apple Pie or any pie.
Baking the pie crust requires very few simple ingredients. All you need is flour, Salt, Coldwater, and Cold Fat. As far as Fat is concerned you must use both Butter and Shortening.
You can also use just butter or just shortening. But, my mentor - Sally, from Sally's Baking Addiction has told me, that it's best to use the best of both worlds.
She was right. I tried this recipe with just butter and then I tried it again with both shortening and butter. The difference was clear. My dough was softer. It was so easy to work with a soft dough.
While I was rolling the dough or while I placed it on the pie dish or while I was making the lattice the dough was so pliable.
So buttery and so soft.
Not so delicate that it will tear apart. But, just sort of perfect.

I guess it was the magic of shortening. Shortening is the reason this pie crust has that gorgeous flakiness.
Its soft tender and simply melts in your mouth, the moment you take its first bite. Also, the goodness of butter adds to the softness and brings a buttery texture to this homemade pie crust.
Making Pie Dough
Read how to make the best Homemade Buttery Pie crust.
Always use cold butter and cold shortening. Also, use Ice Cold water to make the dough. If you have seen the video you will see how I used Ice cubes along with some cold water to knead my pie dough. Therefore always remember to use COLD butter, COLD Shortening, and COLD Water to make a crispy, flaky, buttery, pie crust. Wondering Why?
Well, the reason is pretty plain and simple. We don't want the butter to melt. Neither do we want the shortening to melt. This is the reason we keep the dough in the refrigerator once we have kneaded it. When cold butter and cold shortening hits the hot air of the oven, the fat rises and creates that gorgeous flaky, crispy pie crust.
That's the only reason we use everything cold while making pie dough. This concept applies to hand pies, puff pastry etc.

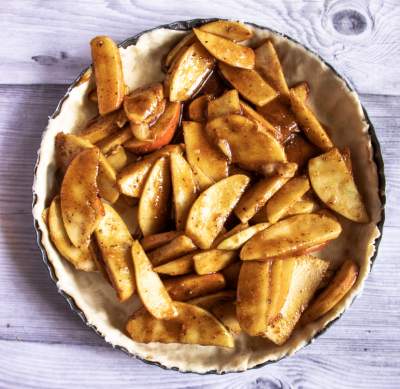
Apple Pie Filling
By the time your dough is taking its time in the refrigerator, make the apple pie filling.
Yes! Let's get to the good part. I love this part of baking an Apple Pie. Get ready for all the deliciousness.
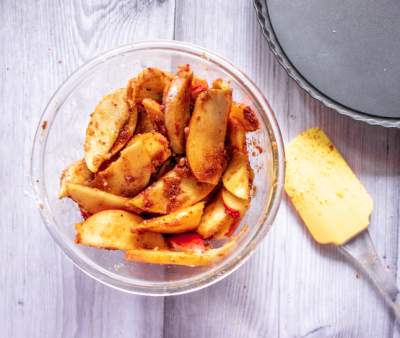
Take a bowl full of sliced apples. Yes, I don't prefer chopping my apples into small cubes. I rather prefer thin slices of apples. According to me, that looks prettier.
And, I have used Honeycrisp Apples to make this Apple Pie.
You can use Fiji, Pink Lady, or Granny Smith to make this pie.
Sally from Sally's Baking Addictions advises using Pink Lady (sweet) and Granny Smith (tart) for a complex flavor. I had just honey crisp apples, and I thought, let me just use it to make my apple pie.


Into the bowl full of apples add 1 cup of Packed Light brown sugar along with 1/2 Cup Granulated Sugar, and Few Spices.
As per spices is concerned, I use ground cinnamon, ground nutmeg, and ground ginger.
To add a little tartiness to my pie I use Apple cider vinegar. You can also use Fresh Lemon juice if you want. But, don't add both lemon juice and apple cider vinegar. It will make it too tarty and bitter (the last thing that we want)

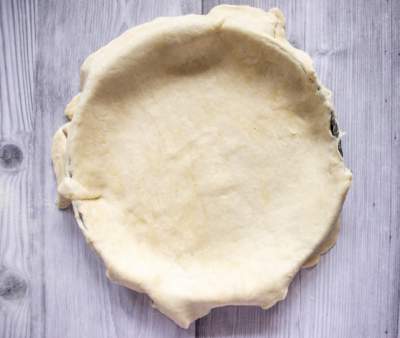
Fill the Apple Pie filling in your pie dough that has been laid on the pie dish. Fill all the way up to the top.


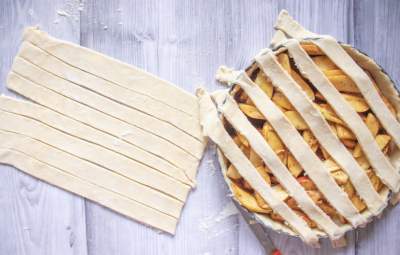
The Lattice
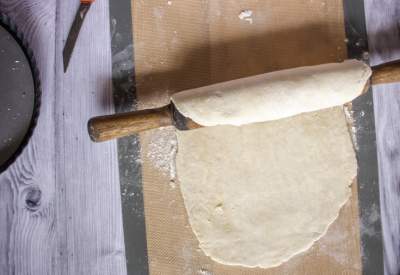
This is the last part of making Apple Pie. And, surely one of my favorite parts. To make the lattice, first roll out the dough, (approximately a little larger than the diameter of your pie dish). Don't worry! Even I didn't roll out a perfect circle.

After you've rolled the dough, trim off the edges to make a perfect square.

Now use a sharp pizza cutter and cut out long vertical strips.

Use longer strips in the center and shorter strips on the sides.

Now take alternate strips and fold them all the way back. They should be like falling off the pie. Now lay one of the unused strips on top. Unfold the strips so that they fall over the perpendicular strips.
Repeat this step with alternate strips. It should look like a weaved basket. Fold the excess of dough that has been laying in the back. Flute the edges.

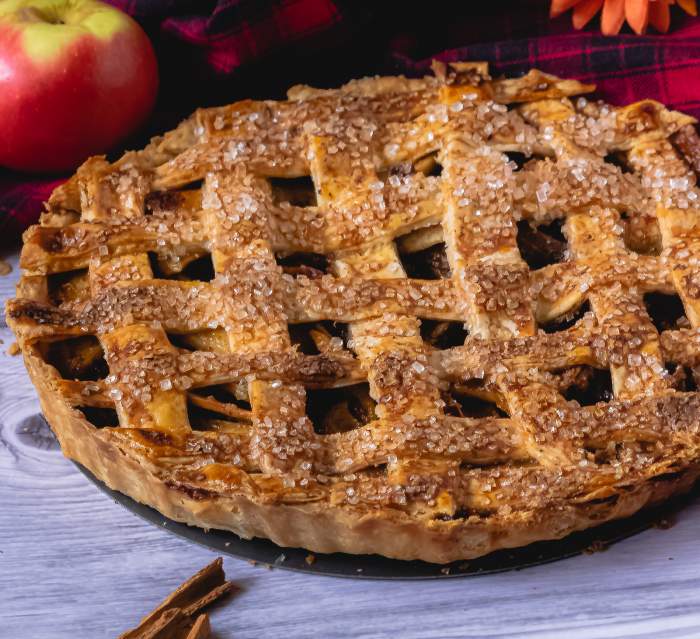
Brush with egg wash and sprinkle coarse sugar. Also, my last little secret of this smelling so good would be sprinkling some grated nutmeg on top.

First, you got to position your rack to the lower third position. Now place your pie dish right at the center and bake this for about 20-minutes at 400F. This hot temperature will make the crust brown.
After, 20-minutes, lower the temperature to 375F and bake it for additional 35 to 45 minutes or until the apples are thoroughly cooked and bubbly. Insert a knife and it should come out almost clean (not entirely clean)
Cool it down for at least 4-hours and then cut it into slices and enjoy with some caramel on top.

If you are making this recipe, then please provide a rating and also take a snap and share it on Instagram with #recipemagik.
OTHER APPLE RECIPES:
- Caramel Pecan Apple Crumble Cheesecake
- Homemade Cinnamon spiced Apple Jam | Apple Jam in Slow Cooker
- Crunchy & Sweet Mini Condensed Milk Apple Tarts
- Healthy Apple Cranberry Muffins

Classic Old-Fashioned Apple Pie
INGREDIENTS
- 6 Large Apples Cored and thinly sliced (approximately 10-12 cups) I have used Honey Crisp Apples
- 1 Cup Packed Light Brown Sugar
- ½ Cup Granulated Sugar
- 1 Tablespoon Ground Cinnamon
- 1 Teaspoon Ground Nutmeg and more for sprinkling on the crust
- ½ Teaspoon Ground Ginger
- ½ Teaspoon Apple Cider Vinegar
- 1 Large Egg for Egg wash beaten with 1 tablespoon milk
- Coarse Sugar OPTIONAL for sprinkling
INSTRUCTIONS
- Learn to make a crispy and flaky pie crust.
- Place sliced apples in a large bowl. Add brown sugar, granulated sugar, apple cider vinegar, ground cinnamon, ground nutmeg, and ground ginger into it. Toss to combine and keep aside.
- On a floured surface, cut the chilled pie dough into two halves. Keep the other half in the refrigerator while you roll one half to make the pie crust. Roll the dough until it has about 1/2 inch thickness. Turn the dough to a quarter turn after every few seconds so that you have a circular rolled dough which is about 11-12 inches in diameter. Roll the dough over your rolling pin and unwrap it on your pie dish. Tuck it carefully into the pie dish with your fingers and trim the edges to remove the extra hanging crust.
- Add the Apple Pie Filling and pile them on top of each other. Pack them tight. Preheat the oven to 400F or 204C
- Take out the other half of the dough, and roll it on a floured surface approximately 1-inch larger than the diameter of your pie dish. In this case, I rolled it approximately 11-12 inches in diameter. Use a pizza cutter or a pastry wheel or sharp knife to slice thin vertical slices about 1/2 inch wide. You will have about 16 strips. Weave the strips carefully over and under one another so that it looks sort of like a basket. Add the lattic right on the apples and press it down slightly. Trim off the excess from the corners and flute the edges of your pie.Brush egg wash over the lattice crust. Sprinkle some coarse sugar and ground nutmeg on top.
- Place the pie in the lower third rack of the oven. If you think it will spill over then just place this pie dish on a baking tray and then allow it to bake at 400F for at least 20-minutes.After 20-minutes, lower the temperature to 375F 191C and bake for additional 35-45 minutes or until the pie filling is bubbly. If the pie crust is getting too brown you can loosely cover the top with an aluminum foil. After your pie is baked, insert a knife in the center and check. It should come out relatively clean with some moist crumbs.

- Allow the pie to cool down for 3 to 4 hours. Cut it into slices and serve with some caramel sauce on top. This is best served on the same day. However, if you wish to store it then you can cover it tightly with a plastic wrap or foil and refrigerate for up to 3-4 days.
Video
Notes
- Make-Ahead & freezing: You can make the pie dough ahead of time and then store it in the refrigerator for at least 5 days. You can also freeze it for up to 3 months - but make sure it is properly wrapped with a plastic wrap and then double wrapped with an aluminum foil. Thaw overnight in the refrigerator before using it the next day.
- You can also freeze baked apple pie after it has cooled down completely. Keep it in a disposable aluminum pie dish. The best part about storing it in this dish is that you can take it straight from the freezer to the oven. But you have to bake it a little longer than the mentioned bake time. But, the top might get a little too brown so you can tent with foil and prevent over-browning.
- But, ideally, you should thaw it overnight in the refrigerator before baking it.
- If this feels a little too sweet for you then you can add some salted caramel sauce on top or some fresh lemon juice to balance the sweetness.
- Dump the apple pie filling on top of each other and pack it tightly. Place the lattice right on top of the pie filling and also press it a little so that there are no gaps between the lattice and the pie filling.
- Don't forget to use cold water, cold butter cubes, and cold shortening to make the pie crust.
Ask Me Anything