

Thanksgiving is all about gathering around the table with loved ones, sharing gratitude, and—of course—enjoying incredible food. While the turkey and pie usually steal the spotlight, no holiday spread is truly complete without a fun, festive dessert tray. If you want to delight guests of all ages this year, look no further than these adorable, creative, and remarkably easy Thanksgiving cookies.
Whether you are looking for zero-bake shortcut treats made with pantry staples like Oreos, Rolos, and candy corn, or simple cut-out cookie bases transformed into cute woodland turkeys and autumn pumpkins, this collection has something for everyone. Best of all, these recipes require no intimidating culinary techniques—just simple ingredients, a little creativity, and plenty of fun.
Let’s dive into 30 of the sweetest ways to celebrate the season!
Pumpkin Pie Sugar Cookies
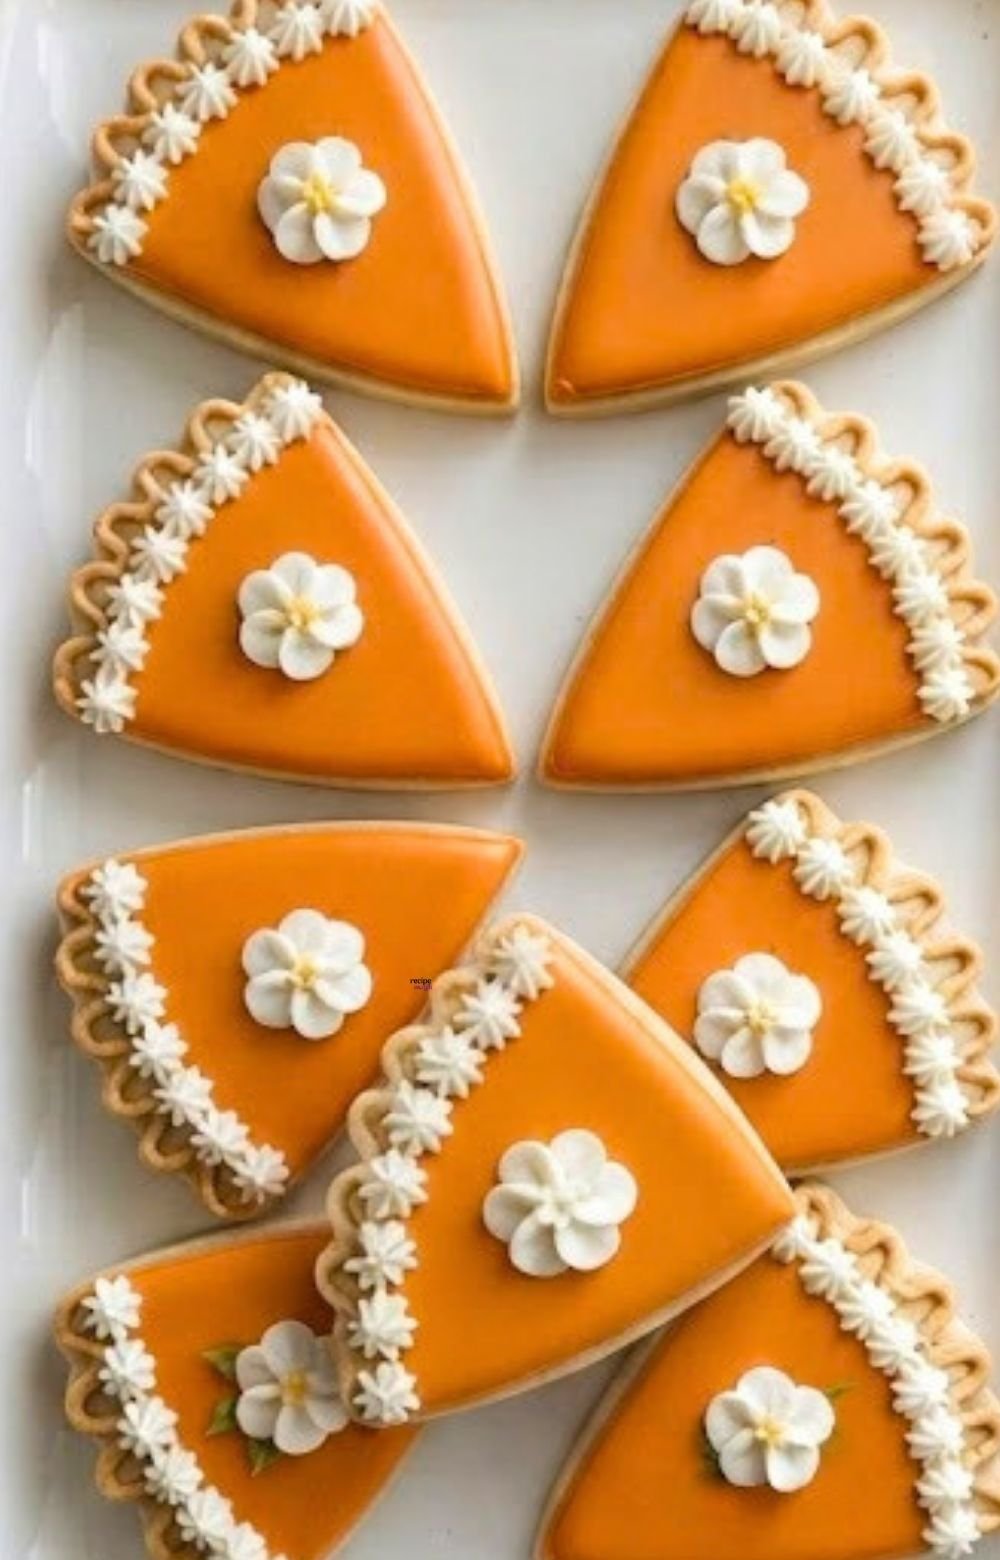
Thanksgiving Pumpkin Pie Sugar Cookies Recipe
Here is the complete recipe to make these charming pie-slice sugar cookies with vibrant orange glaze and piped white detailing.
Ingredients
For the Cut-Out Sugar Cookies:
- 2 1/2 cups all-purpose flour
- 1/2 tsp baking powder
- 1/4 tsp salt
- 3/4 cup unsalted butter, softened
- 3/3 cup granulated sugar
- 1 large egg
- 1 tsp vanilla extract
For the Royal Icing & Glaze:
- 2 cups powdered sugar
- 2 to 3 tbsp milk or water
- 1 tsp light corn syrup (for shine)
- Orange food coloring (gel-based)
- White piping consistency royal icing (or store-bought decorating frosting)
Instructions
1. Make the Cookie Dough:
- In a medium bowl, whisk together the all-purpose flour, baking powder, and salt.
- In a separate large bowl, beat the softened butter and granulated sugar together until light and fluffy (about 2 minutes).
- Add the egg and vanilla extract, mixing well until fully combined.
- Gradually mix in the dry ingredients just until a dough forms. Do not overmix.
- Divide the dough in half, flatten into discs, wrap in plastic wrap, and chill in the refrigerator for at least 1 hour.
2. Cut and Bake:
- Preheat your oven to 350°F (175°C) and line baking sheets with parchment paper.
- Roll out the chilled dough on a lightly floured surface to about 1/4-inch thickness.
- Use a sharp knife, a pastry wheel, or a pie-slice shaped cookie cutter to cut out triangle pieces.
- Transfer the slices to the prepared baking sheets and bake for 8–10 minutes until the edges are just lightly golden.
- Remove from the oven and let them cool completely on a wire rack.
3. Decorate:
- Orange Base Flood: Mix the powdered sugar, milk, and corn syrup to a smooth consistency. Tint it vibrant orange. Spread or flood the top of each cookie triangle with the orange glaze, leaving a small bare crust edge at the wide end if desired. Let it set completely (about 30–60 minutes).
- Crust & Piping Details: Using a piping bag fitted with a small star tip and white frosting, pipe a ruffled shell or star border along the wide curved edge of each slice to mimic a pie crust.
- Center Flower: Pipe a small, delicate white flower with a tiny yellow center right in the middle of each orange slice.
Oreo Turkey Cookies
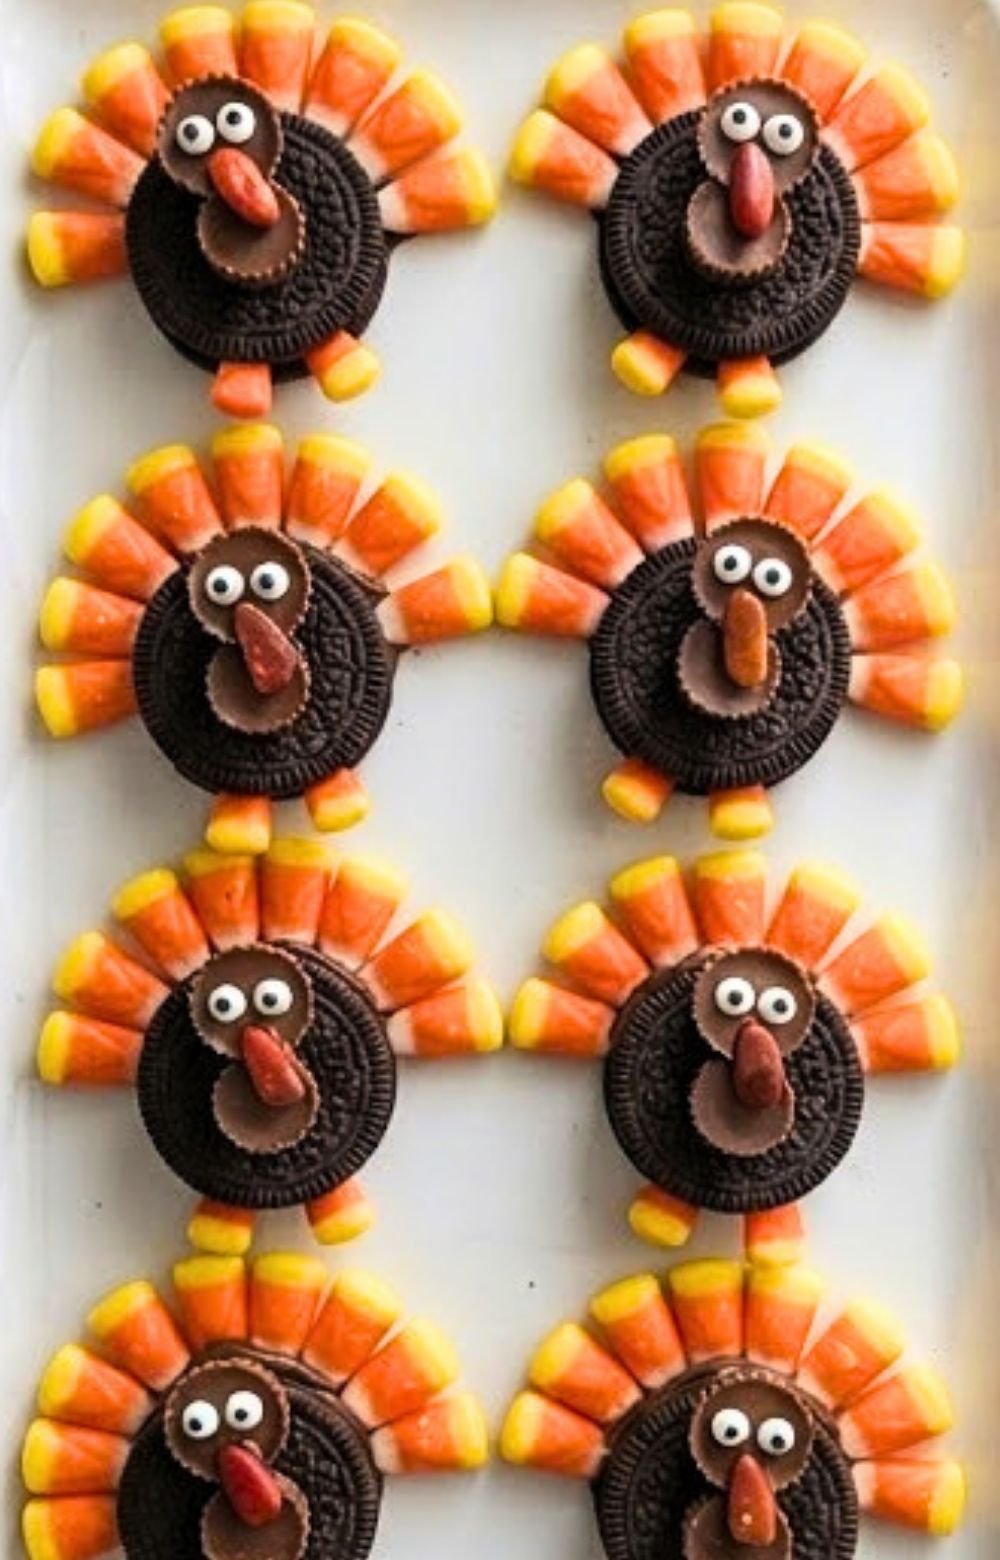
No-bake and fun to assemble, these adorable little turkey treats are a festive and easy project for Thanksgiving!
Ingredients
- 8 to 10 regular Oreo cookies (or Double Stuf for easier inserting of candy corn)
- 8 to 10 miniature peanut butter cups (unwrapped)
- Candy corn (about 5 to 7 pieces per turkey for the tail feathers, plus a few extra tips for the beaks)
- Reese's Pieces or small orange/brown candies (or a drop of orange frosting) for the snood/wattle
- Edible candy googly eyes
- Melting chocolate, tube of black/chocolate decorator icing, or a small amount of peanut butter/frosting (to use as edible "glue")
Instructions
1. Prep the Turkey Bodies:
- Unwrap the miniature peanut butter cups.
- Use a small dab of melted chocolate, decorator icing, or peanut butter on the back of each peanut butter cup and press it onto the front center of an Oreo cookie to act as the turkey's body.
2. Create the Feathers:
- Gently twist open one side of an Oreo cookie (or carefully push them directly into the cream if using Double Stuf).
- Press the wide ends of the candy corn into the cream filling in a fan shape along the top half of the cookie to form the colorful tail feathers.
- (Optional) If you twisted the cookie open, press the top half back down to secure the candy corn firmly in place, or secure them with a little melted chocolate along the inner edge. Add two small pieces of candy corn at the bottom base of the Oreo for feet.
3. Add the Face and Details:
- Attach two edible candy googly eyes to the front of the miniature peanut butter cup using a tiny dab of icing or melted chocolate.
- Cut or snap the orange tip off a piece of candy corn and attach it just below the eyes as the beak.
- Add a tiny red or orange candy piece (or a small dot of red/orange icing) next to the beak for the wattle.
Let them set for about 10–15 minutes if you used melted chocolate for glue, then arrange them on your serving tray and enjoy!
Pumpkin Pie Thumbprint Cookies
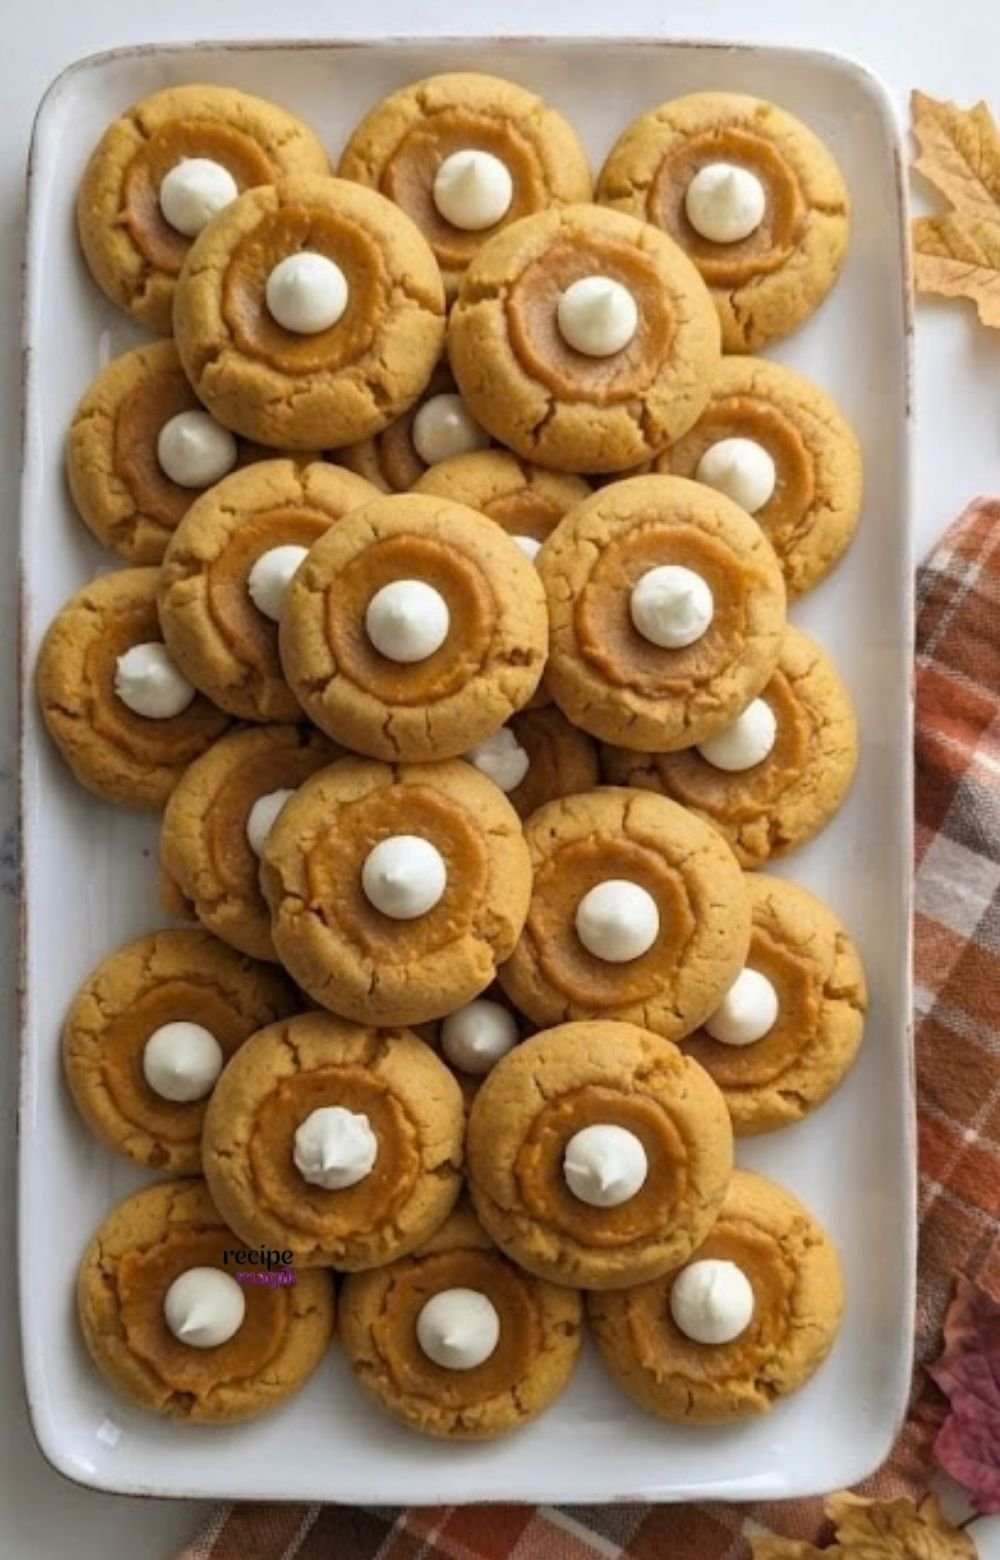
Pumpkin Pie Thumbprint Cookies Recipe
Soft, spiced round cookies with a rich, creamy pumpkin pie filling and a dollop of buttercream frosting on top—these capture all the classic flavors of a Thanksgiving slice in a bite-sized treat.
Ingredients
For the Soft Cookie Dough:
- 2 1/4 cups all-purpose flour
- 1 tsp baking soda
- 1 tsp ground cinnamon
- 1/2 tsp ground nutmeg
- 1/4 tsp ground ginger
- 1/4 tsp salt
- 3/4 cup unsalted butter, softened
- 1/2 cup granulated sugar
- 1/2 cup light brown sugar, packed
- 1 large egg
- 1 tsp vanilla extract
For the Pumpkin Pie Filling:
- 1/4 cup canned pumpkin puree (not pumpkin pie mix)
- 2 tbsp brown sugar
- 1 tsp pumpkin pie spice
- 1/2 cup cream cheese, softened (or smooth vanilla pudding/white chocolate ganache to help bind and set)
For the Buttercream Dollop:
- 1/2 cup unsalted butter, softened
- 1 1/2 cups powdered sugar
- 1 to 2 tbsp heavy cream or milk
- 1 tsp vanilla extract
Instructions
1. Make the Cookie Dough:
- Whisk together the all-purpose flour, baking soda, cinnamon, nutmeg, ginger, and salt in a medium bowl.
- In a large bowl, beat the softened butter, granulated sugar, and brown sugar together until light and fluffy.
- Add the egg and vanilla extract, beating until well combined.
- Gradually mix in the dry ingredients until a soft dough forms.
- Chill the dough in the refrigerator for about 30 minutes to make it easier to roll.
2. Shape and Bake:
- Preheat your oven to 350°F (175°C) and line baking sheets with parchment paper.
- Roll the dough into 1-inch balls and place them a couple of inches apart on the baking sheets.
- Use your thumb or the back of a rounded teaspoon to press a deep indentation into the center of each ball.
- Bake for 9–11 minutes until the edges are set and lightly golden. Re-press the centers gently with the spoon while they are still warm if the indentations puffed up too much. Let them cool completely.
3. Prepare the Pumpkin Filling & Frosting:
- Pumpkin Filling: In a small bowl, whisk together the pumpkin puree, brown sugar, pumpkin pie spice, and softened cream cheese until smooth and thick. Spoon a small amount into the center of each cooled cookie.
- Buttercream Frosting: Beat the butter, powdered sugar, heavy cream, and vanilla extract together until light and fluffy. Transfer to a piping bag fitted with a small round tip.
4. Assemble:
- Pipe a small, neat dot of white buttercream frosting right on top of the pumpkin filling in the center of each cookie.
Arrange them in a big, beautiful pile on your serving tray alongside your fall decor and enjoy!
Nutter Butter Acorn Cookies
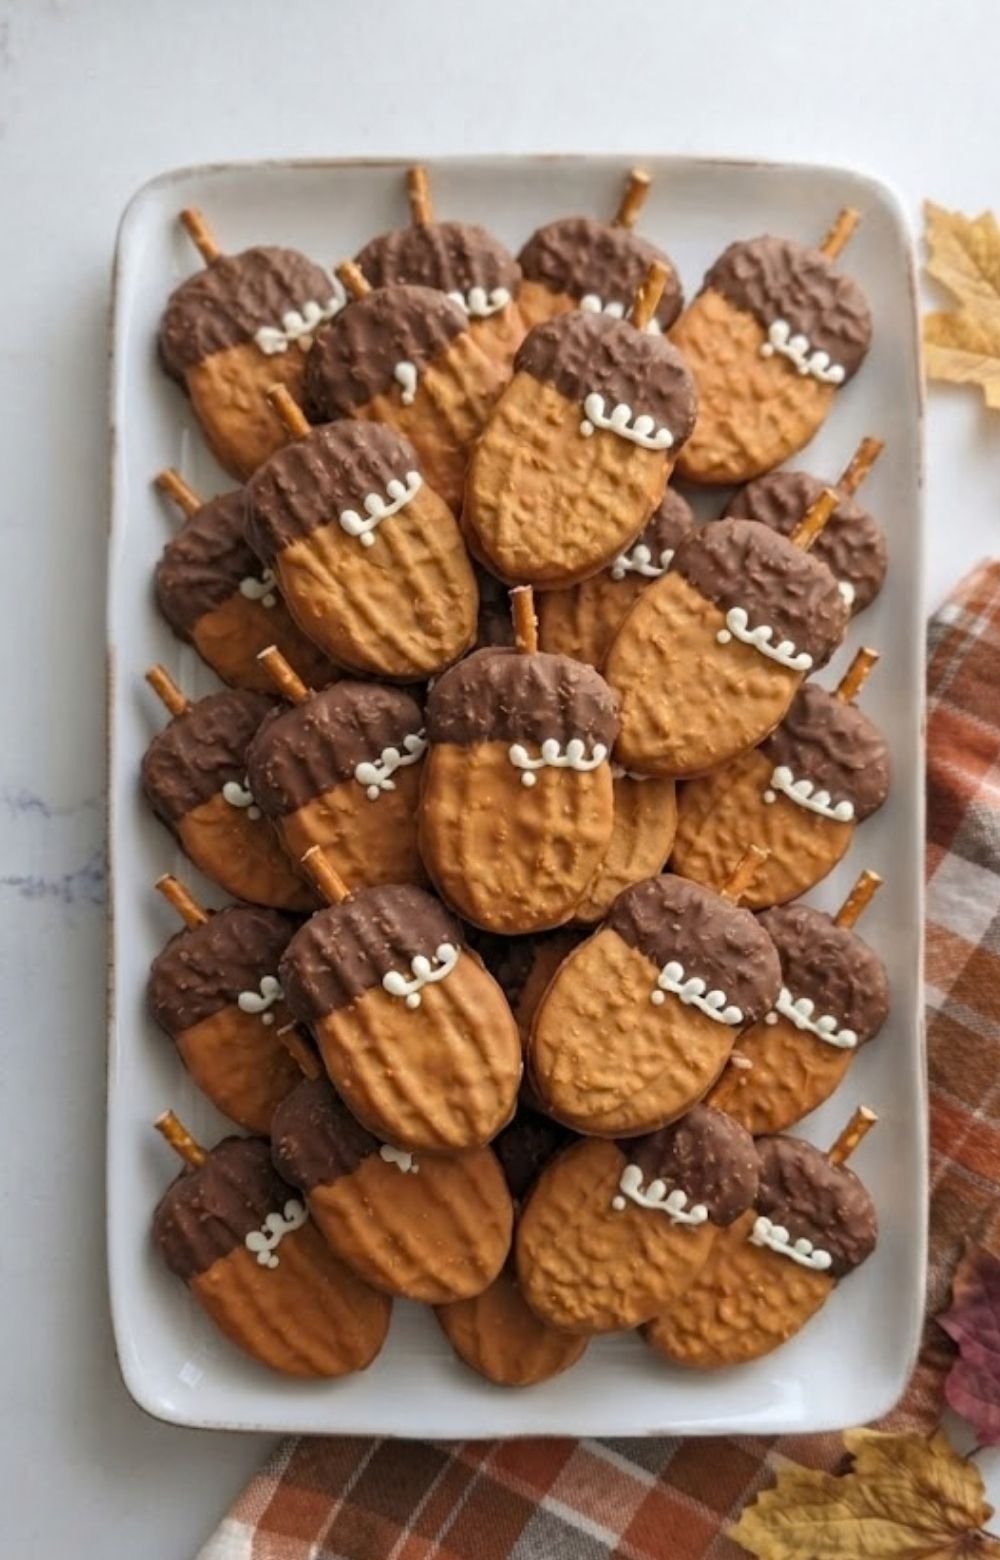
Nutter Butter Acorn Cookies Recipe
No-bake, quick to put together, and wonderfully festive, these cute chocolate-dipped acorn cookies are a classic fall treat!
Ingredients
- 1 package (approx. 12-15) Nutter Butter cookies
- 1 cup chocolate melting wafers or chocolate chips (milk or semi-sweet)
- 1 tsp coconut oil or vegetable shortening (optional, to thin the chocolate for dipping)
- Pretzel sticks (broken into small pieces for the stems)
- White decorator icing or melted white chocolate (for the little textured piping detail)
- A pinch of edible gold or brown sanding sugar (optional, for extra texture on the chocolate cap)
Instructions
1. Prep the Stems:
- Break or cut pretzel sticks into short pieces (about 1 inch long) to serve as the acorn stems.
- Carefully press one pretzel piece into the top edge of the peanut-butter filling of each Nutter Butter cookie.
2. Melt the Chocolate:
- In a microwave-safe bowl, melt the chocolate chips or melting wafers in 30-second increments, stirring in between until completely smooth. Stir in the coconut oil or shortening if the chocolate is too thick.
3. Dip the Acorn Caps:
- Hold a Nutter Butter cookie by the bottom half and dip the top third (the end with the pretzel stem) into the melted chocolate.
- Let any excess chocolate drip off gently back into the bowl.
- Place the dipped cookies onto a parchment-paper-lined baking sheet. (If using sanding sugar, sprinkle a tiny bit onto the wet chocolate cap now).
4. Add the Piping Details:
- Allow the chocolate caps to set completely (you can pop them in the fridge for 5–10 minutes to speed this up).
- Using a piping bag or a small ziplock bag with the corner snipped off, pipe a cute little zigzag or dotted line of white icing right along the dividing line between the chocolate and the peanut butter cookie to mimic the cap's texture.
Let them set fully before stacking or arranging them on your serving tray.
Pumpkin Cut Out Sugar Cookies
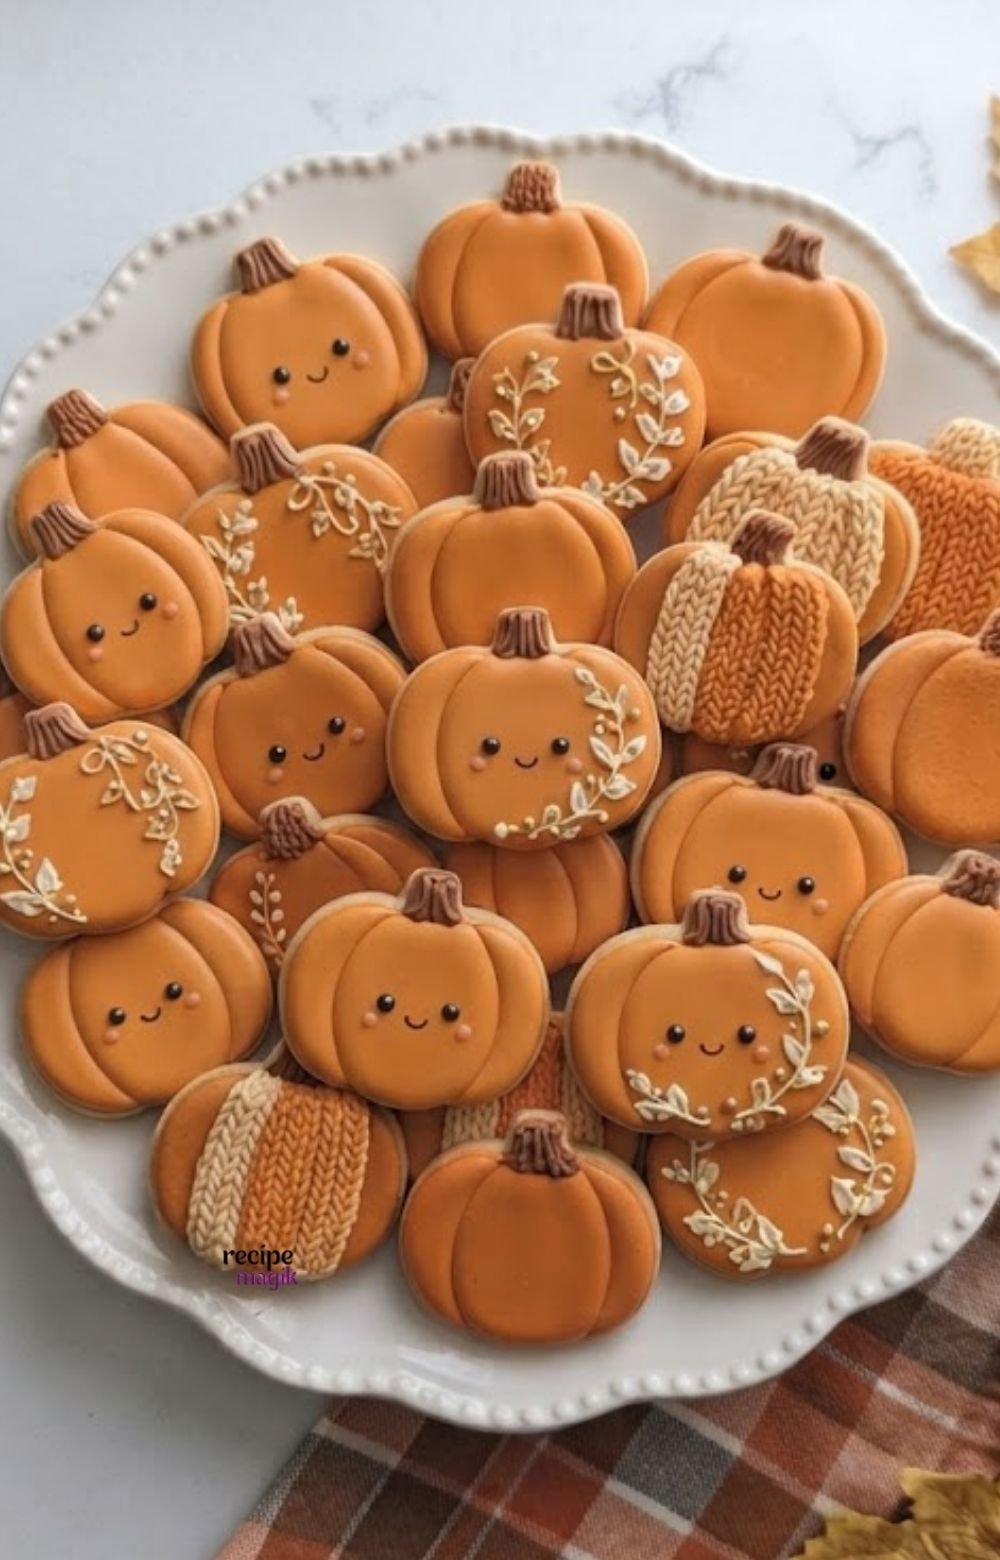
Cute Pumpkin Cut-Out Sugar Cookies Recipe
Delightfully adorable with sweet little smiley faces, delicate floral vines, and cozy knitted-texture designs, these pumpkin-shaped sugar cookies are sure to be the star of your Thanksgiving spread!
Ingredients
For the Cut-Out Sugar Cookies:
- 2 1/2 cups all-purpose flour
- 1/2 tsp baking powder
- 1/4 tsp salt
- 3/4 cup unsalted butter, softened
- 3/4 cup granulated sugar
- 1 large egg
- 1 tsp vanilla extract
For the Royal Icing & Decorations:
- 2 cups powdered sugar
- 2 to 3 tbsp milk or water
- 1 tsp light corn syrup (for a smooth gloss)
- Gel food coloring: Orange, warm brown, and white
- Food writer edible marker (black, for the cute little faces)
Instructions
1. Make the Cookie Dough:
- Whisk together the all-purpose flour, baking powder, and salt in a medium bowl.
- In a separate large bowl, beat the softened butter and granulated sugar until light and fluffy (about 2 minutes).
- Add the egg and vanilla extract, mixing well.
- Gradually stir in the dry ingredients just until a dough forms. Do not overmix.
- Divide the dough into two discs, wrap in plastic, and chill in the refrigerator for at least 1 hour.
2. Cut and Bake:
- Preheat your oven to 350°F (175°C) and line baking sheets with parchment paper.
- Roll out the chilled dough on a lightly floured surface to roughly 1/4-inch thickness.
- Use a pumpkin-shaped cookie cutter to cut out your shapes, re-rolling scraps as needed.
- Place on the baking sheets and bake for 8–10 minutes until the edges are just barely golden. Cool completely on a wire rack.
3. Decorate with Character:
- The Pumpkin Base Flood: Mix your royal icing to a smooth flood consistency and tint it a vibrant autumn orange. Outline and flood the base of the pumpkins, leaving the stems bare. Let the orange base dry completely (about 1–2 hours).
- Cute Faces: Once the orange layer is fully hardened, use a black edible ink writer to draw tiny, sweet sleeping or smiling eyes and a cute little mouth on the pumpkins.
- Cozy Knitter & Floral Details:
- Tint a portion of your icing warm brown for the stems.
- Use white piping icing to pipe delicate, elegant leafy vine details across some of the pumpkins.
- For the "knitted sweater" textured pumpkins, use a fine-tipped piping bag with thick white or orange icing to create crossed vertical lines and braided cable patterns across the surface.
Arrange them piled high on a circular white decorative platter alongside your fall harvest towels and leaves. Enjoy!
Oreo & Rolo Pilgrim Hat Cookies
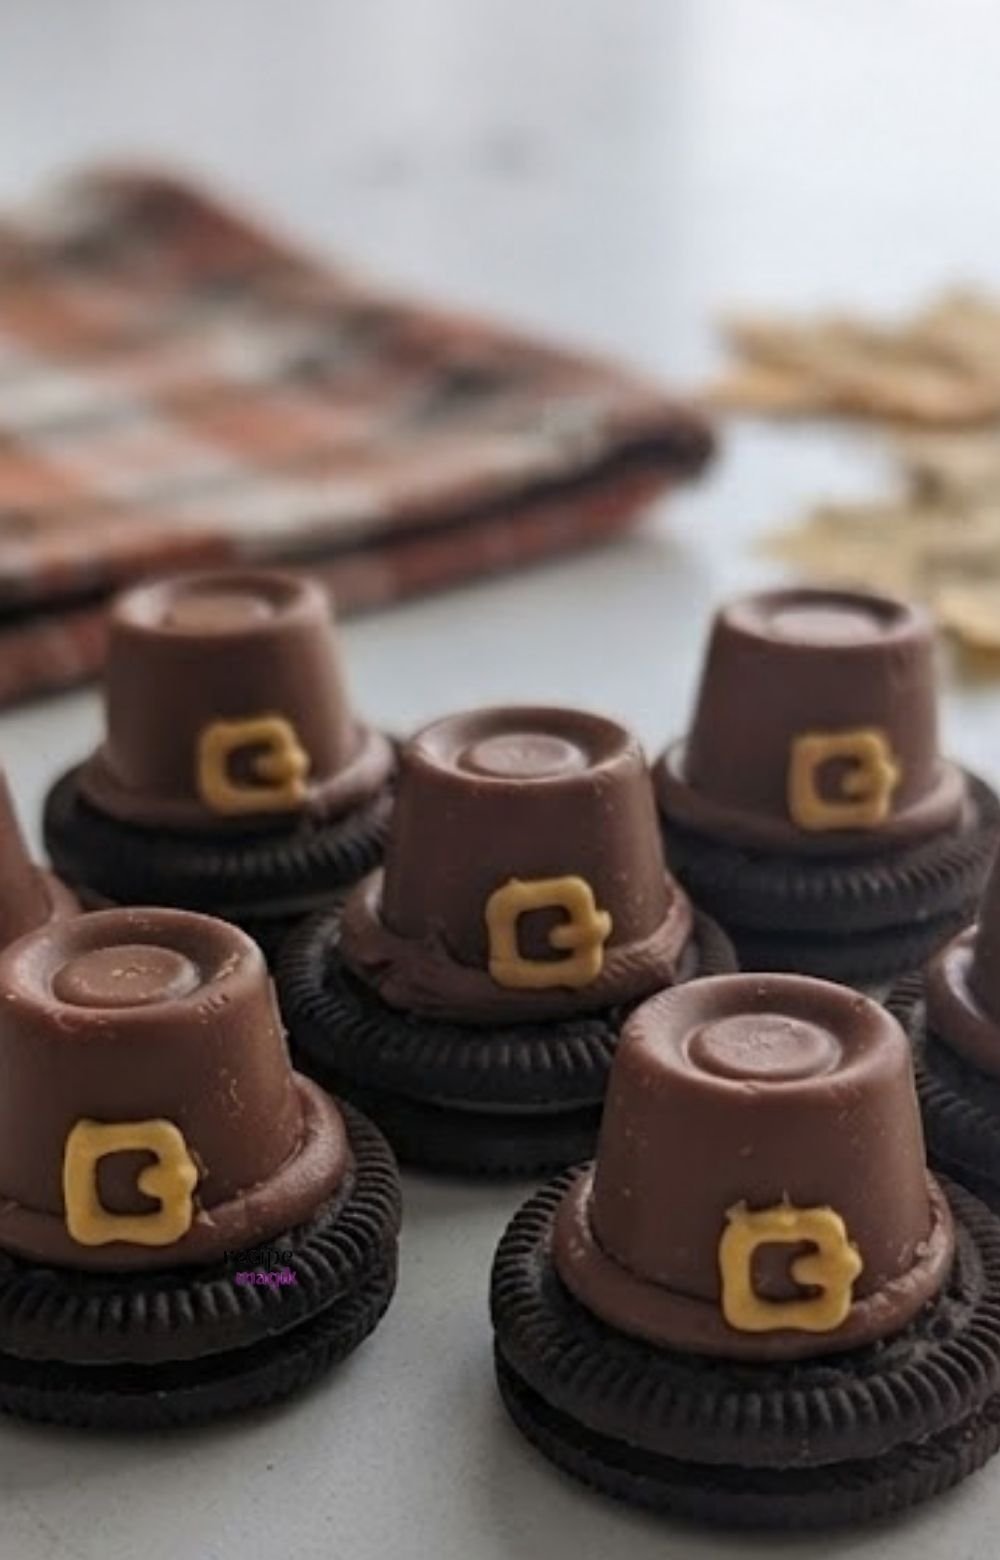
No-bake, adorable, and incredibly simple to assemble, these little pilgrim hats are a perfect project for kids or a quick Thanksgiving treat!
Ingredients
- 8 classic Oreo cookies (or your favorite chocolate sandwich cookie)
- 8 Rolo candies (unwrapped)
- 1/4 cup chocolate frosting (store-bought or homemade)
- 1 tube yellow or gold decorator icing (with a small round piping tip) OR 8 small yellow candy-coated sunflower seeds
Instructions
1. Prep the Base:
- Lay out the 8 classic Oreo cookies on a clean surface or serving tray. These will be the brims of your pilgrim hats.
2. Create the Hat Tower:
- Place a small dab of chocolate frosting (about the size of a pea) in the very center of each Oreo cookie. This acts as edible glue.
- Take an unwrapped Rolo candy and place it, wide-end down, directly onto the dab of frosting on the Oreo. Press down gently to secure it. Repeat for all 8 cookies.
3. Add the Buckle:
- If using decorator icing: Using the tube of yellow or gold icing with a small round tip, carefully pipe a small square or "C" shape onto the front of each Rolo to represent the buckle.
- If using candy seeds: Place a tiny dot of frosting on the back of a yellow sunflower seed and press it onto the front of the Rolo. Repeat for all hats.
Let them set for about 10 minutes so the frosting hardens slightly, then display and enjoy!
Oreo Turkey Cookies
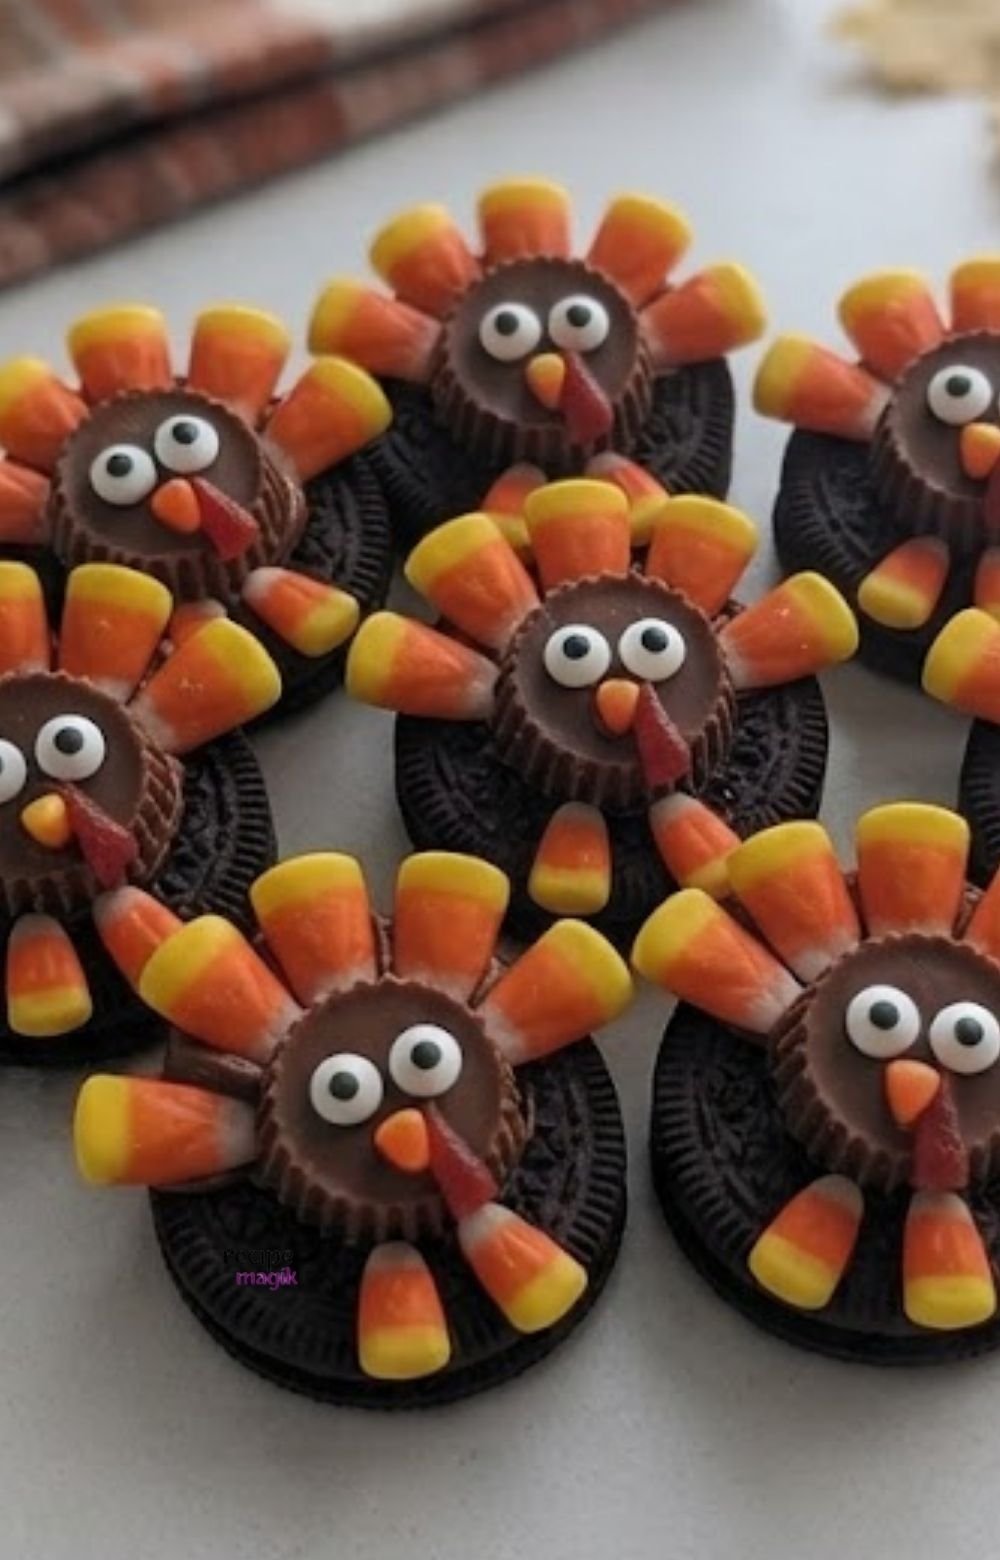
Oreo Turkey Cookies Recipe
Quick, fun, and completely no-bake, these cute little turkey cookies are a wonderful holiday classic to add to your Thanksgiving lineup!
Ingredients
- 8 to 10 regular or Double Stuf Oreo cookies
- 8 to 10 miniature peanut butter cups (unwrapped)
- Candy corn (about 5 to 7 pieces per cookie for the tail feathers, plus extra tips for beaks)
- Reese's Pieces or small orange/brown candies (or a drop of colored frosting) for the wattle
- Edible candy googly eyes
- Melting chocolate, tube of black/chocolate decorator icing, or a small amount of peanut butter/frosting (to use as edible "glue")
Instructions
1. Construct the Turkey Body:
- Unwrap the miniature peanut butter cups.
- Put a small dab of melted chocolate, decorator icing, or peanut butter on the back of each peanut butter cup and press it onto the front center of an Oreo cookie to form the body.
2. Assemble the Feathers:
- If using Double Stuf Oreos, you can gently push the wide ends of the candy corn directly into the cream filling in a fan shape along the top half of the cookie.
- Alternatively, use a little melted chocolate to glue the candy corn fan to the back or top edge of the Oreo. Add two small pieces of candy corn at the bottom base as feet.
3. Add the Face and Details:
- Attach two edible candy googly eyes to the front of the miniature peanut butter cup using a tiny dab of icing or melted chocolate.
- Cut or snap the orange tip off a piece of candy corn and attach it just below the eyes for the beak.
- Place a tiny red or orange candy piece (or a small dot of frosting) right next to the beak for the wattle.
Let them set for about 10–15 minutes until the chocolate or icing hardens completely, then arrange them on your tray and enjoy!
Salted Caramel Toffee Cookies
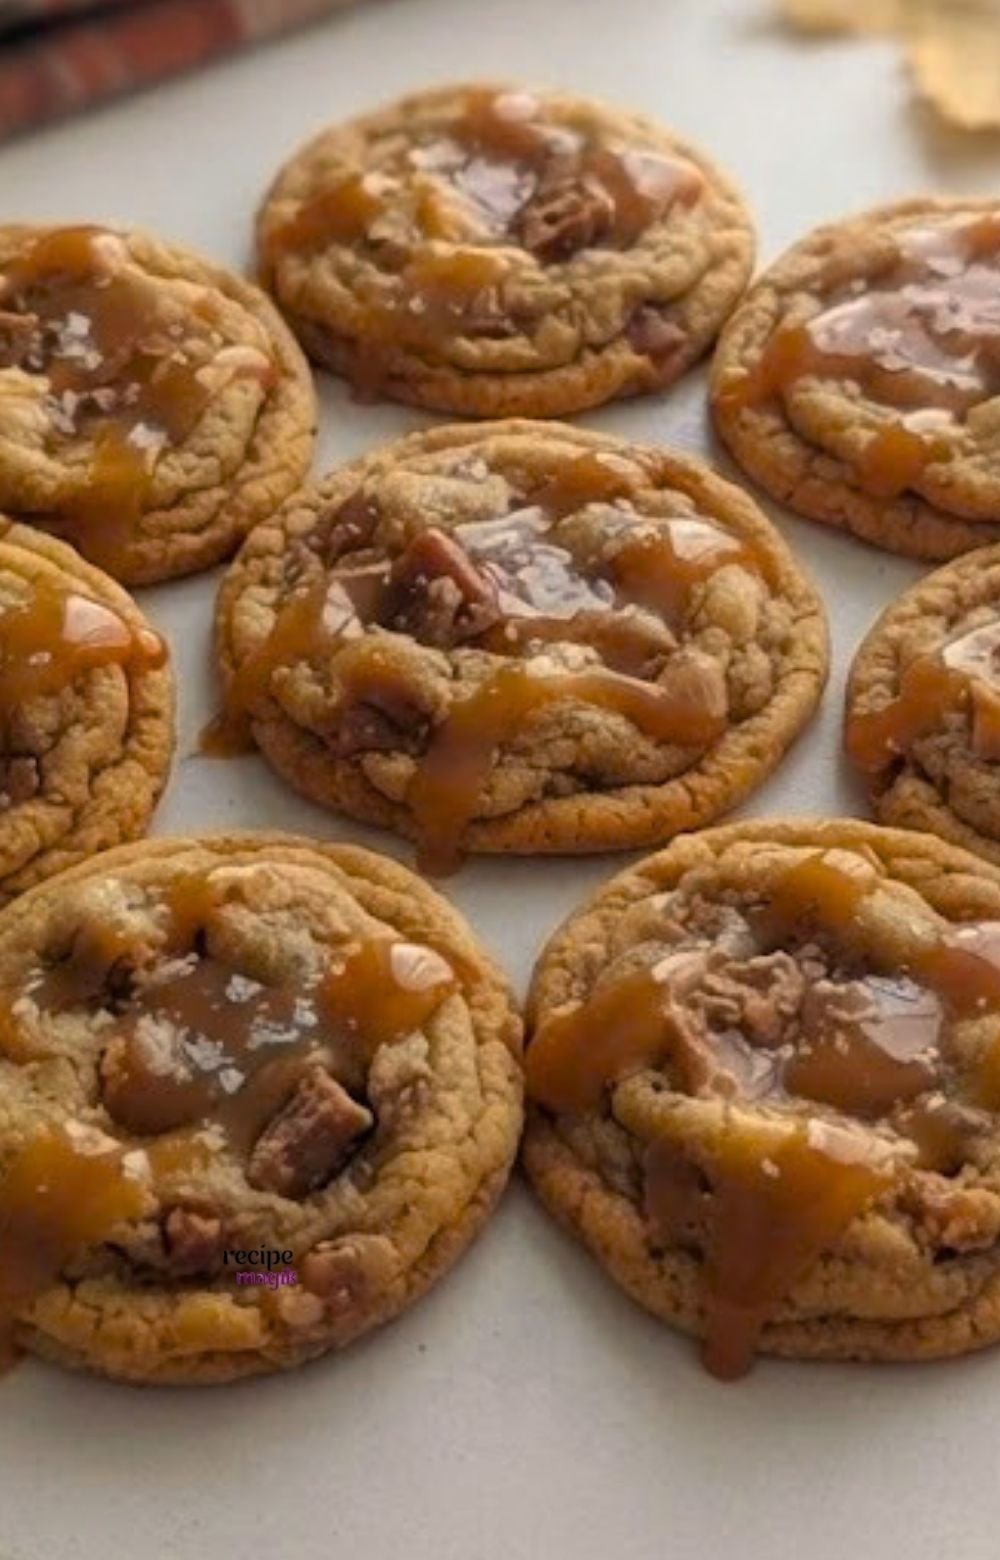
Salted Caramel Toffee Cookies Recipe
Chewy, decadent, and bursting with sweet-and-salty flavor, these incredible cookies are loaded with toffee bits and drenched in a luscious salted caramel drizzle.
Ingredients
For the Cookie Dough:
- 2 1/4 cups all-purpose flour
- 1 tsp baking soda
- 1/2 tsp salt
- 3/4 cup unsalted butter, melted and slightly cooled
- 3/4 cup dark brown sugar, packed
- 1/4 cup granulated sugar
- 1 large egg + 1 extra egg yolk (for chewiness)
- 2 tsp vanilla extract
- 1 cup toffee bits (such as Heath bits)
For the Topping:
- 1/2 cup soft store-bought or homemade caramel sauce
- 1/2 tsp flaky sea salt (such as Maldon) for sprinkling
Instructions
1. Make the Cookie Dough:
- Whisk together the all-purpose flour, baking soda, and salt in a medium bowl.
- In a large bowl, whisk together the melted butter, brown sugar, and granulated sugar until smooth.
- Add the egg, egg yolk, and vanilla extract, whisking until well combined and slightly pale.
- Fold the dry ingredients into the wet mixture using a spatula just until combined, then gently stir in the toffee bits.
- Chill the dough in the refrigerator for about 30 minutes to prevent the cookies from spreading too flat.
2. Bake:
- Preheat your oven to 350°F (175°C) and line baking sheets with parchment paper.
- Scoop balls of dough (about 2 tablespoons each) and place them a few inches apart on the baking sheets.
- Bake for 9–11 minutes until the edges are golden and set, but the centers are still soft and slightly underbaked.
- Let the cookies cool on the baking sheet for 5 minutes before transferring them to a wire rack.
3. Finish with Caramel & Sea Salt:
- Warm the caramel sauce slightly so it is easy to drizzle.
- Drizzle generous ribbons of caramel over the top of each cooled cookie.
- Immediately sprinkle a light pinch of flaky sea salt over the caramel while it's warm so it sticks.
Arrange them alongside your fall decor and enjoy!
Maple Leaves Sugar cookies
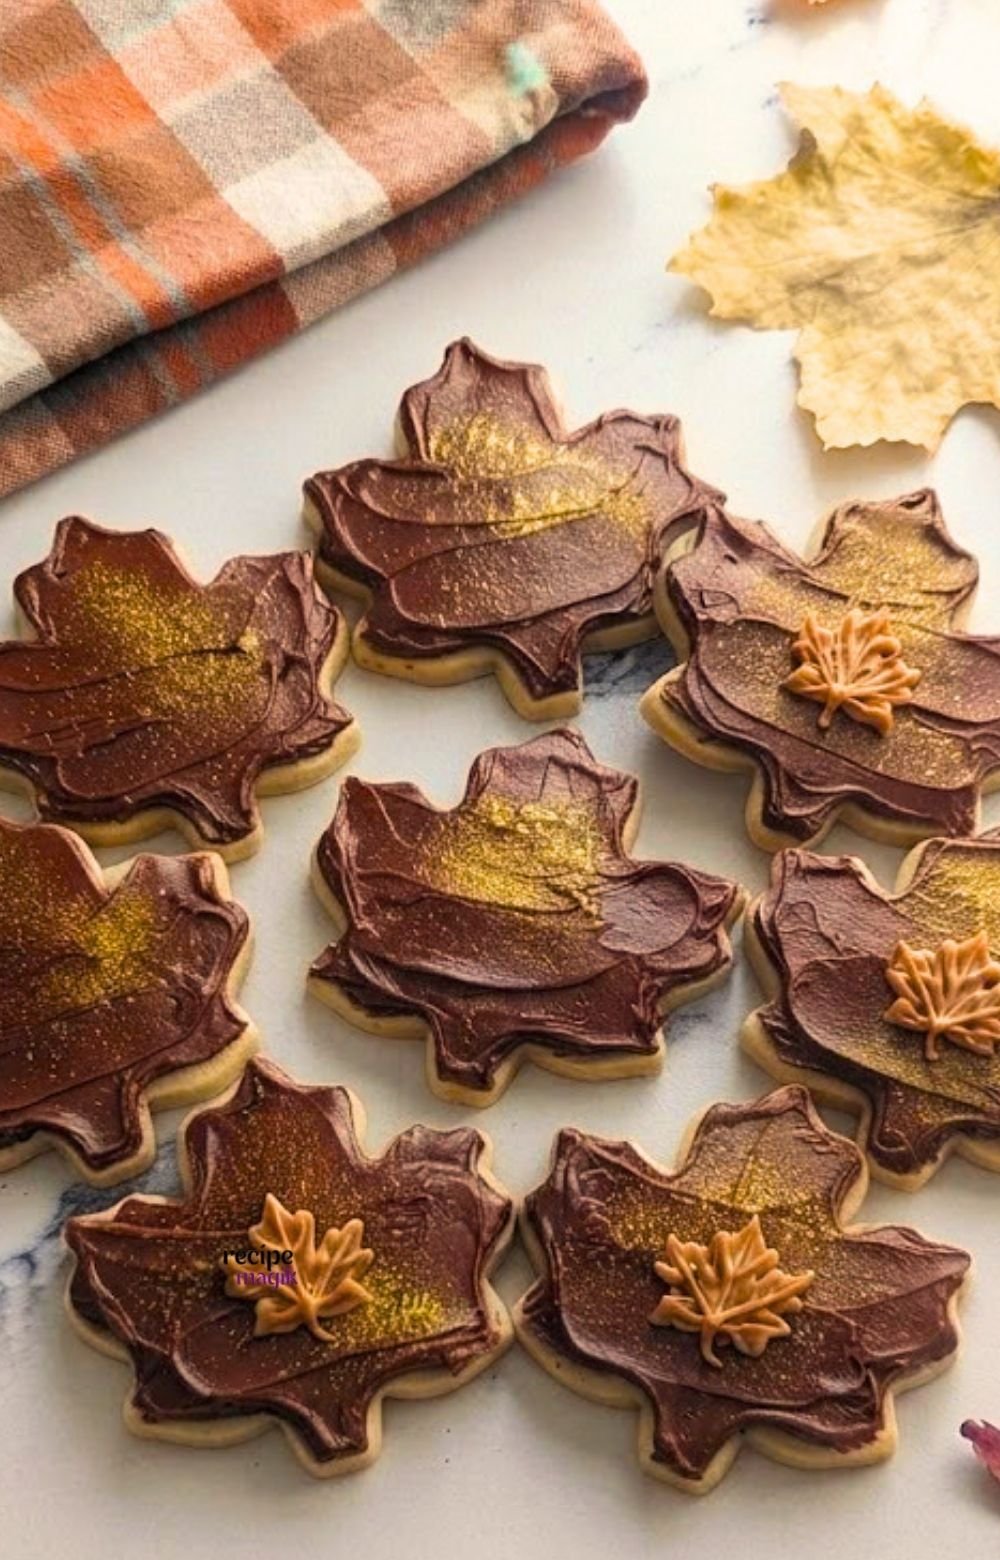
Chocolate-Frosted Maple Leaf Sugar Cookies Recipe
Buttery, tender sugar cookies cut into festive autumn leaf shapes, smothered in rich chocolate frosting, and dusted with edible gold glitter for a touch of seasonal magic.
Ingredients
For the Cut-Out Sugar Cookies:
- 2 1/2 cups all-purpose flour
- 1/2 tsp baking powder
- 1/4 tsp salt
- 3/4 cup unsalted butter, softened
- 3/4 cup granulated sugar
- 1 large egg
- 1 tsp vanilla extract
For the Chocolate Frosting & Decorating:
- 1/2 cup unsalted butter, softened
- 2 cups powdered sugar
- 1/3 cup unsweetened cocoa powder
- 2 to 3 tbsp heavy cream or milk
- 1 tsp vanilla extract
- Edible gold luster dust or gold sanding sugar
- Optional: A few pre-made miniature royal icing maple leaves (or leftover cookie dough scraps piped as tiny accent leaves) for the tops
Instructions
1. Make and Bake the Cookies:
- Whisk together the all-purpose flour, baking powder, and salt in a medium bowl.
- In a large bowl, beat the softened butter and granulated sugar until light and fluffy.
- Add the egg and vanilla extract, mixing until combined.
- Gradually mix in the dry ingredients until a dough forms. Wrap in plastic wrap and chill for 1 hour.
- Preheat your oven to 350°F (175°C) and line baking sheets with parchment paper. Roll out the chilled dough on a floured surface to 1/4-inch thickness and use a maple leaf cookie cutter.
- Bake for 8–10 minutes until the edges are set. Cool completely before frosting.
2. Prepare the Chocolate Frosting:
- Beat the softened butter in a large bowl until smooth and creamy.
- Gradually add the powdered sugar and cocoa powder, alternating with splashes of heavy cream and the vanilla extract.
- Beat on medium-high speed until light, fluffy, and spreadable.
3. Decorate:
- Spread a generous layer of rich chocolate frosting over each cooled maple leaf cookie using a small spatula or butter knife.
- While the frosting is still soft, lightly dust a shimmering layer of edible gold glitter across the surface.
- If desired, press a tiny royal icing maple leaf onto the center of select cookies for an extra dimensional touch.
Arrange them on your white serving tray with your cozy autumn linens and enjoy!
Cozy Knitted Sweater Pumpkin Sugar Cookies
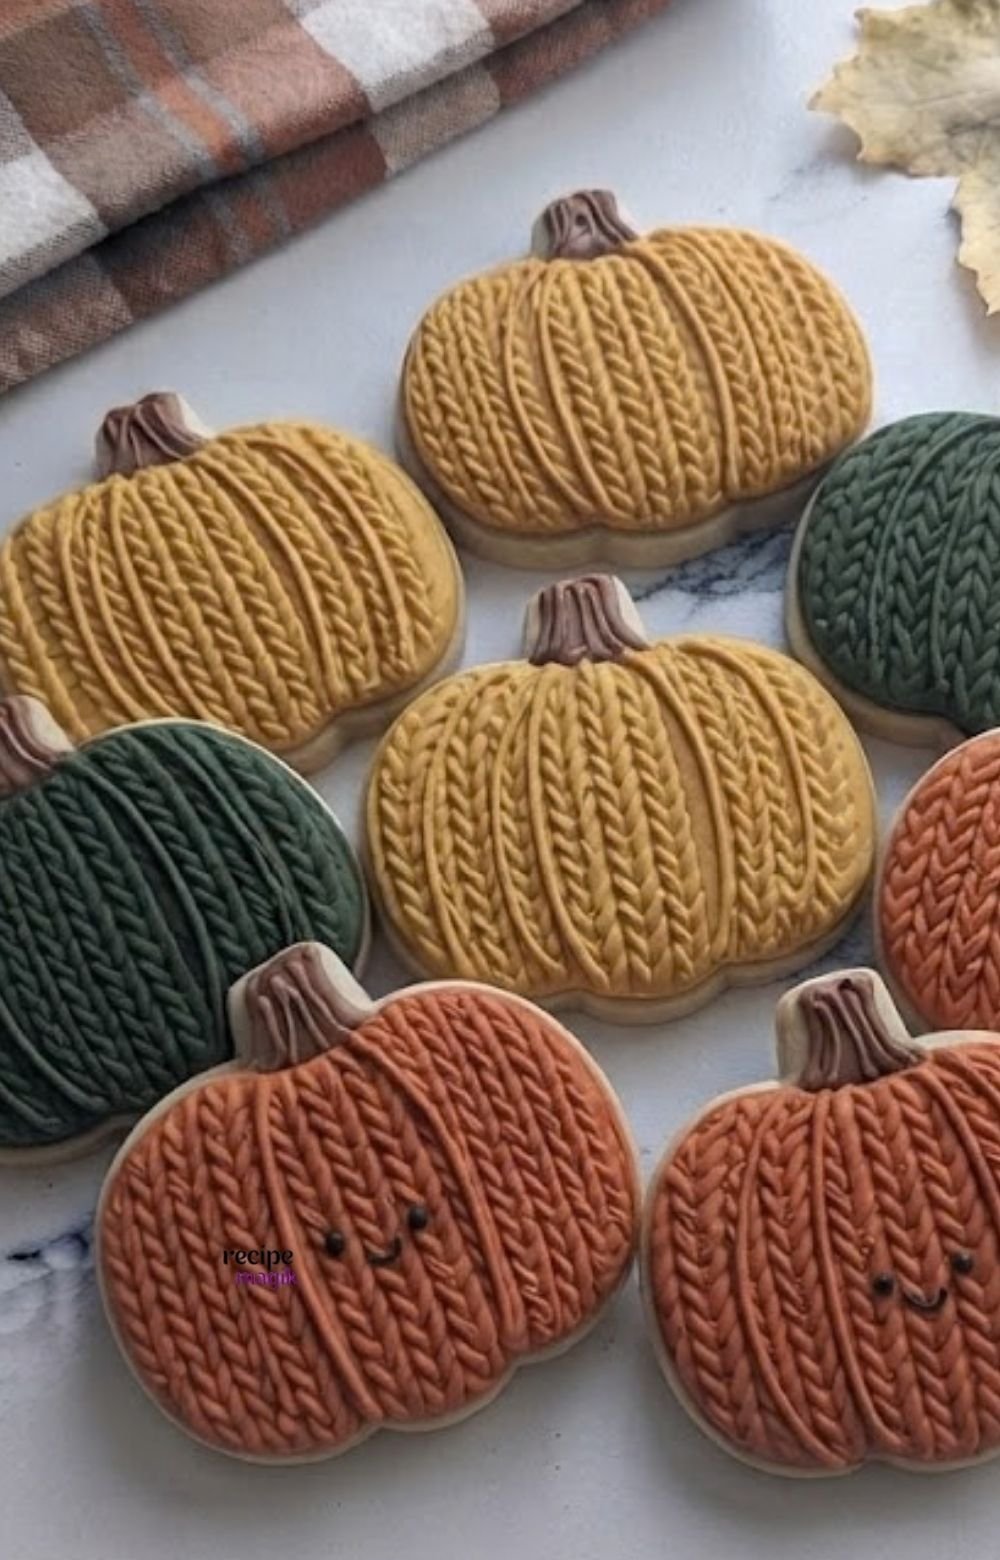
Cozy Knitted Sweater Pumpkin Sugar Cookies Recipe
Featuring an intricate, tactile cable-knit sweater texture across every pumpkin, these charming seasonal sugar cookies are as cozy as they look!
Ingredients
For the Cut-Out Sugar Cookies:
- 2 1/2 cups all-purpose flour
- 1/2 tsp baking powder
- 1/4 tsp salt
- 3/4 cup unsalted butter, softened
- 3/4 cup granulated sugar
- 1 large egg
- 1 tsp vanilla extract
For the Royal Icing & Sweater Textures:
- 3 cups powdered sugar
- 3 to 4 tbsp milk or water
- 1 tsp light corn syrup
- Gel food coloring: Autumn orange, mustard yellow, deep olive/forest green, and warm brown
- Food writer edible marker (black, for the cute smiling faces)
Instructions
1. Make and Bake the Cookies:
- Whisk together the all-purpose flour, baking powder, and salt in a medium bowl.
- In a separate large bowl, beat the softened butter and granulated sugar until light and fluffy.
- Mix in the egg and vanilla extract, then gradually add the dry ingredients until a dough forms.
- Wrap in plastic and chill in the refrigerator for 1 hour.
- Preheat your oven to 350°F (175°C) and line baking sheets with parchment paper. Roll out the dough to 1/4-inch thickness, cut into pumpkin shapes, and bake for 8–10 minutes. Cool completely.
2. Create the All-Over Knitted Texture:
- Tint your royal icing into your chosen autumn palette: burnt orange, mustard yellow, and olive green, plus a small amount of brown for the stems.
- The Base Flood & Knit Effect: Flood the entire pumpkin shape with your chosen colored icing. While the icing is still wet (or by using a slightly thicker piping consistency for a raised 3D cable-knit effect), immediately pipe vertical braided columns, criss-cross stitches, and woven lines spanning from top to bottom across the entire surface.
- Pipe the little brown stems at the top.
- Let the icing dry completely (about 2 to 4 hours so the 3D texture sets firmly).
3. Add Cute Faces:
- Once the textured sweater icing is completely dry and hardened, use a black edible marker to draw sweet, minimalist smiling faces onto the pumpkins.
Arrange them on your white serving platter alongside autumn leaves and cozy plaid linens. Enjoy your masterpiece!
Oreo Pumpkin Treats
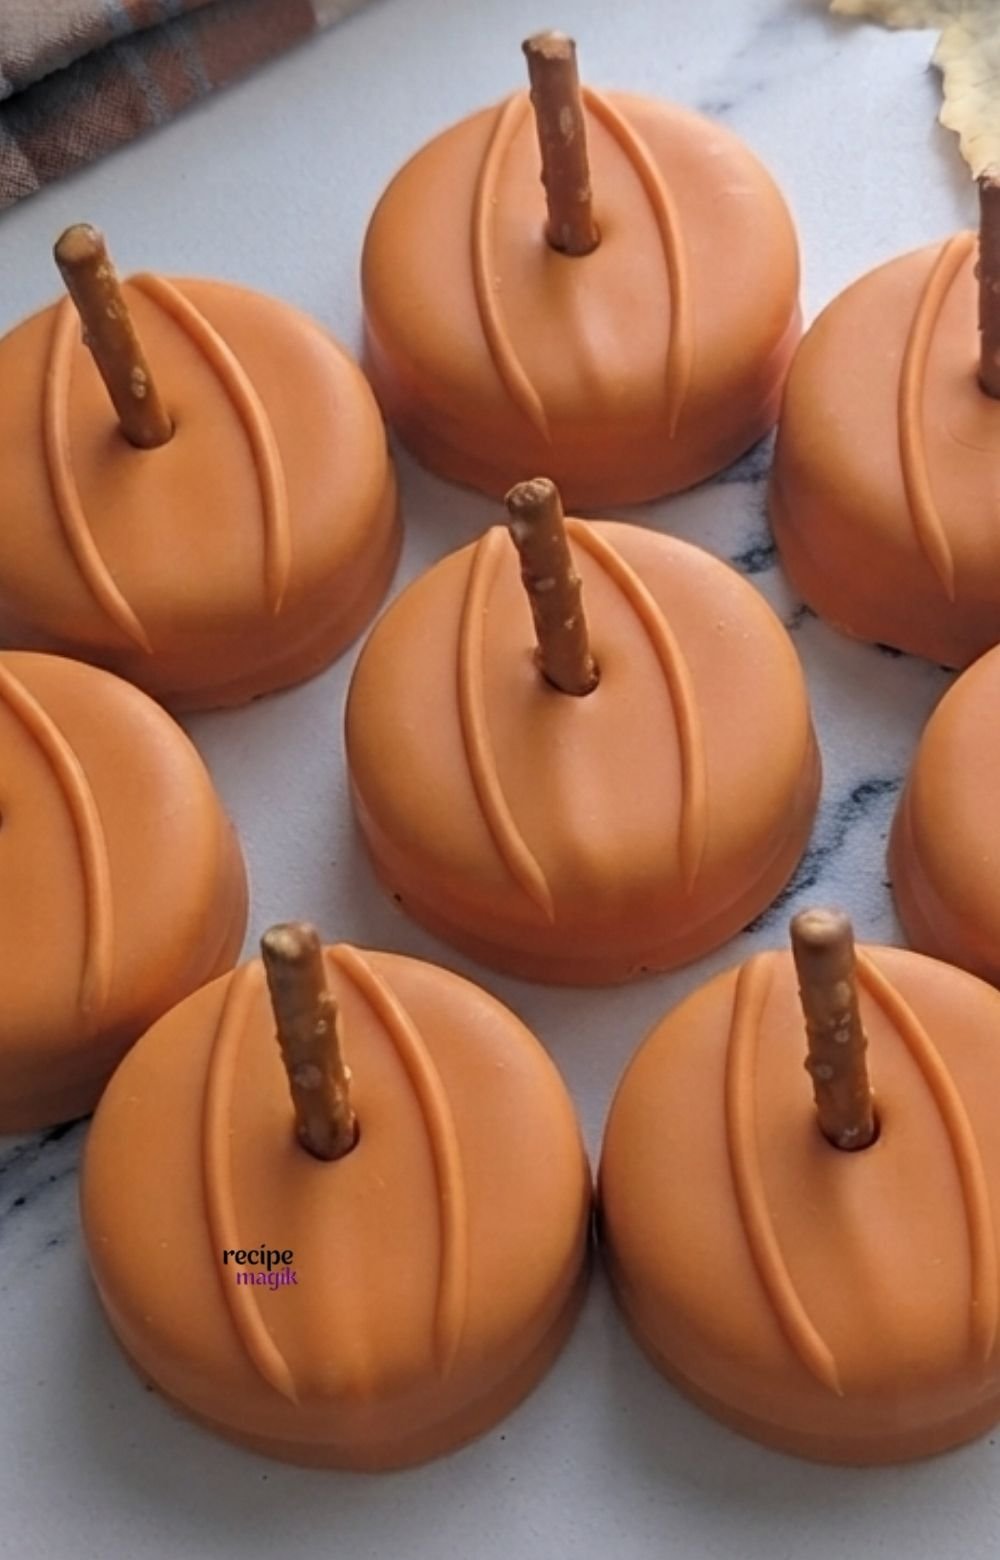
Oreo Pumpkin Treats Recipe
Fun, easy, and completely no-bake, these charming little pumpkin treats transform classic cookies into festive autumn bites with realistic ridged details and pretzel stems.
Ingredients
- 8 classic or Double Stuf Oreo cookies
- 1 cup orange candy melts (or orange-colored white chocolate)
- 8 small pretzel sticks (snapped to about 1-inch lengths for the stems)
- 1 tsp coconut oil or vegetable shortening (optional, to thin out the melted chocolate for smooth dipping)
Instructions
1. Melt the Coating:
- Place the orange candy melts in a microwave-safe bowl. Heat in 30-second intervals, stirring in between, until completely smooth and melted.
- If the mixture is too thick, stir in a teaspoon of coconut oil to thin it out slightly.
2. Dip and Coat:
- Drop one Oreo cookie into the melted orange chocolate, turning it over to coat it completely.
- Lift the cookie out using a fork, gently tapping the fork against the side of the bowl to let any excess chocolate drip off.
- Place the coated cookie onto a baking sheet lined with parchment paper. Repeat for all 8 cookies.
3. Add the Stem and Pumpkin Ridges:
- While the orange coating is still warm and soft, gently press a small pretzel stick straight down into the top center of each cookie to serve as the stem.
- Take a clean toothpick or the clean back of a knife and lightly press subtle vertical lines down the sides of the coated Oreo to give it a classic segmented pumpkin look.
4. Set and Serve:
- Let the cookies sit at room temperature for about 15 minutes (or pop them into the refrigerator for 5–10 minutes) until the candy coating hardens completely.
Arrange your finished pumpkin treats on a white platter alongside cozy fall leaves and enjoy!
Turkey Face Sugar Cookies
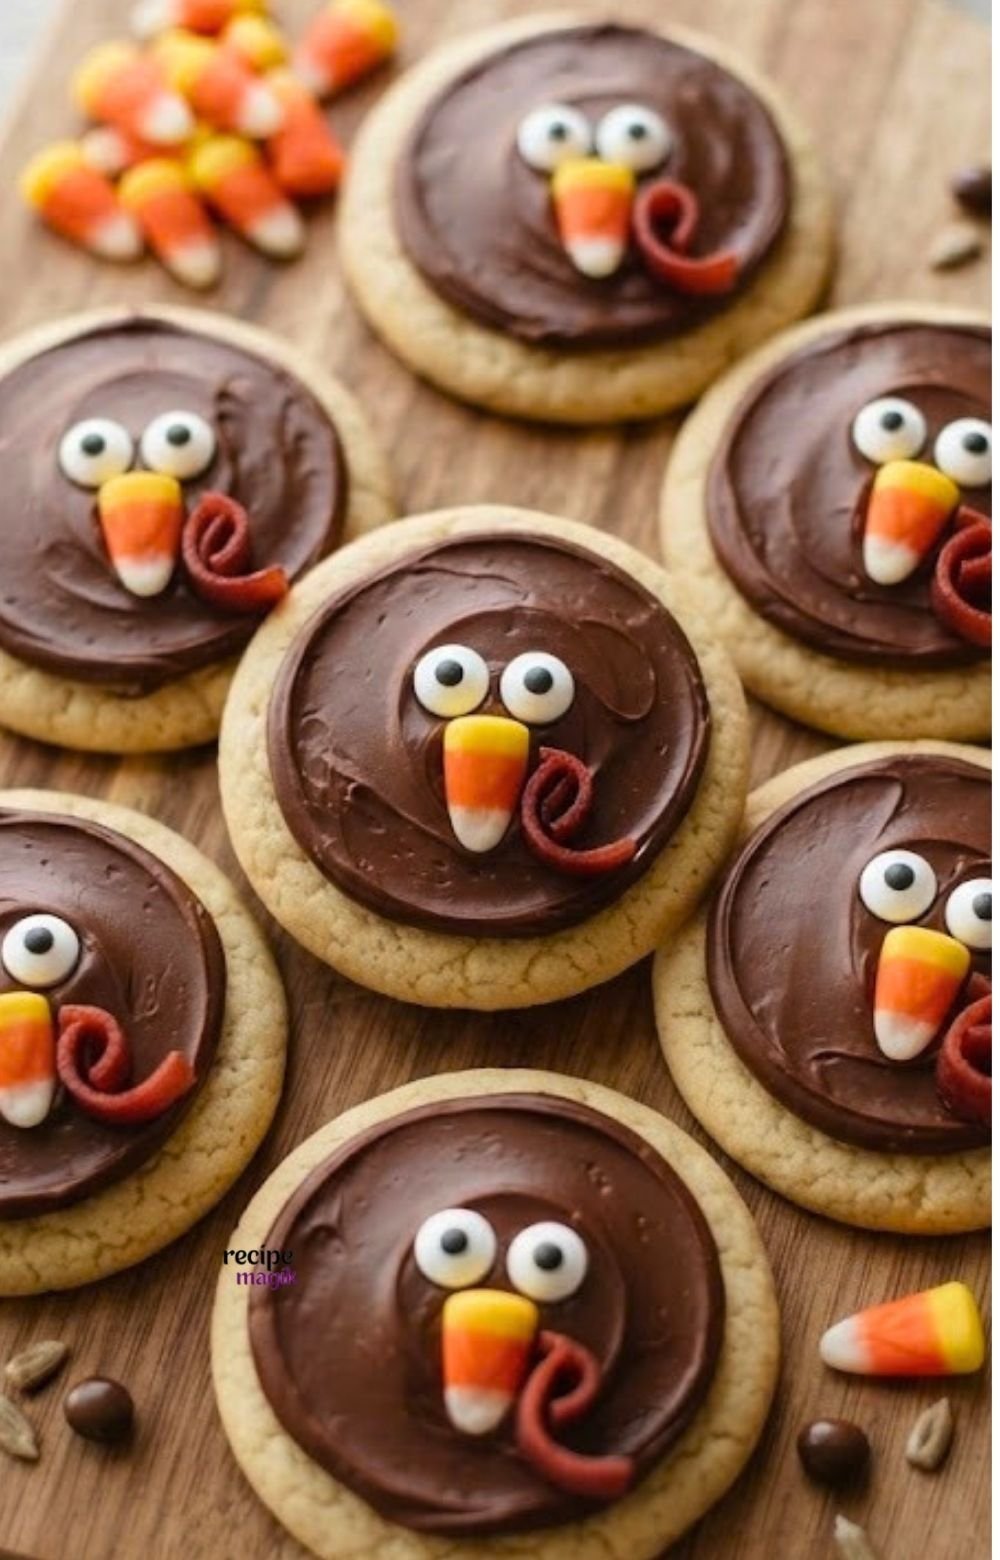
Easy Turkey Face Sugar Cookies Recipe
Adorable, simple, and irresistibly cute, these round sugar cookies feature a smooth layer of rich chocolate frosting and a playful turkey face complete with googly eyes and a silly little candy wattle!
Ingredients
For the Round Sugar Cookies:
- 2 1/2 cups all-purpose flour
- 1/2 tsp baking powder
- 1/4 tsp salt
- 3/4 cup unsalted butter, softened
- 3/4 cup granulated sugar
- 1 large egg
- 1 tsp vanilla extract
For the Turkey Face Decorating:
- 1 cup chocolate frosting (store-bought or homemade)
- Edible candy googly eyes
- Candy corn (used for the beak)
- Red fruit leather or red writing icing (cut or piped into a curvy wattle shape)
Instructions
1. Make and Bake the Cookies:
- Whisk together the all-purpose flour, baking powder, and salt in a medium bowl.
- In a large bowl, beat the softened butter and granulated sugar until light and fluffy.
- Mix in the egg and vanilla extract, then gradually stir in the dry ingredients until a dough forms.
- Chill the dough in the refrigerator for 30 minutes, then roll it out into smooth, round cookie shapes (or scoop and flatten slightly for easy round cookies).
- Bake at 350°F (175°C) for 8–10 minutes until set. Let them cool completely.
2. Add the Chocolate Base:
- Spread a smooth, even circle of chocolate frosting over the top of each cooled round cookie, leaving a small outer border of the golden cookie visible.
3. Build the Turkey Face:
- Press two edible googly eyes into the upper middle section of the chocolate frosting.
- Place a candy corn (point side down) directly below the eyes to serve as the turkey's beak.
- Right next to the beak, add a small curvy piece of red fruit leather or a swirl of red frosting to form the wattle.
Arrange them on a wooden cutting board or serving platter and enjoy your festive creations!
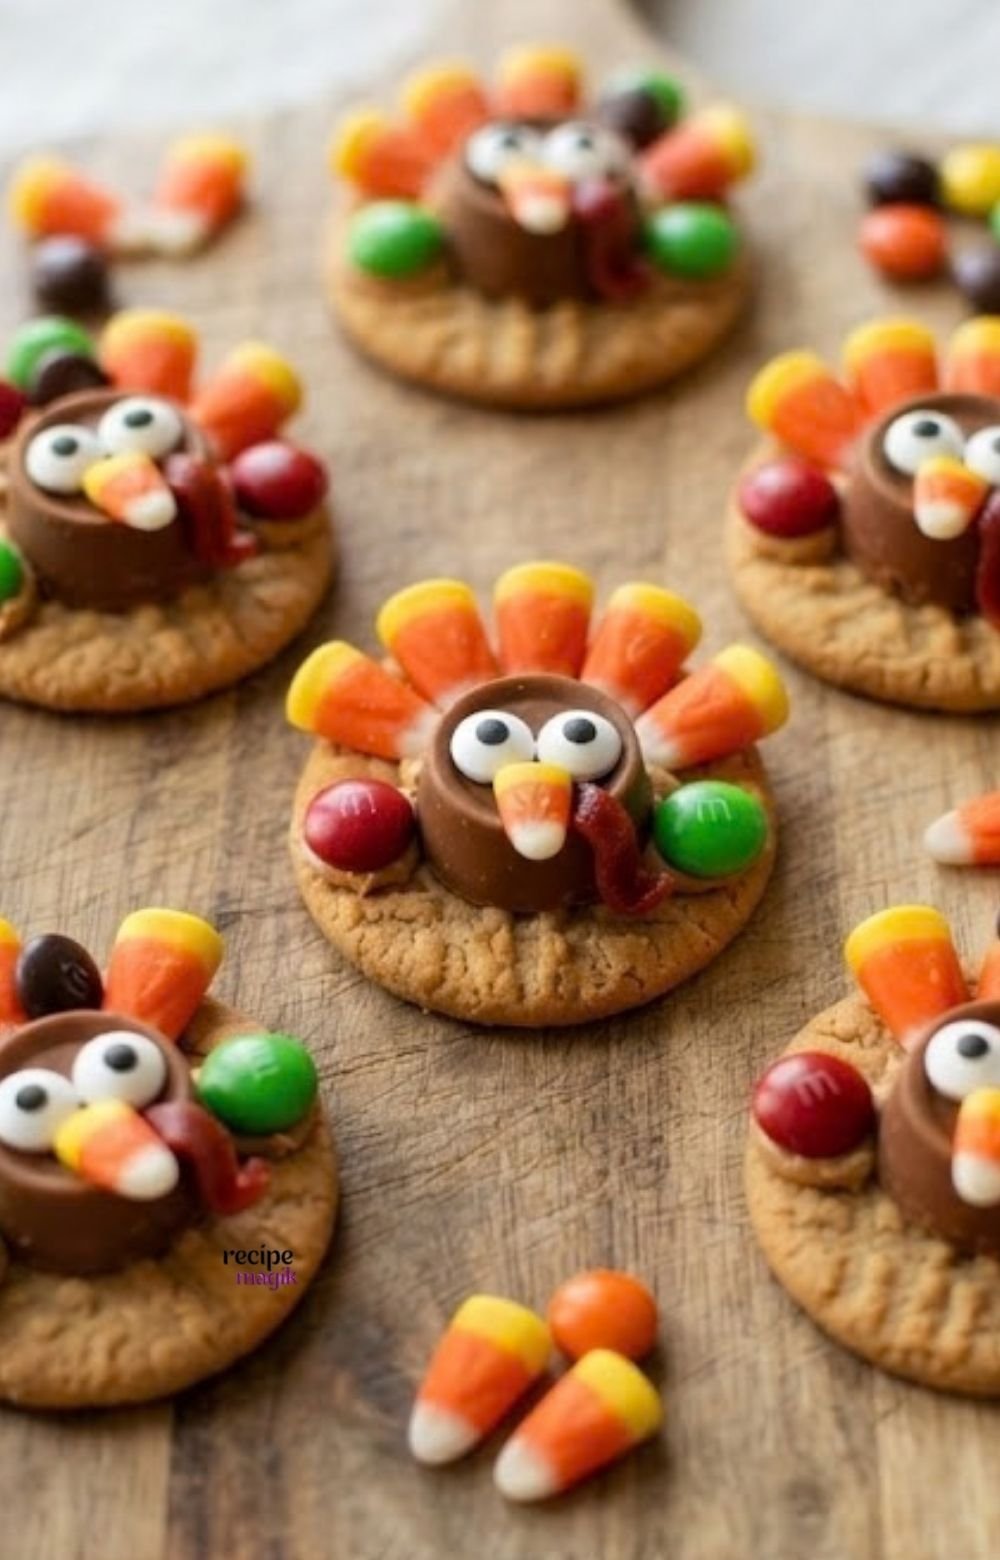
Rolo & Peanut Butter Cookie Turkeys Recipe
Adorable, fun, and completely delicious, these classic Thanksgiving treats feature a peanut butter cookie base, a Rolo candy body, colorful candy corn feathers, and vibrant M&M candies for the wings!
Ingredients
- 12 round peanut butter cookies (homemade or your favorite store-bought brand)
- 12 Rolo chocolates, unwrapped
- 12 miniature peanut butter cups (optional base or alternative body)
- Candy corn (about 5 to 6 pieces per cookie for the fan-shaped tail feathers)
- M&M's candies (red, green, or brown) for the side wings
- Edible candy googly eyes
- A small tube of orange or yellow decorator icing (or melted chocolate/peanut butter to use as edible "glue")
- Red gel icing or small pieces of red fruit leather for the turkey wattle
Instructions
1. Secure the Body:
- Arrange your peanut butter cookies flat on a parchment-lined tray or cutting board.
- Place a small dab of decorator icing, melted chocolate, or peanut butter in the center of each cookie.
- Press an unwrapped Rolo chocolate upright onto the center dab to act as the turkey's main body.
2. Build the Tail Feathers:
- Using a little extra icing or peanut butter at the back base of the Rolo, fan out 5 to 6 pieces of candy corn pointing upward and outward to create the colorful turkey feathers.
3. Add the Wings and Face:
- Attach a colorful M&M candy to each side of the Rolo body using a tiny dab of icing to serve as the wings.
- Stick two edible candy googly eyes onto the front face of the Rolo.
- Attach a small piece of candy corn (or a dab of orange icing) right below the eyes for the beak, and add a tiny piece of red gel icing or fruit leather right next to it for the wattle.
4. Set and Serve:
- Let the cookies sit for about 10–15 minutes until the adhesive icing or chocolate sets firmly.
Arrange your cute little turkey cookies on a wooden serving board alongside extra fall candies and enjoy!
Cheese & Pretzel Snack Pack Turkey
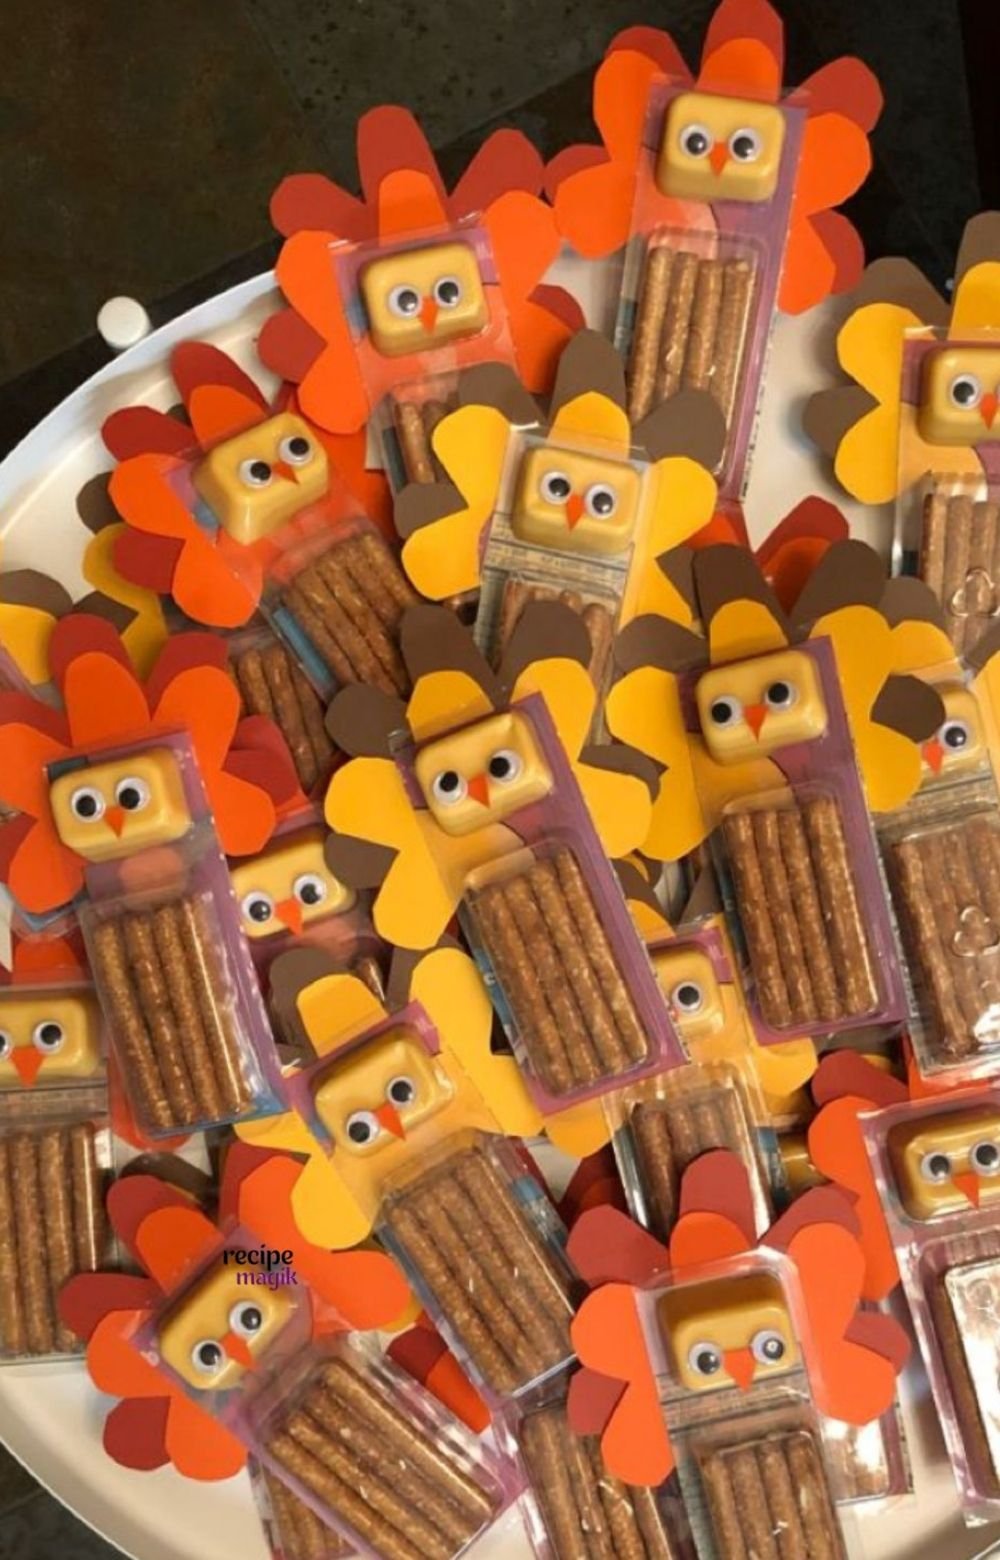
Cheese & Pretzel Snack Pack Turkey Crafts
Super fun, non-edible (or partially edible snack-based) Thanksgiving party favors! These adorable turkeys turn individual store-bought cheese and pretzel dip packs into festive classroom treats or table placeholders using colorful cardstock feathers and googly eyes.
Supplies Needed
- Individual cheese dip and pretzel stick snack packs (such as Laughing Cow cheese wedges or similar snack-pack containers with a square cheese section and pretzel compartment)
- Colored cardstock paper in autumn shades (red, orange, yellow, and brown)
- Edible candy googly eyes (or small craft googly eyes)
- Small scraps of orange or yellow paper (cut into tiny triangles for the beak)
- Glue dots, double-sided tape, or a hot glue gun (low-temp)
- Scissors
Step-by-Step Instructions
1. Cut Out the Paper Feathers:
- Draw and cut out a fan shape or a cluster of layered teardrop "feathers" from your red, orange, yellow, and brown cardstock. Make sure the fan shape is wide enough to peek out from behind the square cheese portion of the snack pack.
2. Attach the Feathers to the Snack Pack:
- Using glue dots or double-sided tape, secure the paper feather fan to the back of the snack pack, right behind the square cheese compartment so the colorful feathers fan out like a turkey's tail.
3. Create the Turkey Face:
- Attach two googly eyes to the front of the square cheese container.
- Glue a tiny paper triangle just below the eyes to serve as the beak.
Line them up on a festive tray for a party or hand them out as classroom gifts!
Harvest Chocolate Chip Cookies

Here is a delicious, bakery-style recipe for these festive Harvest Chocolate Chip Cookies packed with autumn-colored candies, chocolate chips, and dried cranberries!
Ingredients
- 1/2 cup (1 stick) unsalted butter, softened to room temperature
- 1/2 cup granulated white sugar
- 1/2 cup packed light brown sugar
- 1 large egg (at room temperature)
- 1 teaspoon pure vanilla extract
- 1 and 1/2 cups all-purpose flour
- 1/2 teaspoon baking soda
- 1/4 teaspoon salt
- 3/4 cup semi-sweet chocolate chips
- 1/2 cup harvest-colored M&Ms (orange, brown, yellow, and red)
- 1/4 cup dried cranberries (for that extra autumn pop of color and tartness)
Instructions
- Preheat and Prep: Preheat your oven to 350°F (175°C). Line a large baking sheet with parchment paper.
- Mix Wet Ingredients: In a large bowl, use a hand mixer or a stand mixer to beat the softened butter, granulated sugar, and brown sugar together at medium speed for about 2 minutes until smooth and creamy. Add the egg and vanilla extract, then beat until fully combined.
- Combine Dry Ingredients: In a separate medium bowl, whisk together the all-purpose flour, baking soda, and salt.
- Mix Together: Slowly add the dry ingredients to the wet ingredients on low speed just until combined (do not overmix!).
- Fold in the Add-ins: Gently fold in the chocolate chips, harvest M&Ms, and dried cranberries using a spatula or wooden spoon, reserving a few candies to press on top later.
- Scoop and Bake: Scoop rounded tablespoons of dough (about 2 tablespoons each) and place them 2 inches apart on the prepared baking sheet. Press a few extra M&Ms and cranberries into the tops of the dough balls for that picture-perfect look.
- Bake: Bake for 9 to 11 minutes, or until the edges are golden brown and the centers are still soft.
- Cool: Let the cookies cool on the baking sheet for 5 minutes (they will firm up), then transfer them to a wire rack to cool completely.
Enjoy these cozy, colorful autumn treats!
Creating memorable holiday traditions doesn't have to mean spending hours stressed out in the kitchen. With these charming, family-friendly Thanksgiving cookie recipes, you can whip up an impressive dessert spread that looks like it came straight from a professional bakery, all while keeping things simple and fun.
Whether you choose to craft classic chocolate-swirled turkey faces, clever pretzel-stemmed pumpkins, or kid-approved candy creations, these sweet treats are guaranteed to bring smiles to your holiday table. Gather your favorite ingredients, get creative with your decorating, and enjoy making sweet memories this Thanksgiving season!
Ask Me Anything