

When the autumn chill settles in and the house fills with the cozy comforts of the season, I always find myself eager to trade my scrubs and busy hospital days for a quiet evening of hands on art and try Pumpkin Carving for Halloween.
If you are ready to move past basic triangle eyes and simple through cuts, learning how to master deep carving techniques opens up a whole new world of fall home decor. By shaving away layers instead of just slicing all the way through, you can create stunning, multi dimensional designs—from playful, Asymmetrical monsters and spooky Ghostface expressions to intricate gothic crosses and sugar skulls—that glow with incredible atmospheric depth. Also try these Easy Pumpkin Carving Ideas.
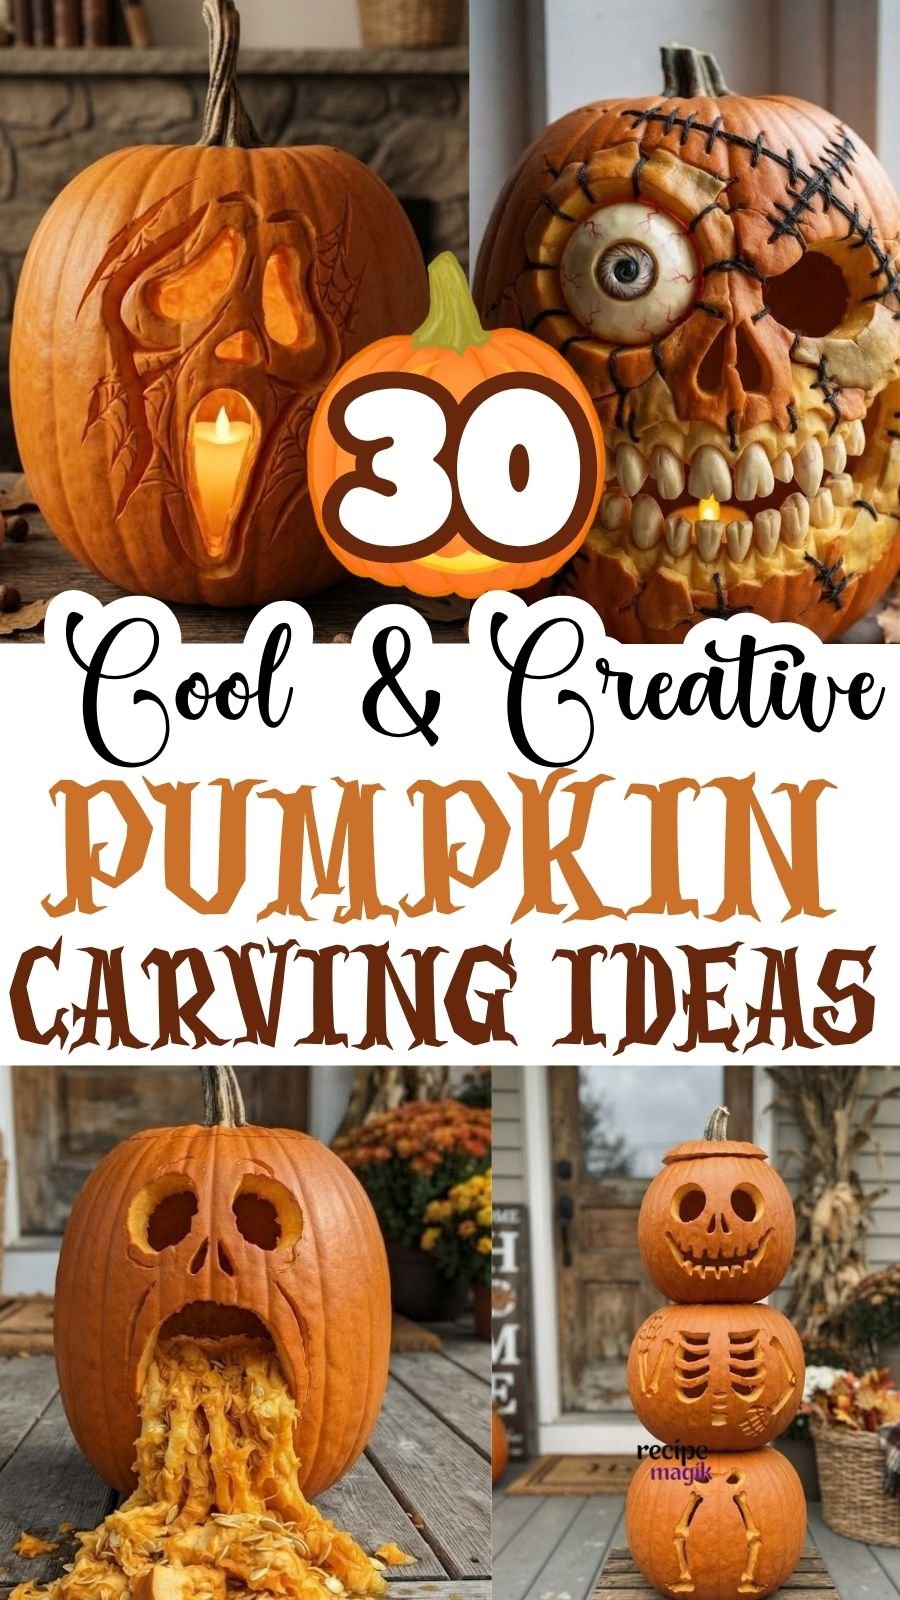
Cool and Creative Pumpkin Carving ideas
Classic Happy Jack Pumpkin Carving
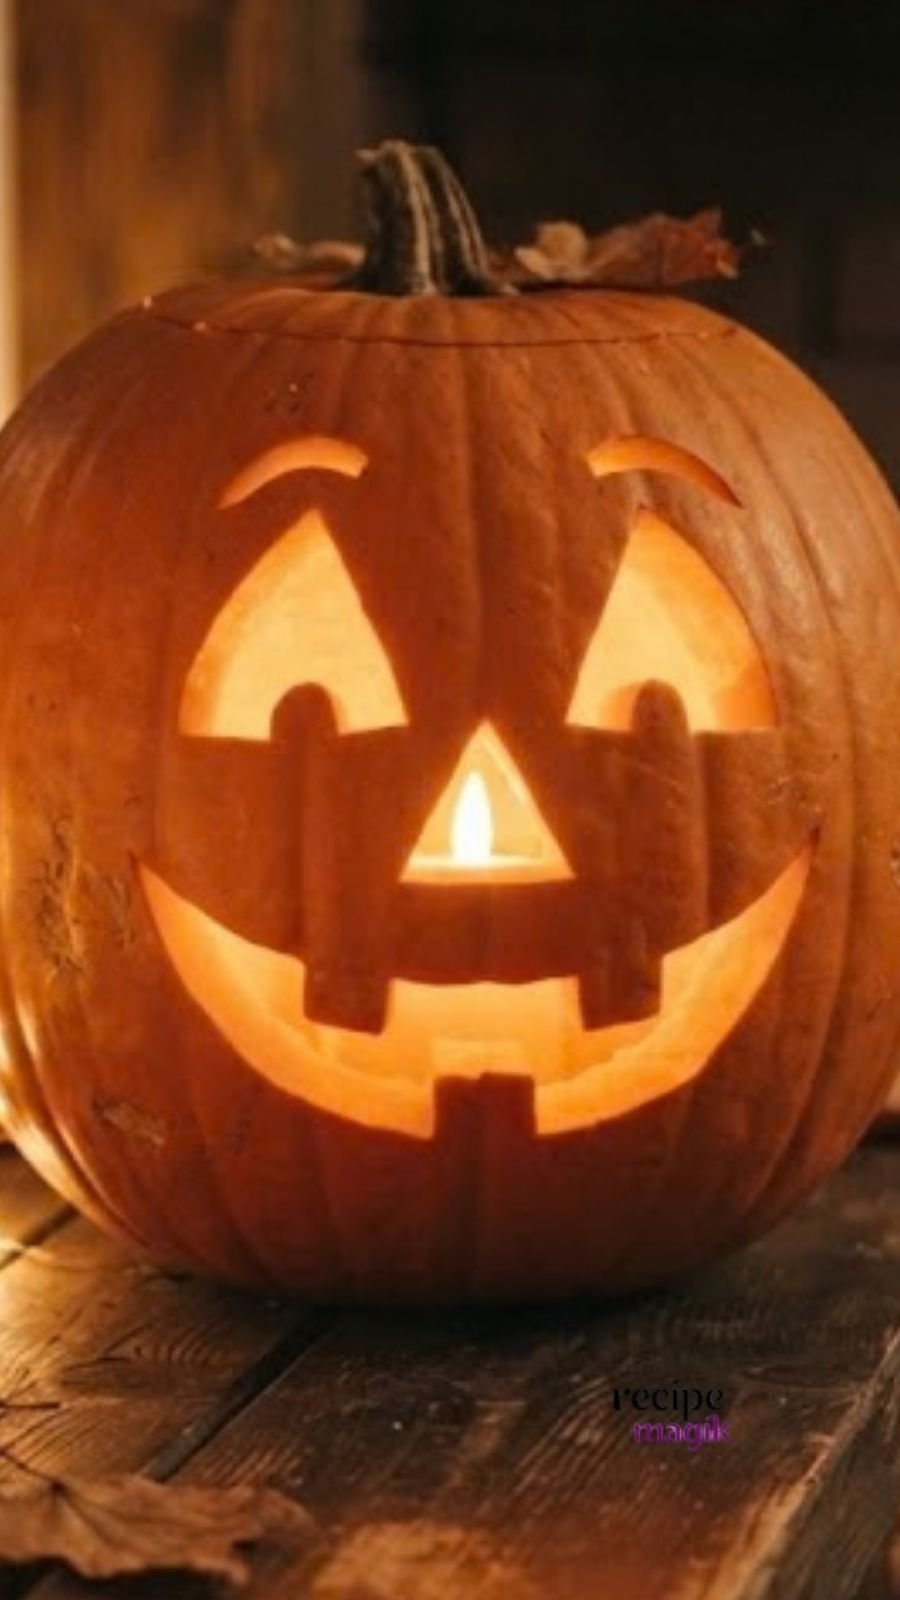
To create this Classic Happy Jack, follow these steps:
Gather Your Supplies Before you start, you will need a sturdy orange pumpkin, a pumpkin carving kit or sharp knife, a large metal spoon, and a printed or drawn template of a simple face. A candle or LED light for the inside is also a must.
Prepare Your Workspace Lay down some old newspapers or a disposable tablecloth on your table. Carving can get messy, and this will make cleanup much easier.
Open the Pumpkin Using your serrated knife, carefully cut a circular lid around the stem. Angle the knife inward so the lid doesn't fall inside when you are finished. Pull the lid off by the stem.
Clean Out the Inside Reach in with your hand and pull out all the loose seeds and stringy pulp. Then, use the metal spoon to scrape the inner walls, especially the side you plan to carve. You want to thin the pumpkin wall to about an inch thick so the light shines through brightly.
Apply Your Template Tape your template of the happy face onto the pumpkin, smoothing it out as best you can along the curved surface. Alternatively, use a marker to draw the face directly onto the rind freehand.
Carve the Design Using a small carving saw from a kit or a sharp paring knife, carefully cut along the lines of your design. It is helpful to "punch" small holes with a needle tool along the pattern first as a guide. Push the cutout pieces out from the inside once you have made all the cuts.
Light It Up Wipe down your finished pumpkin and place your candle or LED light inside. Put the lid back on and turn off the lights to enjoy your creation.
Maneki neko pumpkin carving
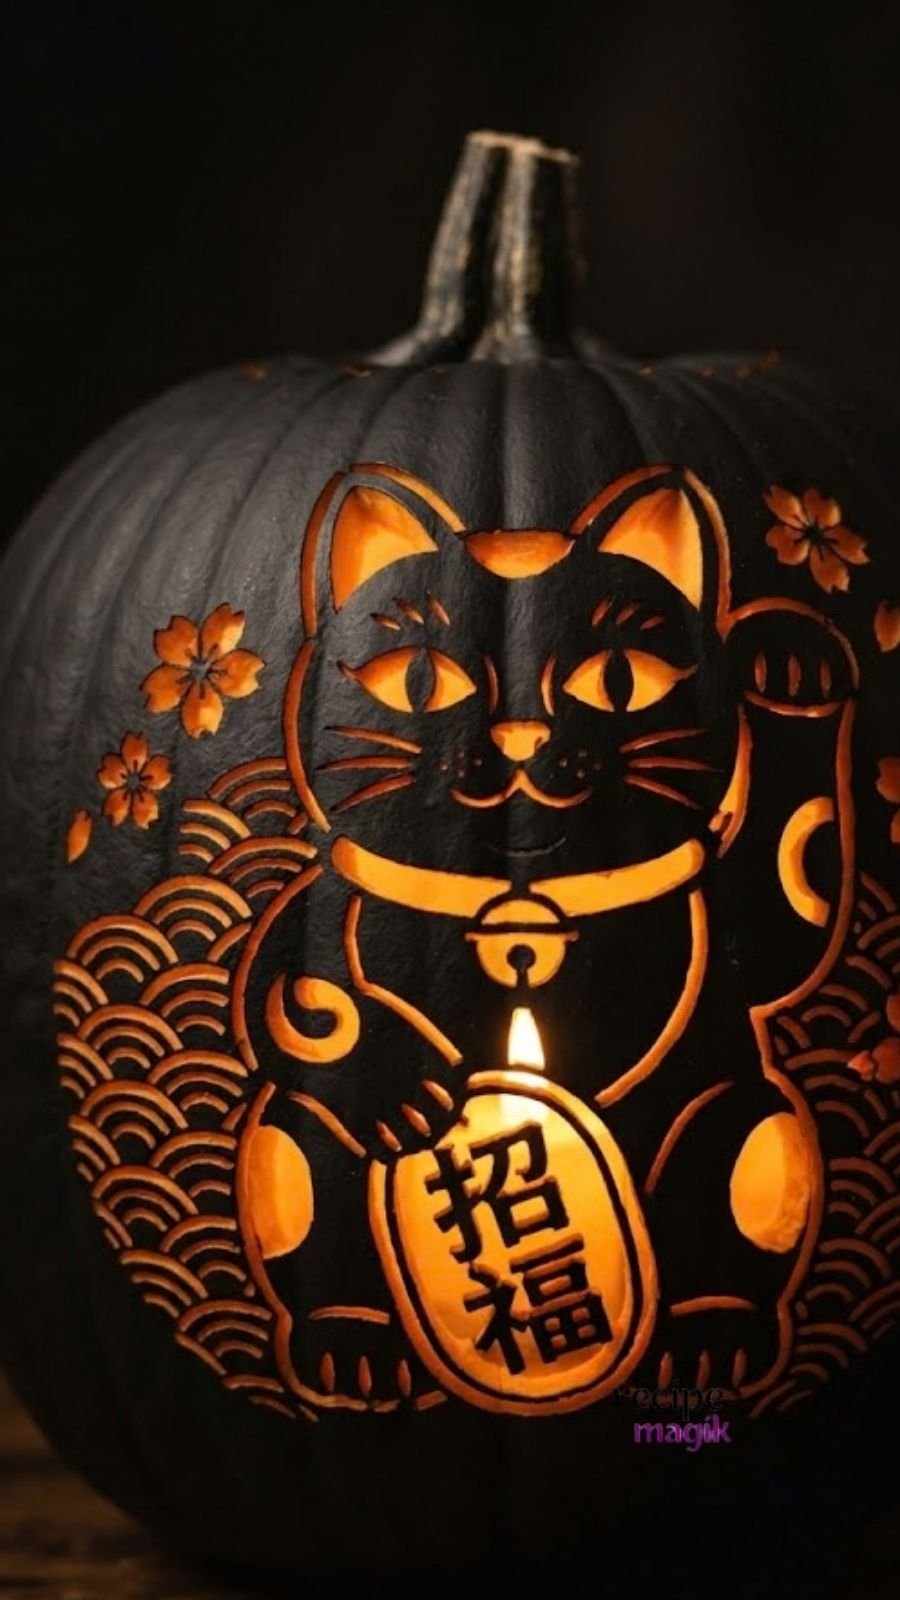
Print out your Lucky Cat template, ensuring it has the character for "good fortune" (招福) on the coin. Tape the template securely to the pumpkin's surface, or if you are confident, trace the design directly onto the black paint with a white or silver marker.
Carve the Details Use your small carving saw to carefully cut along the lines of the design. Start with the smallest details first. When carving the intricate background waves (Seigaiha pattern), be very patient and take your time. It is better to use small, slow strokes.
Special Carving Technique This design is a "shave" carving. For the cat's face, body, collar, and the background waves, you are not cutting all the way through the pumpkin. Instead, you use a linoleum cutter or an X-Acto knife to carefully scrape away just the black paint and a thin layer of the orange rind underneath. Only the internal flame behind the cat (the coin) is cut completely through to allow the bright light to shine.
Light and Display Wipe away any remaining dust or marker lines. Place your candle or LED light inside and put the lid back on. Turn off the lights to watch your Lucky Cat glow with good fortune.
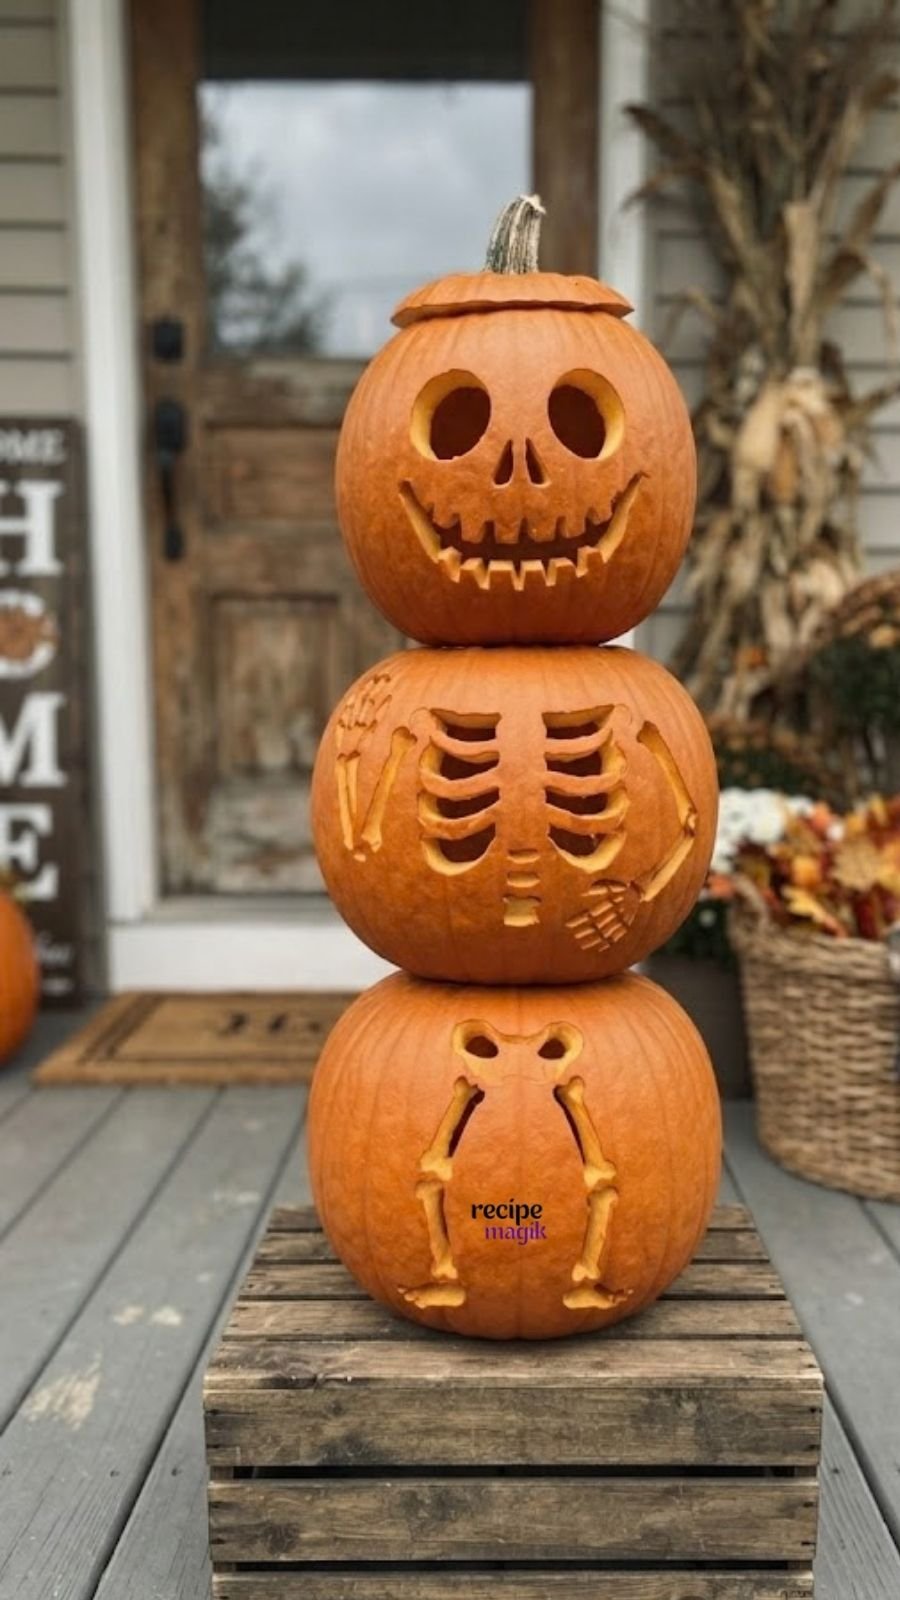
Stacked Skeleton Pumpkin Topiary
Assemble the Base Place your wooden crate or pedestal in the desired location on your porch. The ground should be perfectly level.
Prepare for Stacking and Carving (The Dowel Method) To make the stack stable, especially outdoors, it is highly recommended to use dowels.
- Place the bottom pumpkin on the crate.
- Insert two or three vertical dowels through the top opening of the bottom pumpkin, pushing them down until they are firmly seated on the crate surface. Leave about 4-5 inches of the dowel protruding from the top opening.
- Carefully lower the middle pumpkin onto the protruding dowels, pushing it down until it rests securely on the bottom pumpkin.
- Repeat the process: insert new dowels through the middle pumpkin into the bottom one, leaving 4-5 inches protruding.
- Lower the top pumpkin onto the dowels.Alternatively, if you have a very stable stack and little wind, you can simply carve them and stack carefully, but dowels are safer.
Carve the Design Now, with the pumpkins stacked, you can draw and carve your design. This ensures the skeleton aligns correctly.
- Top Pumpkin: Draw a friendly skeleton face (two large round eyes, a triangular nose, and a wide, jagged-toothed grin). Use your small carving saw to cut all the way through the rind for these face features, creating deep, shadowed voids.
- Middle Pumpkin: Draw the skeleton's ribcage and arms. This pumpkin uses a combination of techniques. For the ribcage lines and the finger bones, you can use the small saw to cut all the way through. For the larger arm bones and the main body of the ribcage, it is often more effective to use a linoleum cutter or X-Acto knife to "shave" away just the orange rind, revealing the lighter, yellow-white flesh underneath. This creates depth without weakening the structure.
- Bottom Pumpkin: Draw the pelvic bone structure and the two crossed leg bones. Use the same shaving technique as the middle pumpkin to create the shape of the pelvis and the definition of the leg bones, cutting cleanly through only for the gaps between the bones.
Display and Enjoy Wipe away any remaining dust or debris. Place the original stems back on the top pumpkin as a "hat." Your deep-carved skeleton topiary is ready to greet your guests during the day! (Since this is a deep-carved design without internal hollows for light, it is best viewed in daylight).
Cheshire Cat Carved Pumpkin
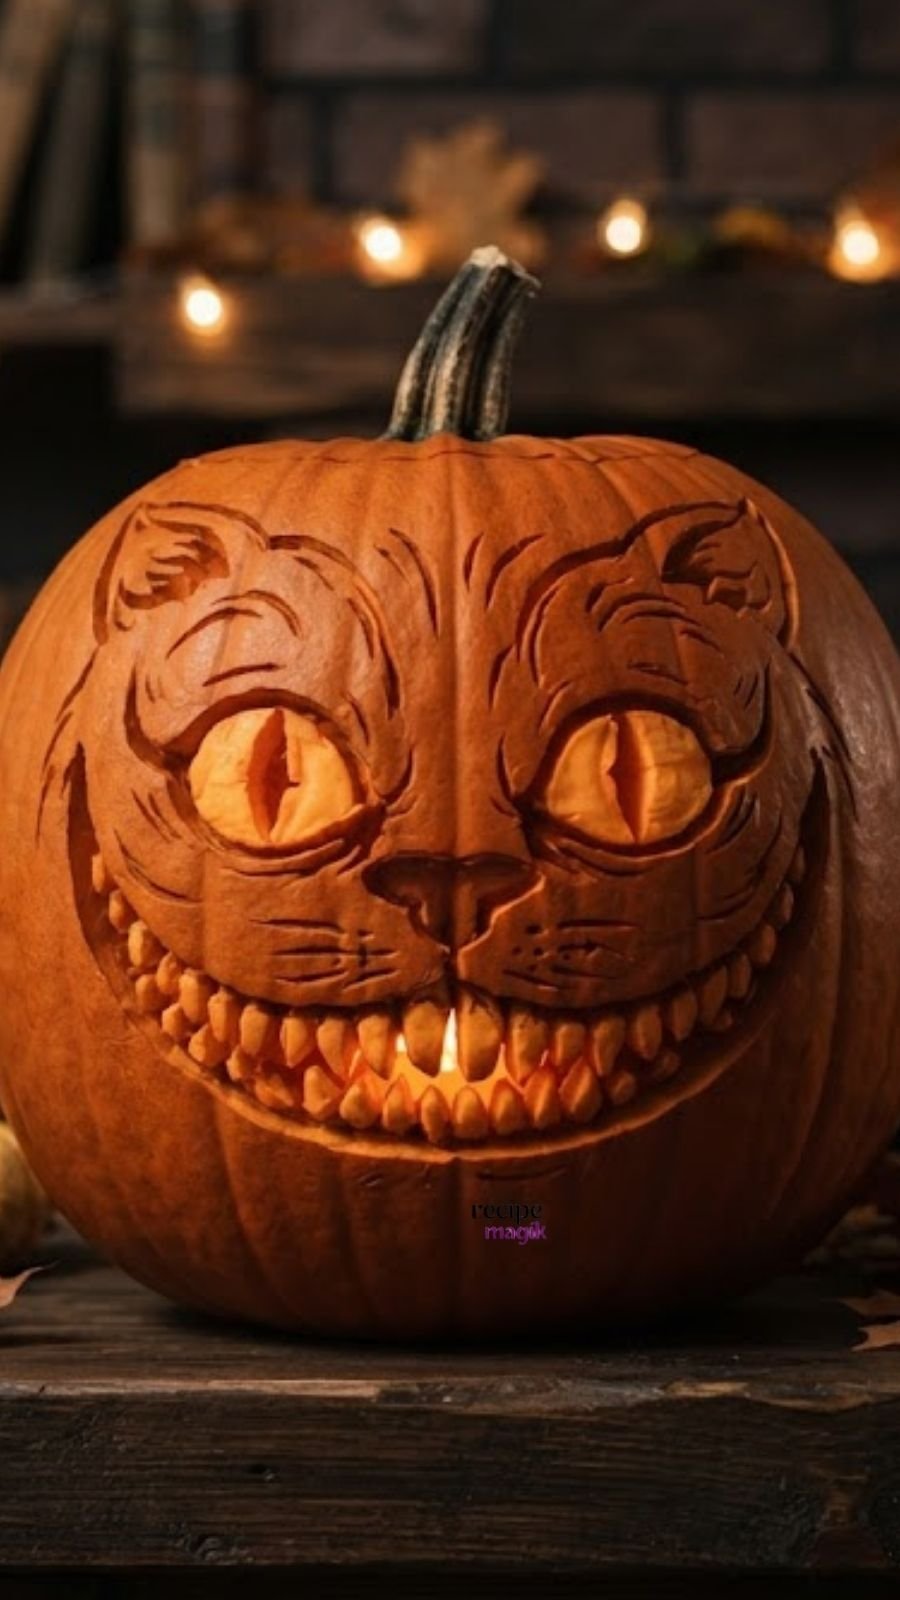
Prepare the Pumpkin Thoroughly clean the outside of the pumpkin. Cut a circular lid around the stem, angling your knife inward so the lid doesn't fall in. Remove the lid and use the large metal spoon to scrape out all the seeds and pulp.
Scrape and Thin the Walls This is the most important step for deep carving. You must thin the pumpkin wall in the area you plan to carve (the entire face) to about 1/2 inch thick. Use your spoon, a scraper, or a clay loop tool to shave away the inner flesh until you can see the orange rind is relatively thin.
Transfer the Design Tape your Cheshire Cat template onto the thinned area of the pumpkin, smoothing it out along the curve. Use a pencil to trace the lines, pressing hard enough to leave an indentation in the rind. Alternatively, draw the large almond eyes and the massive, multi-toothed grin directly onto the pumpkin with a marker.
Deep Carve the Features Using your small carving saw, cut all the way through the rind for the main gaps in the teeth and the pupils of the eyes.
Now, for the deep carving, switch to a linoleum cutter or clay loop tool. Instead of cutting through, you will "shave" or "etch" away layers of the pumpkin rind without going all the way through.
- The Grin: Use the loop tool to shave away the rind between the teeth and gums, creating deep channels that will allow a small amount of light to pass through, making the teeth stand out in bold relief.
- The Eyes: Carve deep channels around the pupils and eyelids to define their shape.
- The Cat's Form: Lightly shave away the rind to outline the general shape of the cat's head.
Refine the Texture Clean up the edges of your deep cuts with a small knife or tool. You can even shave away different depths to create varied shades of glowing orange. The areas where you cut all the way through (teeth gaps, pupils) will be brightest, and the deep-shaved areas (gums, eye shapes) will glow softly.
Light It Up and Display Wipe away any remaining pumpkin bits. Place your LED light or candle inside and replace the lid. The light will shine intensely through the full cuts and glow warmly through the deep-shaved areas, giving the cat its iconic, floating appearance.
Grinning Jack Pumpkin
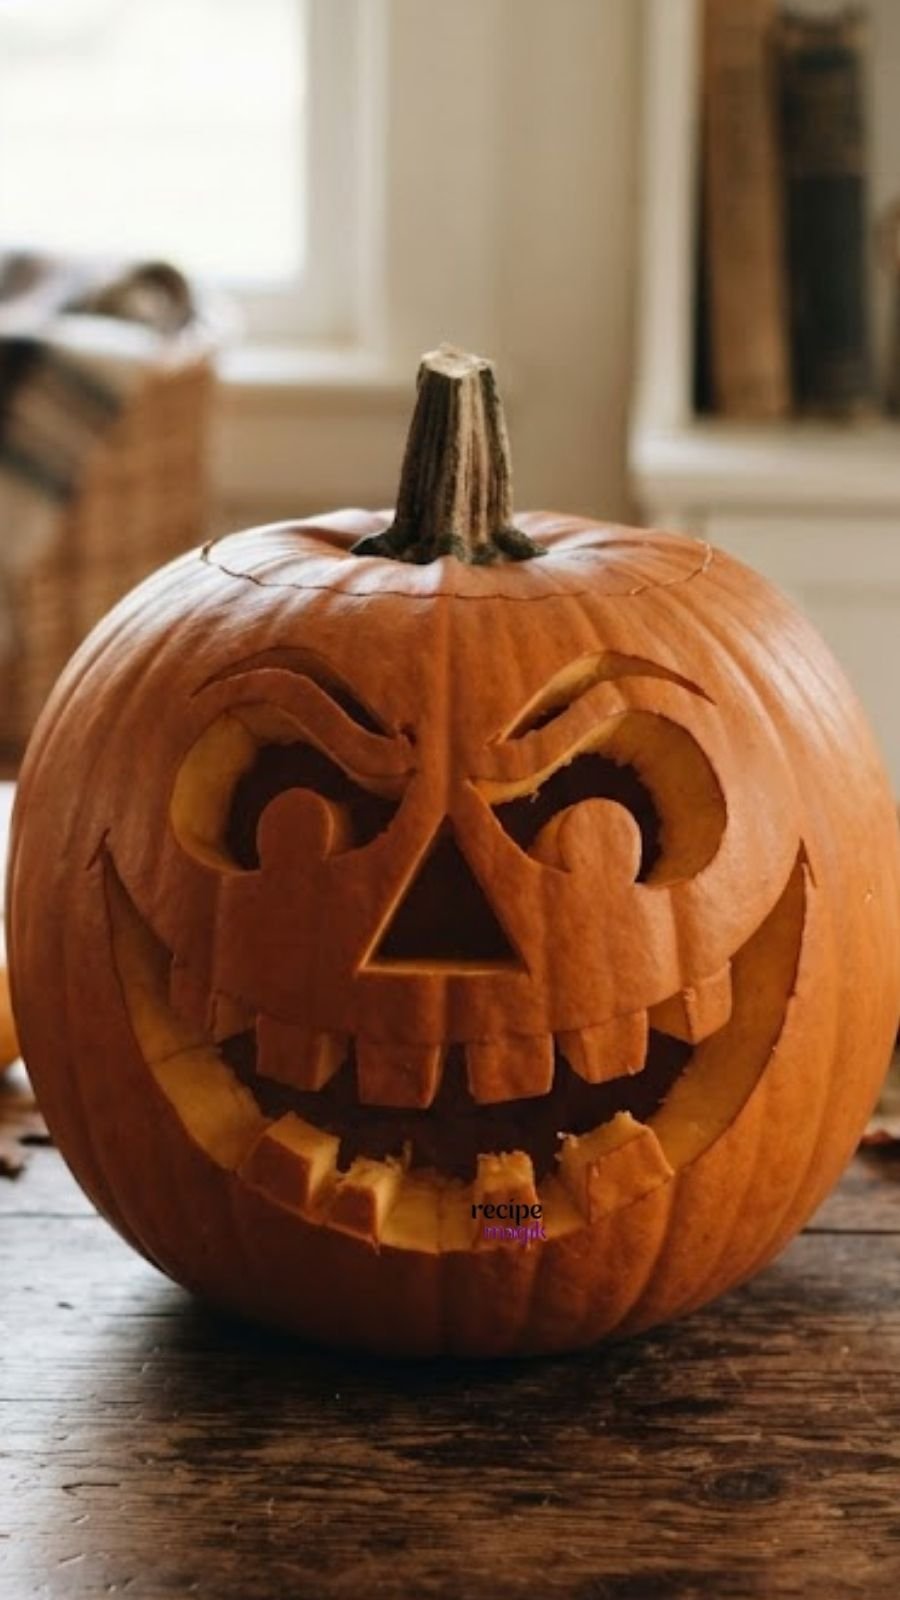
Prepare the Pumpkin Clean the outside of the pumpkin thoroughly and let it dry. Unlike a traditional jack-o'-lantern, you do not need to cut a lid at the top. Leave the stem intact as it adds to the character of the 'head'.
Sketch the Design Use your pencil or marker to draw the face directly onto the pumpkin. This design features large, expressive, triangular eyes with prominent eyebrows, a small triangular nose, and a massive, wide grin. The grin has many individual, jagged teeth. Make your lines bold and clear.
Deep Carve the Features This is the most important step. Using your small, sharp carving saw, carefully cut all the way through the rind and into the thick flesh of the pumpkin for every feature: the eyes, eyebrows, nose, and the gaps between the teeth.
Do not just make a surface scratch. You need to push the saw deep into the pumpkin meat. The goal is to create deep, shadowed voids. For the teeth, cut along the top and bottom of the smile, and then make vertical cuts to define each tooth, removing the small pieces of pumpkin flesh between the teeth to create distinct gaps.
Refine and Clean the Cuts Once you have made all the deep cuts, use a small knife or the tip of your saw to clean up the edges. Push out the cut-out pieces of flesh from the inside (you may need to use the spoon handle to push them through from the front). Scrape the inside of the deep channels clean so they are smooth and create dark, defined shadows. The deeper the cut, the better the shadow effect.
Display Wipe away any pumpkin debris. Place your finished deep-carved Jack on a rustic wooden table in a bright spot. The natural daylight will hit the pumpkin and fall into the deep cuts, creating strong contrasts and making the grin stand out boldly without needing any internal light. Since it's not hollowed out, it will last much longer than a traditional carved pumpkin.
Puking Ghost Pumpkin
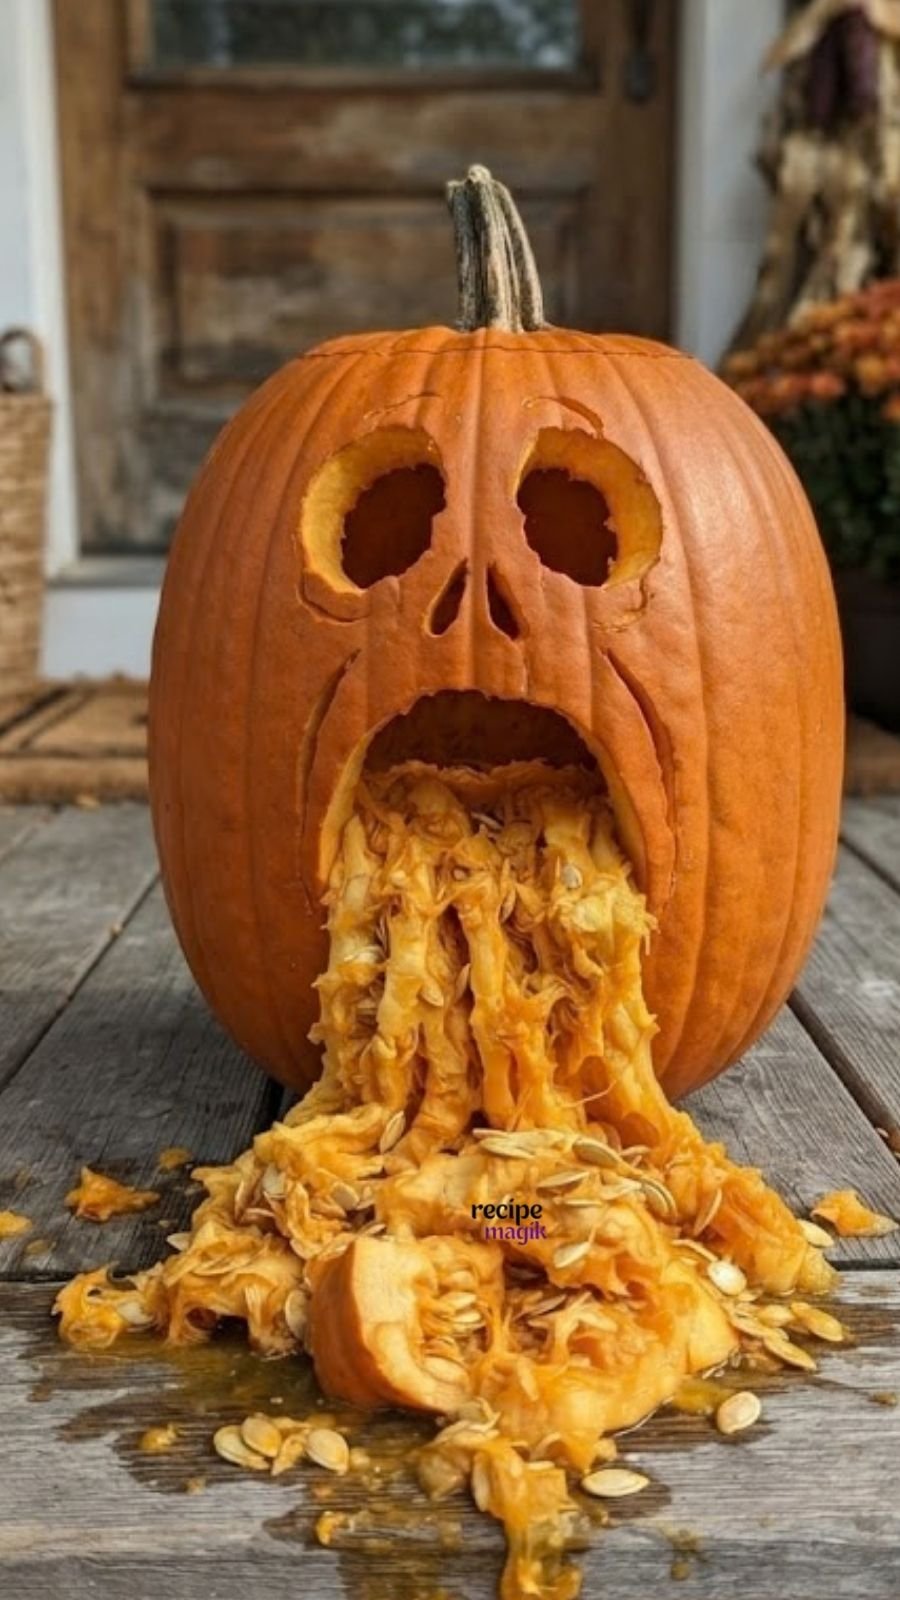
Prepare Your Workspace and Pumpkin Carving a "puking" pumpkin is extremely messy. Lay down newspaper or a disposable tablecloth on your porch or table. Clean the outside of the pumpkin and let it dry. Cut a small, circular lid around the stem at the very top.
Clean Out the Top Only Reach into the pumpkin and pull out the seeds and stringy pulp from the top half only. You need the bottom half of the pumpkin to remain solid and full of guts for the effect. Scrape the walls of the top half clean so they are about one inch thick.
Sketch the Ghost Face Use your pencil or marker to draw a large, spooky ghost face near the top of the pumpkin. This includes two large, hollowed-out eye sockets and a wide, gaping, "screaming" mouth. The bottom of the mouth should be placed about halfway down the pumpkin's front.
Deep Carve the Face Using your small serrated saw, carefully cut all the way through the rind along the lines you drew for the eyes and mouth. Push the cut-out pieces of rind inward and discard them. The goal is to create deep, shadowed holes that define the ghost's expression.
Create the "Puke" Effect This is the key step. The pumpkin guts you left inside need to come out through the mouth.
- Take your wider, sturdy knife and insert it into the mouth opening, pointing it downward into the pumpkin's belly.
- Gently but firmly use the knife to "push" or "scoop" the mass of seeds and pulp upward and outward through the mouth.
- As the guts spill out, arrange them so they cascade down the front of the pumpkin and onto the porch floor. It's helpful to pull some of the stringy pulp to look like a continuous stream.
Refine and Display Use your spoon or fingers to clean up the edges of the mouth opening so the "puke" flows freely. Scrape a little extra pulp from the inside and add it to the pile if it looks sparse. Place your finished masterpiece on the porch in the daytime. Since this design relies on the texture of the raw pumpkin guts, it does not use an internal light. It will last for a day or two before drying out.
Witch Face Pumpkin
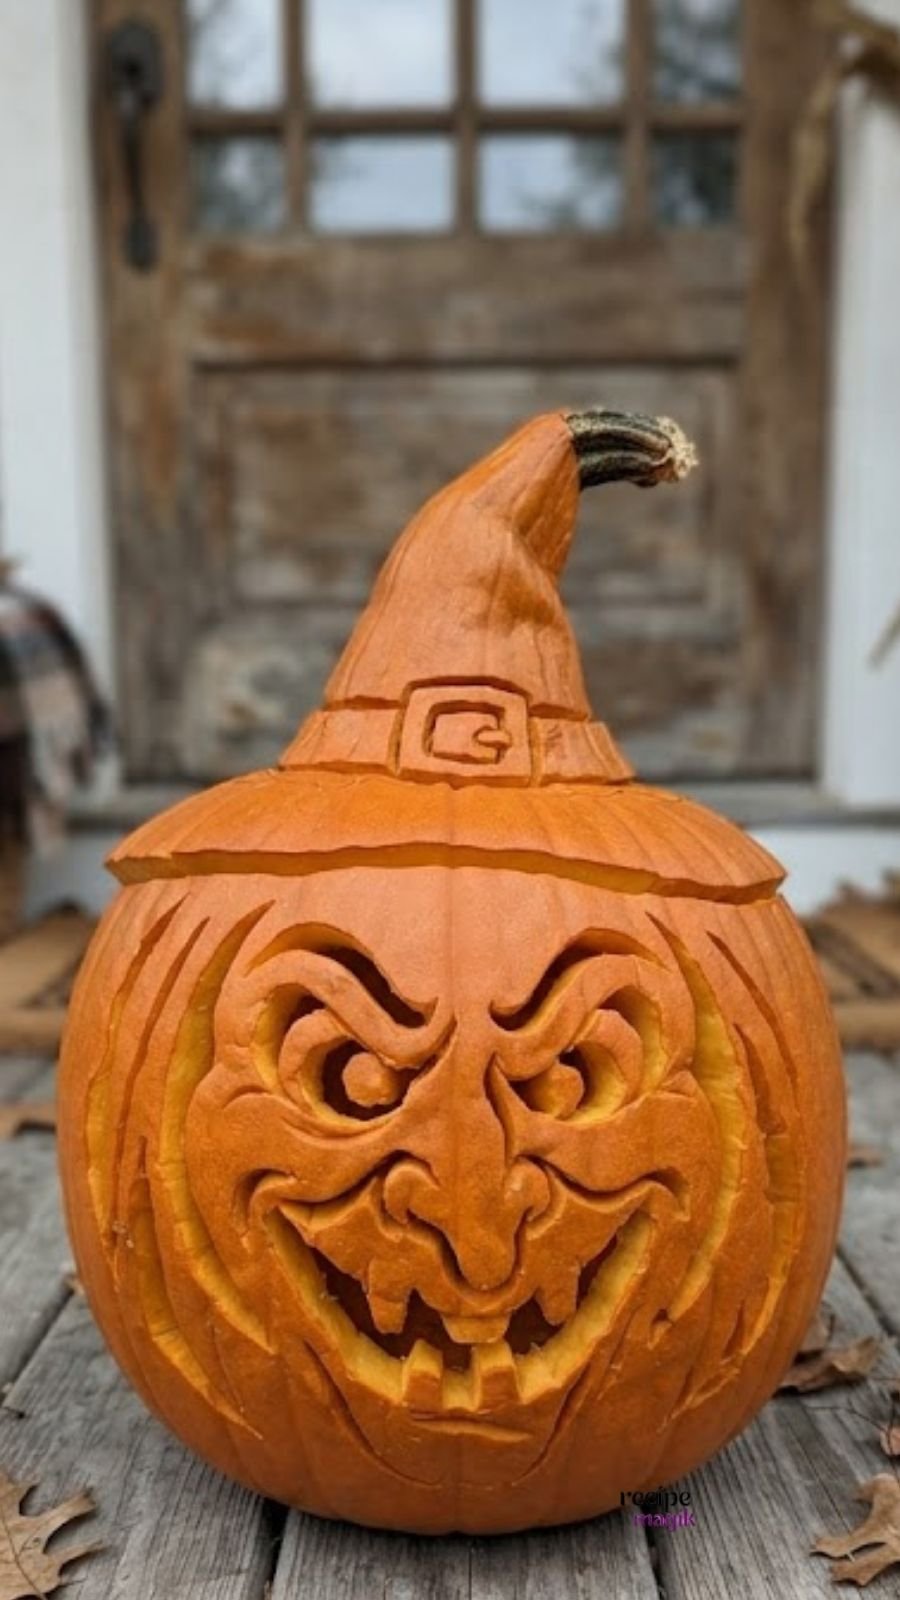
To create this Witch Face Pumpkin, follow these steps:
Gather Your Supplies You will need a medium-to-large, smooth orange pumpkin, a pumpkin carving kit (especially a small, sharp saw and a linoleum cutter or clay loop tool), a large metal spoon, a printed template of a stylized witch face (or sketch one freehand), a pencil or marker, and a bright LED light or flicker candle.
Prepare the Pumpkin Clean the outside of the pumpkin thoroughly and let it dry. Cut a circular lid around the stem and pull it out. Reach inside and remove all the seeds and stringy pulp. Scrape the inner wall clean, especially on the side you plan to carve. Thinning the wall to about one inch thick is essential for detailed carving.
Sketch or Transfer the Design This design combines both cutting and shaving. Use your pencil to draw the face directly onto the pumpkin: a large, crooked nose, arched eyebrows, deep-set eyes, and a wide, snaggle-toothed grin. For the hat, draw a pointed shape at the very top of the pumpkin rind, above the face, with a buckle detail.
Carve the Features For the main facial features (eyes, eyebrows, nose holes, and the gaps between the teeth), use your small carving saw to cut all the way through the rind. Push these pieces out from the inside.
Sculpt the Details This is the key to the witch's expression. Instead of cutting through for the entire face, you will "shave" away just the orange rind.
- The Grin: Use a linoleum cutter or clay loop tool to shave away the rind around the teeth, leaving the teeth standing in relief. Shave down into the flesh to create deep channels.
- The Nose: Carefully shave away layers of the rind on the nose itself to create its lumpy, hooked shape and texture. Shave the area around the nose deeply to make it stand out.
- The Hat: Use the saw to cut the outline of the pointed hat. Then, use the shaver tool to carve the texture of the hat, shaving lines to suggest a pointed shape and the buckle.
Refine and Clean Use a small knife or the tip of your saw to clean up the edges of all your cuts. Scrape the inside of the shaved channels to make them smooth so they catch the light.
Light It Up and Display Wipe away any pumpkin bits. Place your LED light or candle inside and put the lid back on. Turn off the lights to watch the witch come to life, with the light glowing intensely through the cut areas and softly through the deeply shaved sections. Place it on your porch and enjoy!
Archibald pumpkin
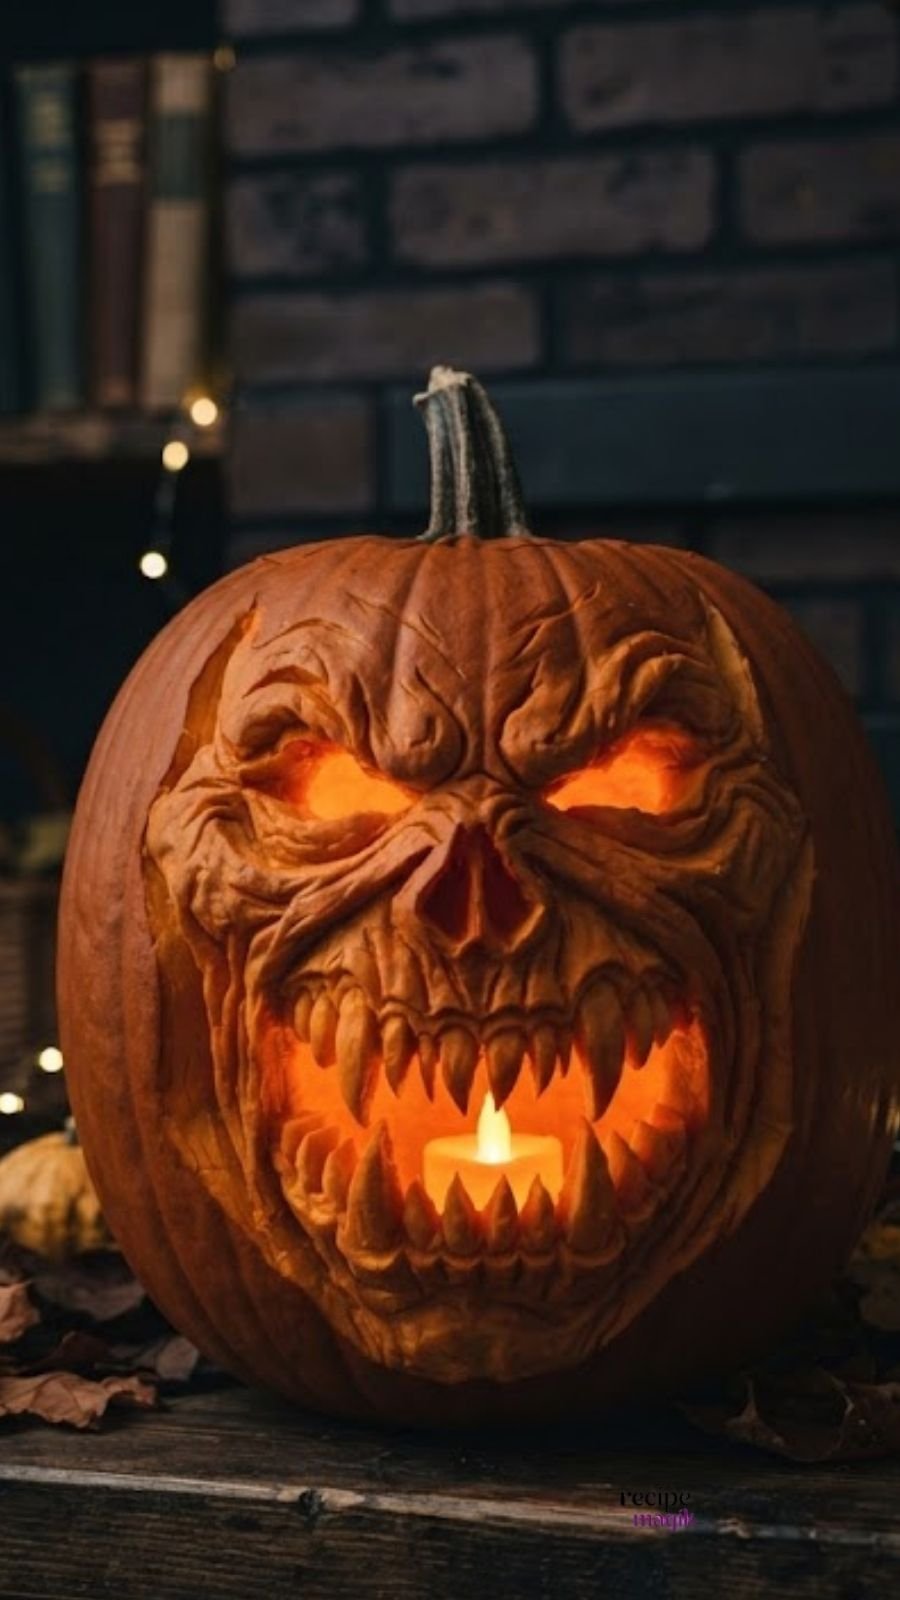
To create this terrifying, deep-carved Archibald pumpkin, follow these steps. This design requires advanced carving techniques.
Gather Your Supplies You will need a large, smooth, thick-walled orange pumpkin, a professional pumpkin carving kit (especially the small serrated saws and a clay loop tool or linoleum cutter), a large metal spoon, a printed template or detailed reference image of the Archibald character face, a pencil or marker, and a bright, multi-setting LED light or strobe candle.
Prepare the Pumpkin Thoroughly clean the outside of the pumpkin. Cut a circular lid around the stem, angling your knife inward so the lid doesn't fall in. Remove the lid and use the large metal spoon to scrape out all the seeds and stringy pulp.
Thin the Walls for Deep Carving This is the most critical step. You must thin the pumpkin wall in the area you plan to carve (the entire face) to about 1/2 inch thick. Use your metal spoon or, even better, a clay loop tool to shave away the inner pumpkin flesh until you can see the orange rind is relatively thin. If it's too thick, you cannot achieve deep shadows.
Transfer the Design Tape your Archibald template onto the thinned area of the pumpkin, smoothing it out along the curve. Use a pencil to trace the lines, pressing hard enough to leave an indentation in the rind. Alternatively, draw the menacing face directly onto the pumpkin with a marker. The design features sunken, hollow eyes, a massive, multi-toothed snarling mouth, and heavy brow ridges.
Deep Carve the Features (The Shadow Work) Using your small serrated saw, cut all the way through the rind for the main gaps: the eye sockets, the nostrils, and the primary gaps between the fangs.
Now, for the deep carving, switch to a linoleum cutter or clay loop tool. Instead of cutting through, you will "shave" or "carve away" layers of the pumpkin rind without going all the way through.
- The Mouth and Fangs: This is where the deep carving really happens. Carve deep channels around each fang to make them stand out in bold relief. Carve away layers of the rind inside the mouth area to create depth, leaving the teeth as raised structures. The light will shine through the gaps you cut and glow warmly through the thinner, shaved areas of the fangs and gums.
- The Eyes and Brow: Shave away the rind to create deep, sunken eye sockets. Carve deep lines above the eyes to form the heavy, furrowed brow of the character. Shave the skin on the face to create wrinkles and texture.
Refine and Clean the Texture Use a small knife or the tip of your saw to clean up the edges of all your deep cuts. The goal is to create a grotesque, fleshy texture. The deeper you carve in specific areas, the more shadow you create, which contrasts with the glowing areas.
Light It Up and Display Wipe away any pumpkin bits. Place your LED light or strobe candle inside and replace the lid. Use a bright LED setting to make the deep-carved teeth, gums, and eyes glow intensely with a warm, flickering orange light. Place the pumpkin on a dark, rustic mantelpiece at night to maximize the terrifying effect of the deep shadows.
Friendly ghost carved pumpkin
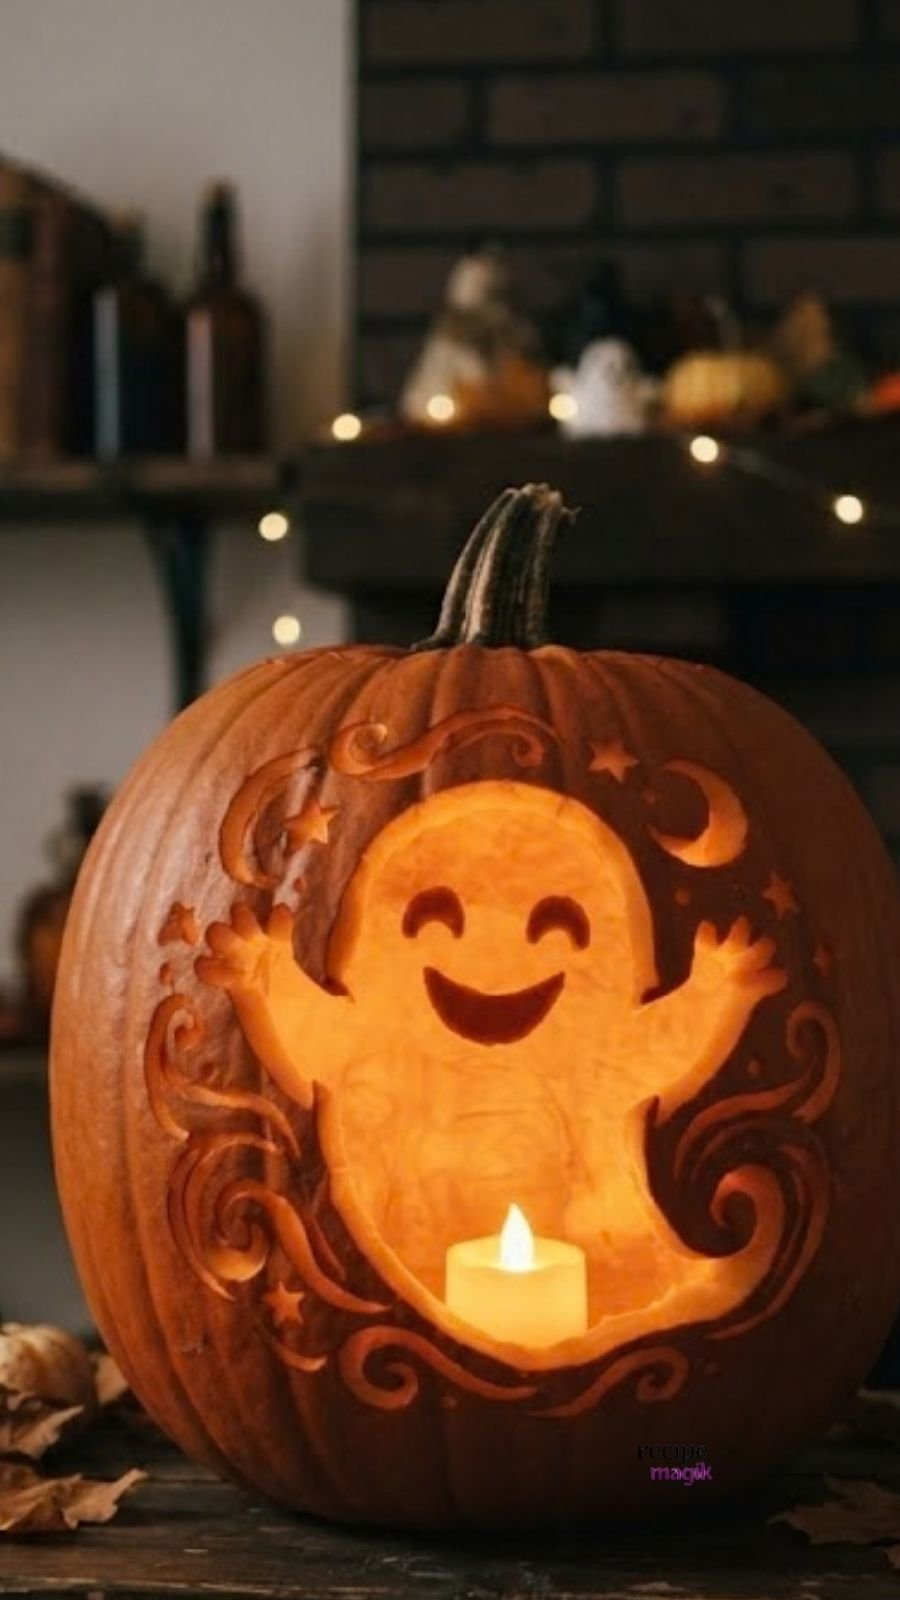
To create this Deep-Carved Friendly Ghost Pumpkin, follow these steps:
Gather Your Supplies You will need a medium-to-large, smooth orange pumpkin, a heavy-duty pumpkin carving kit (especially the small serrated saw and a linoleum cutter or clay loop tool), a large metal spoon, a printed template of the friendly ghost design (or sketch it freehand), a pencil or marker, and a bright LED light or flicker candle.
Prepare the Pumpkin Thoroughly clean the outside of the pumpkin. Cut a circular lid around the stem, angling your knife inward so the lid doesn't fall in. Remove the lid and use the large metal spoon to scrape out all the seeds and stringy pulp.
Scrape and Thin the Walls This is the most important step for deep carving. You must thin the pumpkin wall in the area you plan to carve (the entire ghost and swirls) to about 1/2 inch thick. Use your spoon, a scraper, or a clay loop tool to shave away the inner flesh until you can see the orange rind is relatively thin.
Transfer the Design Tape your friendly ghost template onto the thinned area of the pumpkin, smoothing it out along the curve. Use a pencil to trace the lines, pressing hard enough to leave an indentation in the rind. Alternatively, draw the large, happy ghost figure and the surrounding swirling tendrils directly onto the pumpkin with a marker.
Deep Carve the Features Using your small serrated saw, cut all the way through the rind for the main features of the ghost: its friendly smiling mouth, its eyes, and the little stars and moon shapes. Push these small pieces out from the inside.
Sculpt the Ghost and Swirls This is the key to the deep carving. Instead of cutting through for the entire ghost, you will "shave" or "etch" away layers of the pumpkin rind without going all the way through.
- The Ghost's Body: Use your linoleum cutter or clay loop tool to shave away the orange rind from the entire body of the ghost, leaving it as a raised, translucent, glowing shape. The shaved flesh will allow the light to shine through warmly, creating the soft, ethereal effect.
- The Swirling Tendrils: Do the same for the swirling tendrils that surround the ghost. Carefully shave away the rind along these lines to create glowing, deep channels.
- Outline: You can choose to leave a thin line of the original orange rind around the ghost and swirls to make them pop, or shave right up to the edge for a softer look.
Refine and Clean Use a small knife or the tip of your saw to clean up the edges of all your deep cuts. Scrape the inside of the shaved channels and the ghost's body to make them smooth so they catch and diffuse the light evenly.
Light It Up and Display Wipe away any pumpkin bits. Place your LED light or candle inside and replace the lid. The light will shine intensely through the full cuts (eyes, mouth) and glow warmly through the deep-shaved areas (ghost body, swirls), bringing your friendly ghost to life. Place it on your mantelpiece in a dimly lit room to maximize the effect.
Frankenstein inspired Jack O Lantern
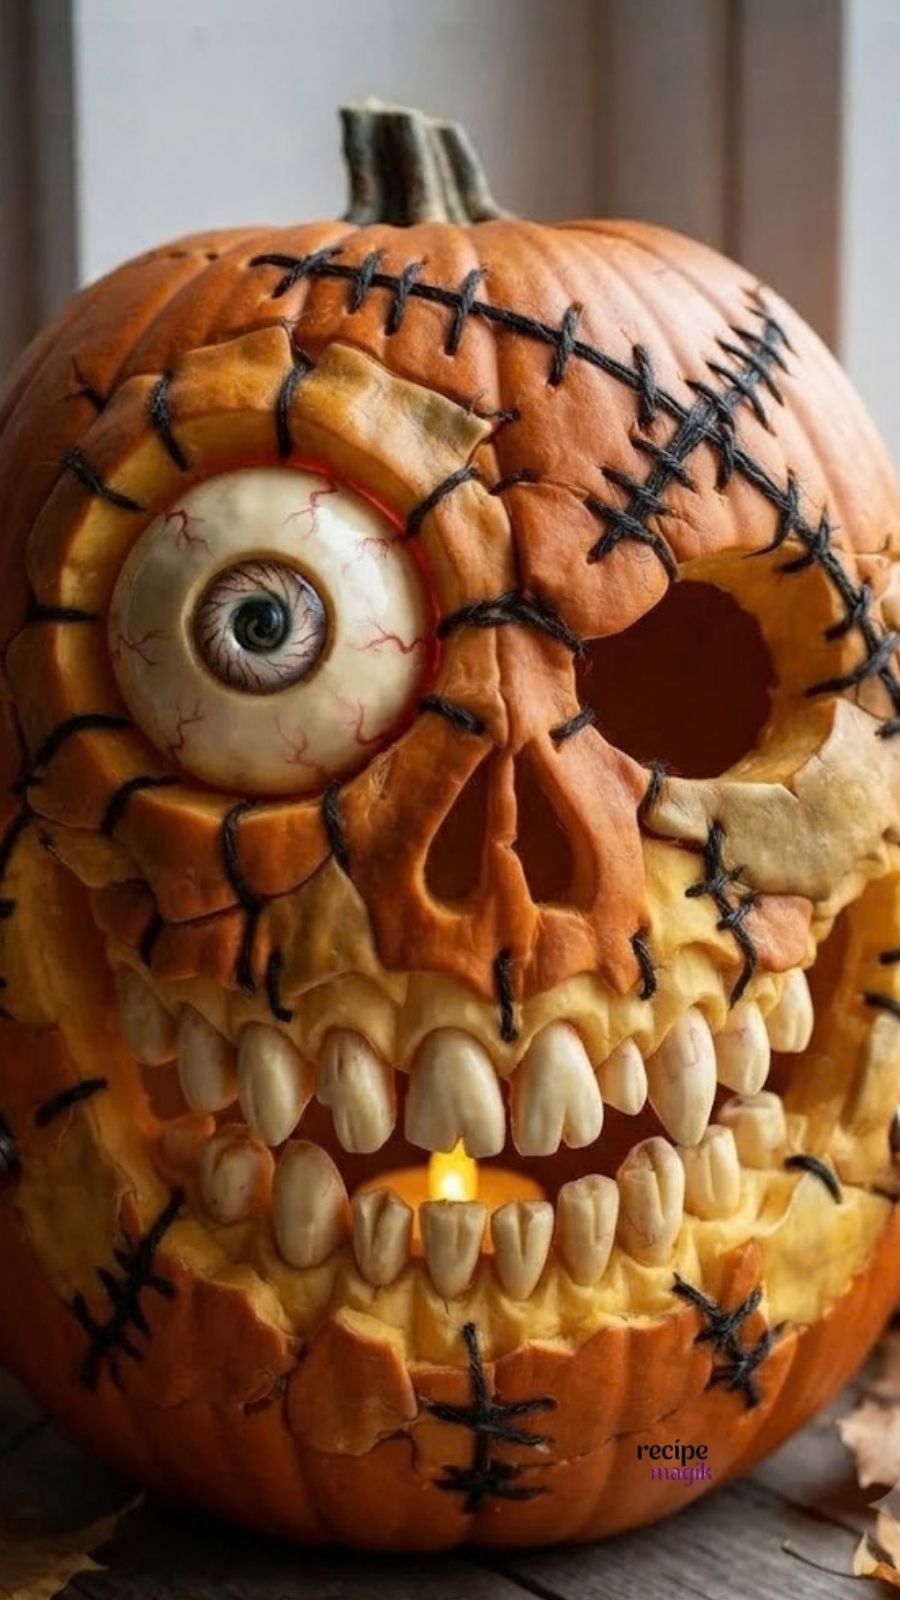
This is an advanced carving that combines traditional pumpkin carving with sculptural elements. Here is a step-by-step guide to creating this Frankenstein-inspired Jack-o'-lantern.
Materials Needed
- Large, thick-walled orange pumpkin
- Heavy-duty pumpkin carving kit (especially small serrated saws, a clay loop tool, and a linoleum cutter)
- Large metal spoon or scoop
- A large, realistic prosthetic eyeball (available at Halloween stores or online)
- Thick black twine or yarn
- Large upholstery needle (or a drill with a small bit)
- Two large bolts, nuts, and washers
- A sharp knife
- Battery-operated LED candle (essential, as a real flame could melt the eye)
- Pencil or marker
Step-by-Step Carving Process
1. Prepare the Pumpkin
Thoroughly clean the outside of the pumpkin. Unlike a traditional Jack-o'-lantern, you should cut the lid from the bottom of the pumpkin. This preserves the structural integrity of the top, which is crucial for supporting the heavy eyeball and stitches. Scrape out all seeds and pulp, thinning the walls of the pumpkin to about 1/2 inch thick, especially on the front face.
2. Plan and Sketch the Design
Use a pencil to sketch the design directly onto the pumpkin.
- Outline the large, circular left eye socket.
- Sketch the shape of the smaller, empty, jagged right eye socket.
- Draw the large, open, toothy grin across the lower half.
- Mark the locations for the "scars" and the neck bolts.
3. Sculpt the "Skin Flaps" (Advanced Technique)
This is the most complex part. You are not just cutting through the skin; you are peeling it back.
- Using a linoleum cutter or a small, sharp craft knife, carefully score the lines for the skin flaps around the left eye and the forehead.
- Use a clay loop tool or a small pairing knife to shave away only the outer layer of orange skin in these areas, leaving a lighter, yellowish-green layer underneath exposed. This creates the look of raw flesh.
- For the skin flaps that are pulled back, carefully cut under the skin layer and peel it away from the flesh beneath, leaving it attached only at the "seam" lines.
4. Carve the Eye and Mouth Sockets
- Cut out the smaller, empty right eye socket completely.
- For the large left eye, carve out the circle until it is slightly smaller than your prosthetic eyeball. This ensures a tight, secure fit.
- Carve out the entire mouth area.
5. Add the Stitches
- Option A (Needle): Use a large upholstery needle threaded with thick black twine to "sew" along the seam lines of the skin flaps and across the forehead. Poke the needle all the way through the pumpkin wall and pull it tight, creating a "scar" pattern.
- Option B (Drill): If the pumpkin wall is too thick for a needle, use a drill with a small bit to pre-drill the holes, then thread the twine through with the needle.
6. Insert the Prosthetic Eyeball
Push the prosthetic eyeball into the large left socket from the outside. It should be a snug friction fit. You may need to carefully trim the pumpkin flesh inside the socket until the eye sits flush and is held securely.
7. Carve and Insert the Teeth
You can carve teeth directly from the pumpkin flesh, but for this hyper-realistic look, it's better to use the pumpkin's own thick-cut pieces.
- Carve a row of individual, blocky, irregular teeth from a separate piece of thick pumpkin wall.
- Trim them to be slightly different sizes.
- Insert these teeth into the top and bottom of the open mouth cavity, pressing them into the soft inner flesh.
8. Install the Neck Bolts
Choose a location on the lower left and right sides of the pumpkin, near the jawline. Carefully drill a hole on each side just slightly smaller than the diameter of your bolts. Screw or push the bolts through the holes. Secure them from the inside with a nut and washer if the pumpkin wall is sturdy enough.
9. Light It Up and Display
Place your battery-operated LED candle inside the pumpkin from the bottom opening. The light will shine through the empty eye, the mouth, and will even create an eerie glow around the edges of the prosthetic eye. Place it on a wooden surface scattered with dried leaves for the perfect autumnal display.
miniature pumpkin in a cage
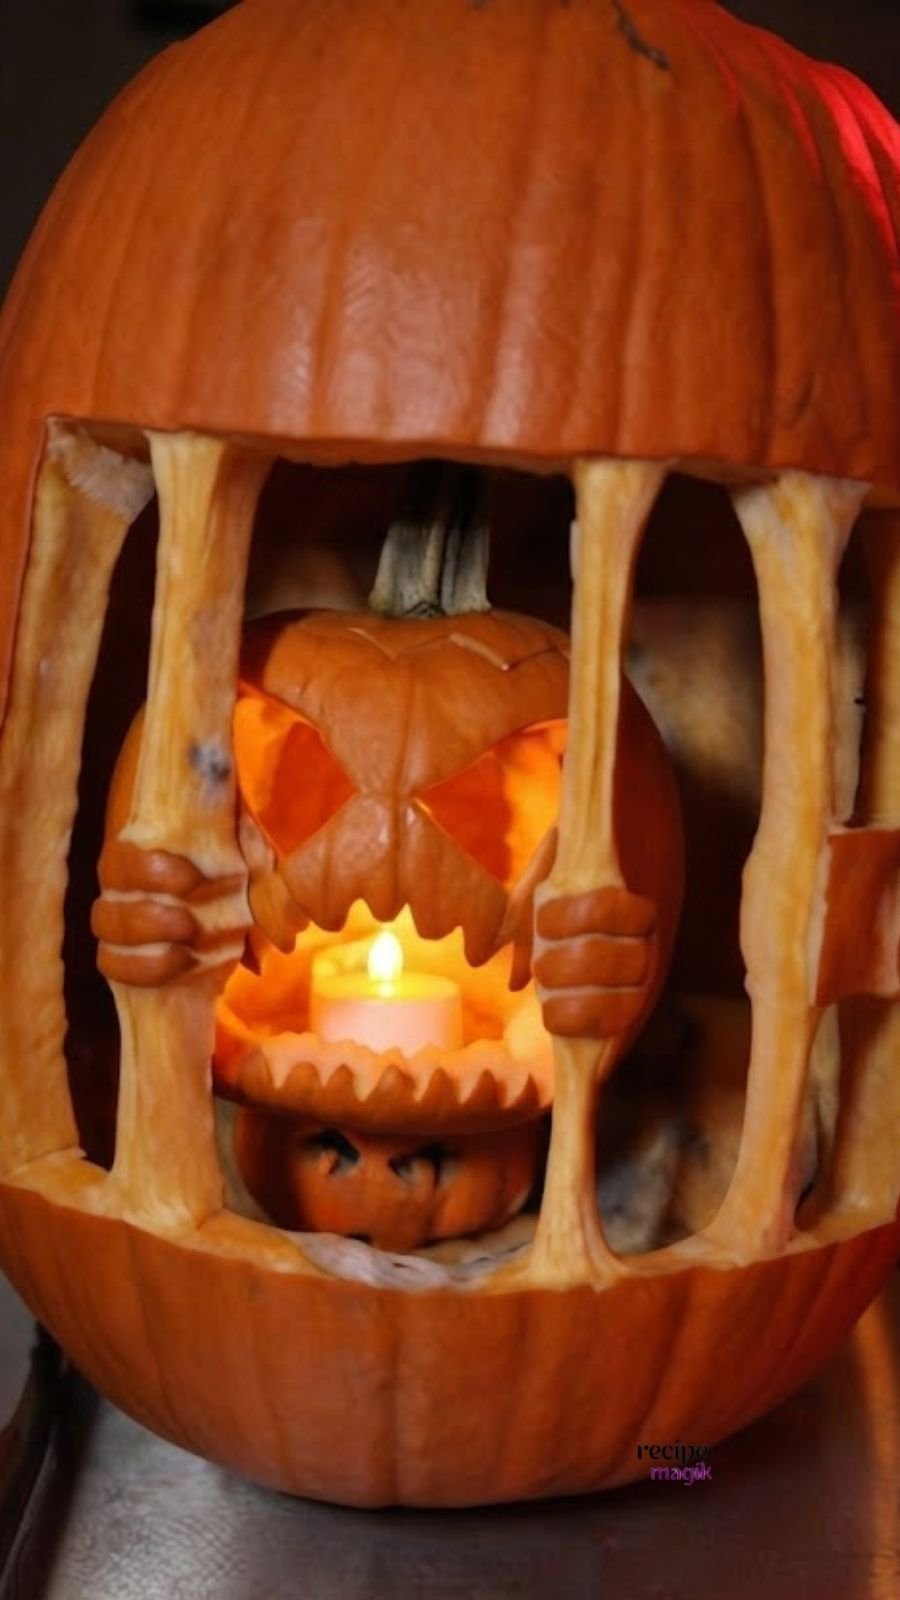
To create a simplified version of this trapped miniature pumpkin in a cage, follow these steps:
Gather Your Supplies You will need one large, tall orange pumpkin for the outer cage, one small miniature pumpkin for the prisoner inside, a small saw, a large metal spoon, a marker, and an LED tealight candle.
Prepare the Outer Pumpkin
Wash the large pumpkin and cut a large hole in the back or bottom to scoop out all the seeds and pulp. Thin the front walls slightly so it is easier to carve.
Draw the Window and Bars
Instead of carving complex cylindrical bars, use a marker to draw a large square or arched window frame on the front of the large pumpkin. Inside that window, draw 3 or 4 vertical thick vertical stripes to act as the cage bars.
Carve the Cage Openings
Using your small saw, cut out the negative space between the bars and around the window frame so that you are left with sturdy vertical pumpkin strips acting as prison bars.
Prepare the Prisoner
Take your miniature pumpkin, cut a small lid into the top or back, and clean out its seeds. Carve a simple, spooky jack-o-lantern face (triangular eyes and a jagged mouth) into the front of the mini pumpkin.
Place the Prisoner and Light
Set the small prisoner pumpkin inside the large cage so it peeks out through the bars. Place a lit LED tealight inside or right in front of the mini pumpkin so it glows.
Scary Pumpkin Teeth Carving
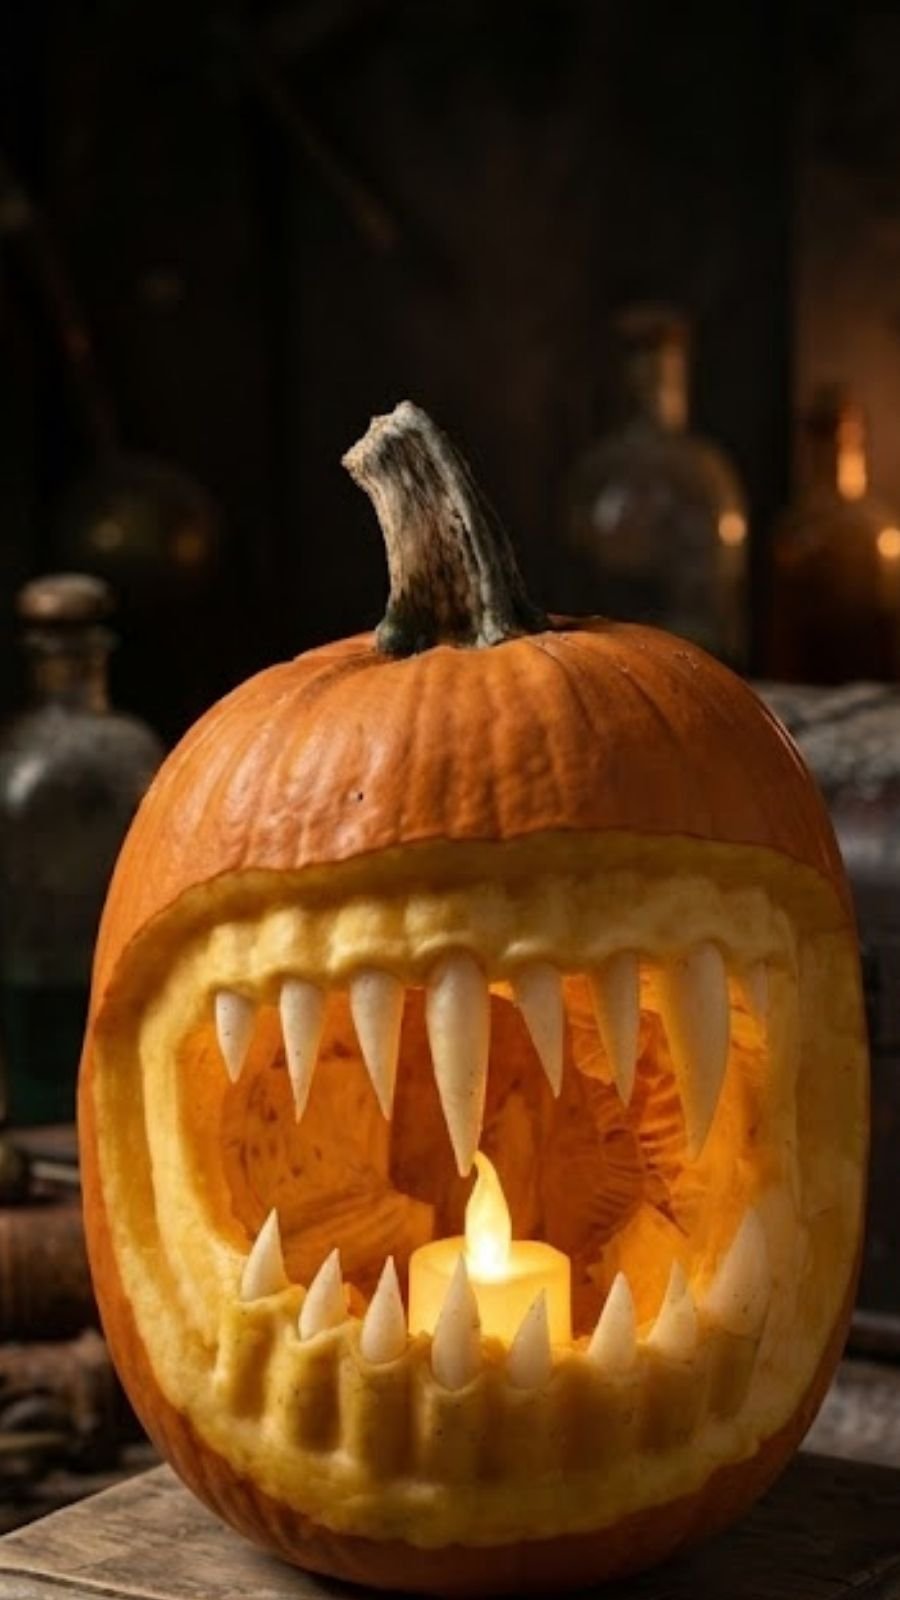
To create this monstrous pumpkin with terrifying potato teeth, follow these steps:
Gather Your Supplies You will need a large, smooth orange pumpkin, a heavy duty carving saw, a large metal spoon, a marker, several raw potatoes, a paring knife, and a battery operated LED candle.
Prepare the Pumpkin
Wash the outside of the pumpkin and dry it thoroughly. Cut a circular lid around the stem at the top, angle your knife inward so the lid stays put, and use your spoon to scoop out all the seeds and stringy pulp.
Sketch the Giant Mouth
Use your marker to draw a massive, gaping open mouth that takes up most of the front of the pumpkin. Extend the corners of the mouth wide across the sides to create an aggressive, menacing grin.
Carve the Main Mouth Opening
Using your serrated carving saw, cut all the way through the rind along your marked lines and remove the large cutout piece. Scrape the inner edges clean so the opening is smooth.
Prepare the Potato Teeth
Take your raw potatoes and peel them. Cut them into long, sharp, conical wedges to look like giant fangs. Make some longer and sharper for the top jaw, and shorter, blockier ones for the bottom jaw.
Attach the Teeth
Push the carved potato fangs firmly into the top and bottom inner edges of the pumpkin's mouth opening. The natural moisture and tight fit of the pumpkin flesh will hold the potato teeth securely in place.
Light It Up and Display Place a battery operated LED candle inside the center of the pumpkin. The warm light will illuminate the gaping mouth, making the sharp potato teeth cast eerie shadows. Set your creation on a sturdy wooden pedestal to complete the look.
Skull face pumpkin
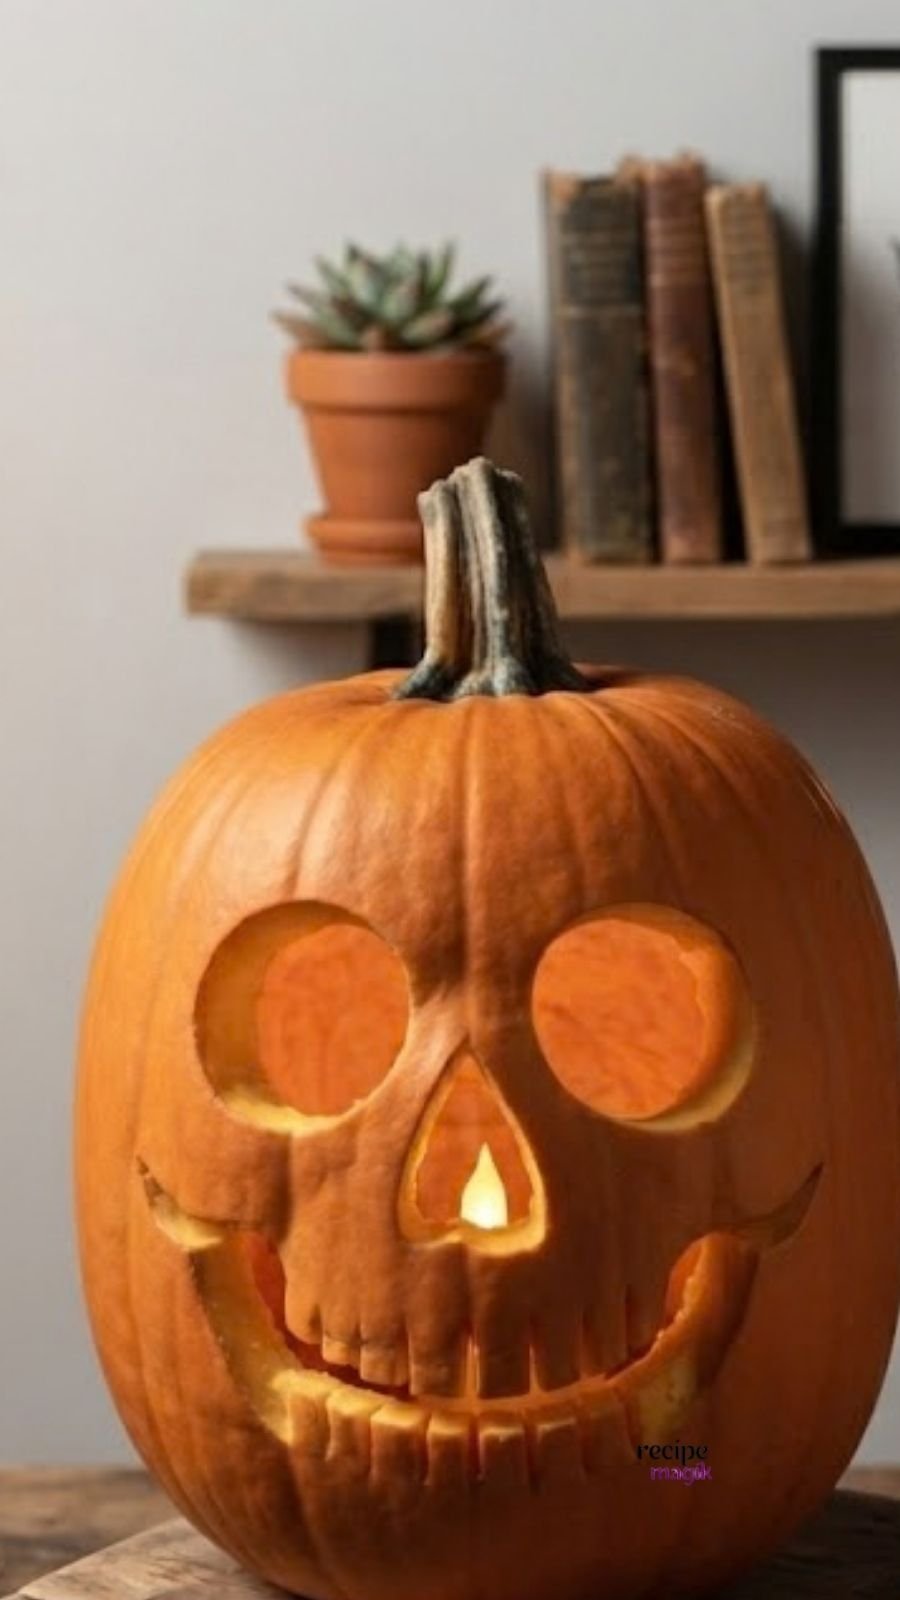
To create this simple, deep-carved skull face pumpkin against a cozy home background, follow these steps:
Gather Your Supplies You will need a medium-to-large orange pumpkin, a carving saw, a linoleum cutter or clay loop tool for shaving, a large metal spoon, a marker, and an LED tealight candle.
Prepare the Pumpkin Wash and dry your pumpkin, then cut a lid around the stem and scoop out all the seeds and pulp. Shave the inner wall of the front face down to about 1/2 inch thick so you can carve and scrape easily.
Sketch the Skull Face Use your marker to draw two large circular eye sockets, a sharp inverted triangle for the nose, and a wide, friendly skeletal smile with vertical lines for teeth.
Cut and Deep Carve Use your small saw to cut all the way through the rind for the nose cavity and the inner ventilation points if needed. For the eye sockets and the grin, use your linoleum cutter or loop tool to shave and scoop deep recesses without going all the way through the thick rind, leaving the skull features sunken and textured.
Etch the Teeth Score vertical hash marks across the shaved smile line to create the detailed look of individual skull teeth.
Light It Up and Display Place your LED tealight inside the pumpkin. Position it on a wooden surface in a comfortable, homey indoor setting to let the warm light radiate through the deep-carved skull features.
Day of the Dead pumpkin
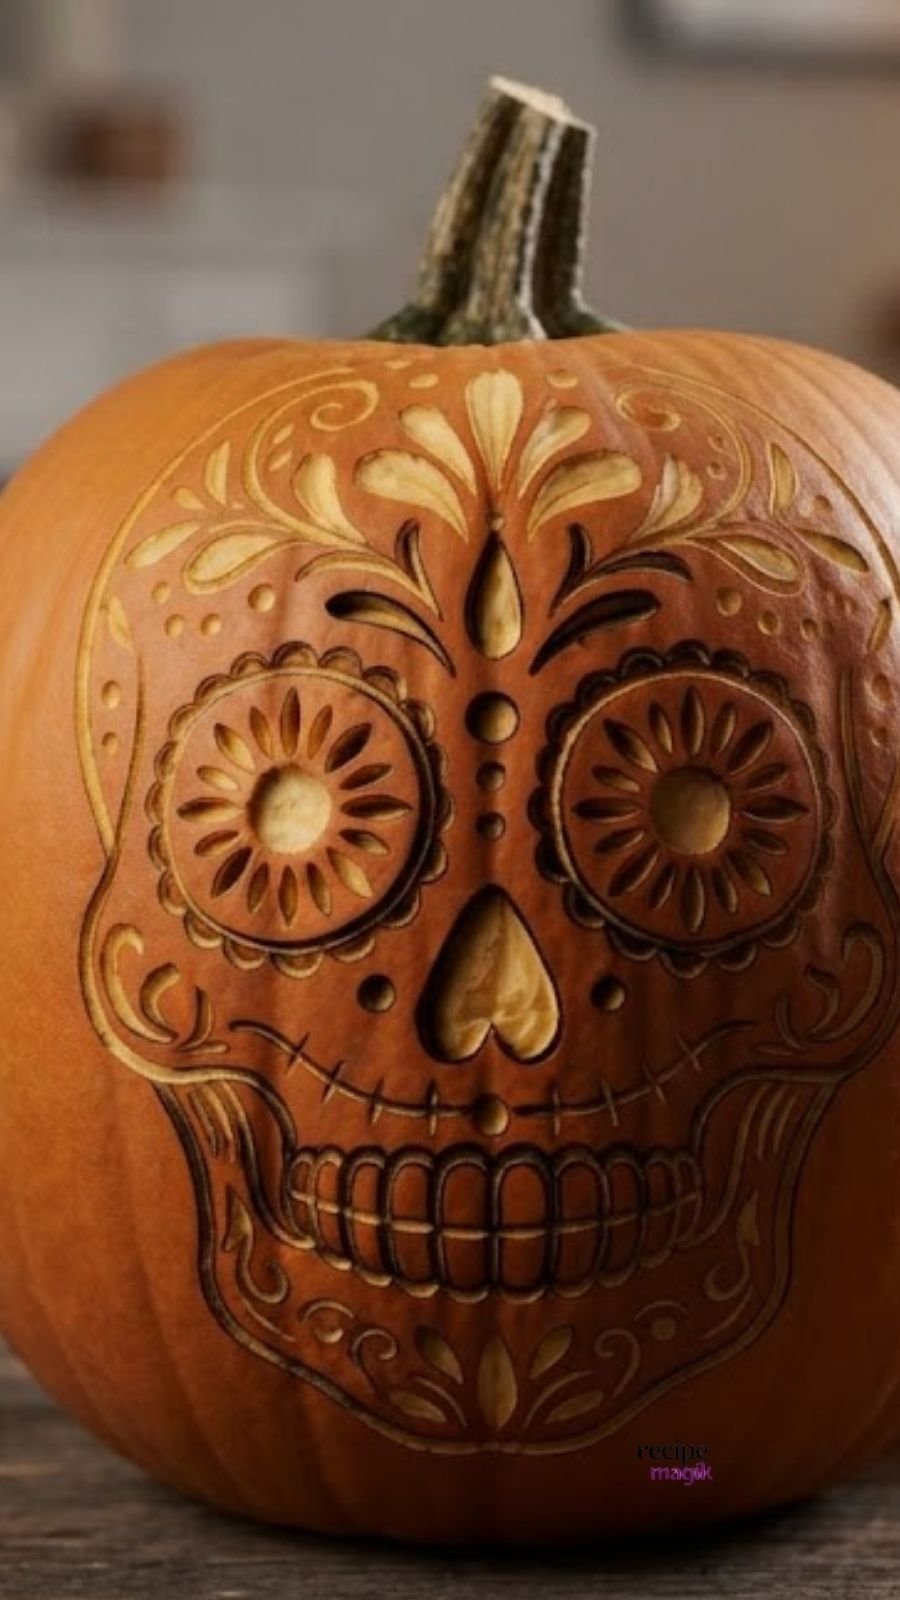
To create this detailed, surface-carved Day of the Dead pumpkin, you will need advanced carving tools and significant patience. This is an etching and shaving technique, not a through-and-through cut.
Here are the step-by-step instructions to achieve this look.
Materials Needed
- Pumpkin: A smooth, firm, unblemished orange pumpkin.
- Tools: A professional pumpkin carving kit is essential. Specifically, you need:
- A linoleum cutter or clay loop tool (for shaving large areas).
- A fine-point X-Acto knife or etching tool (for detail lines).
- A small, sharp paring knife.
- Template: A printed or hand-drawn template of the sugar skull design.
- Transfer Method: Graphite paper or a sharp poking tool.
- Lighting: An LED light (flameless candle) to illuminate it from within.
Step-by-Step Carving Process
1. Prepare the Pumpkin
Clean the outside of the pumpkin thoroughly. Instead of cutting a lid at the top (which can compromise the structure for complex top carvings), cut a circular hole in the bottom of the pumpkin. Scoop out all the seeds and pulp from the bottom. Scrape the inside wall of the front face until it is about 1/2 inch thick; this makes it easier to carve consistently.
2. Transfer the Design
Tape your sugar skull template securely onto the front of the pumpkin. Because of the pumpkin's curve, you may need to make small relief cuts in the paper to get it to lay flat. Transfer the design using graphite paper tucked underneath, or use a sharp tool to poke tiny, close-set holes along all the lines of the design to create a dot-to-dot guide on the rind.
3. Etch the Main Outline (The Depth Layer)
Remove the template. You should have a faint graphite or dotted outline of the skull. Using your fine-point etching tool or X-Acto knife, carefully trace all the main lines of the skull: the eye sockets, the nose, the jawline, and the main curves of the forehead and cheek patterns. Cut only about 1/8 inch deep—just enough to break the tough outer skin.
4. Carve the Surface Details (Shaving Technique)
This is the most time-consuming part. You are not cutting through the pumpkin; you are shaving away the outer orange layer to reveal the lighter, yellowish-green flesh underneath.
- Large Areas: Use your linoleum cutter or clay loop tool. For the large flower petals around the eyes and the decorative swirls on the forehead, carefully push the tool under the skin and shave it off in strips within the etched outlines. Work from the center of the petal outwards.
- Delicate Lines: For the fine details—like the scalloped lines on the teeth, the teardrops, and the dots—use the tip of your X-Acto knife to carefully scrape away the skin.
5. Define the Features (The Light Layer)
- Eye Sockets & Nose: The circular patterns for the eyes and the heart shape for the nose are the only parts that should be carved almost all the way through. Use your small paring knife or a large loop tool to carve these shapes completely out, creating dark, shadowed voids.
- Teeth: Go back over your etched lines for the teeth and make them slightly deeper and wider.
6. Clean Up
Gently wipe away any loose pumpkin bits with a damp cloth. Use your fine-point tool to clean up any rough edges on your etched lines. The contrast between the dark skin, the light shaved flesh, and the deep-cut voids is what creates the 3D effect.
7. Light It Up and Display
Place your finished pumpkin on a sturdy surface. Insert a battery-operated LED light from the bottom opening. The light will glow warmly through the shaved, thin areas of the rind, making the intricate skull patterns pop against the darker skin.
Sculpted Ghostface pumpkin
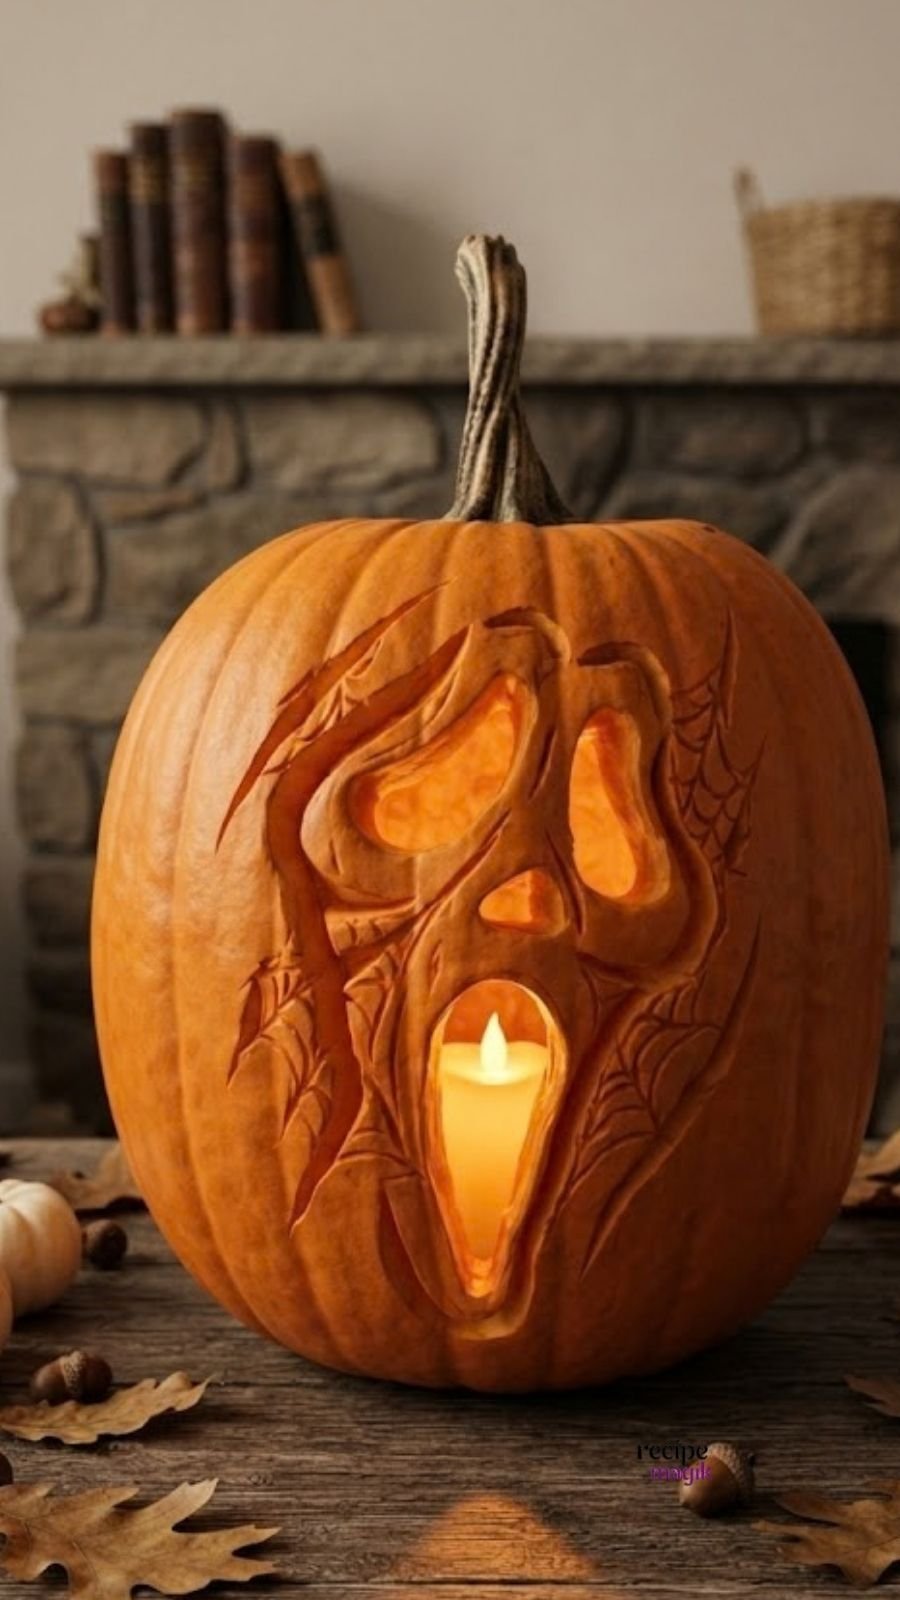
To create this intricately sculpted Ghostface pumpkin, you will need advanced carving skills and patience. This is primarily a sculpting and shaving technique, not a traditional through-and-through cut.
Here is the step-by-step guide to achieving this look:
Materials Needed
- Pumpkin: A large, smooth, thick-walled orange pumpkin.
- Tools: A comprehensive clay loop tool set (various sizes), a linoleum cutter, a small X-Acto knife, a fine-point etching tool, and a metal spoon or scoop.
- Lighting: A bright battery-operated LED candle (essential, as a real flame can burn the thin sculpted areas).
- Transfer Method: Graphite paper or a sharp poking tool (like a needle-nose tool or pin).
Step-by-Step Sculpting Process
1. Prepare the Pumpkin
Clean the outside of the pumpkin thoroughly. Instead of cutting a lid at the top (which compromises the structure for complex designs), cut a large circular hole in the bottom of the pumpkin. Scoop out all the seeds and pulp from the bottom. Scrape the inside wall of the front face until it is about 1/2 to 3/4 inch thick. This thickness is crucial for deep sculpting.
2. Transfer the Design
You need a complex pattern that maps out the different depths of the Ghostface mask. Tape your template securely onto the front of the pumpkin. Transfer the design using graphite paper tucked underneath, or use a sharp poking tool to poke tiny, close-set holes along all the lines of the mask, hood, and spiderwebs.
3. Sculpt the Main Features (The Deepest Layer)
Remove the template. You should have a dotted outline.
- Eye Sockets & Mouth: Using your smallest clay loop tool or X-Acto knife, carefully cut all the way through the pumpkin wall to create the dark voids for the eyes and the open mouth. These are the only parts that should be fully hollow.
- Mask Edges: Use the loop tool to carve deep, clean lines defining the jawline, nose, and forehead. This creates separation and depth.
4. Sculpt the "Skin" (Shaving Technique)
This is the most time-consuming part. You are not cutting through the pumpkin; you are shaving away layers to different depths.
- Cheeks and Forehead: Use a medium-to-large clay loop tool to shave away the outer orange skin layer, revealing the lighter, yellowish-green flesh beneath. Shave deeper in the cheek areas to create the hollowed look, and leave the skin slightly thicker around the nose bridge.
- Hood: Use the linoleum cutter or a small loop tool to shave away the skin in the areas representing the folds of the black hood, creating texture and shadow.
5. Add the Details (Spiderwebs)
- Using your fine-point etching tool or the very tip of your X-Acto knife, carefully etch the delicate, intricate spiderwebs onto the side of the pumpkin. These lines should be shallow but crisp, just deep enough to break the skin.
6. Define the "Flesh" (Smoothing)
Go back over all the shaved areas with a very sharp, small loop tool or the X-Acto knife to smooth out the texture and make the contours of the mask face (cheeks, eye sockets, nose) look natural and skeletal. This refinement is what makes it look sculpted rather than just carved.
7. Define the Internal Glow
Place your battery-operated LED candle inside the bottom opening. The warm light will shine through the deeply thinned areas of the flesh (the cheeks, forehead, and hood folds) with a warm, golden hue, while the fully hollow eyes and mouth will remain as stark dark shadows, creating the dramatic chiaroscuro effect.
8. Display
Set your creation on a rustic wooden table. Scatter dried oak leaves, acorns, and uncarved mini white pumpkins around the base to complete the autumnal, mysterious aesthetic seen in the image.
Spooky Pumpkin Carving
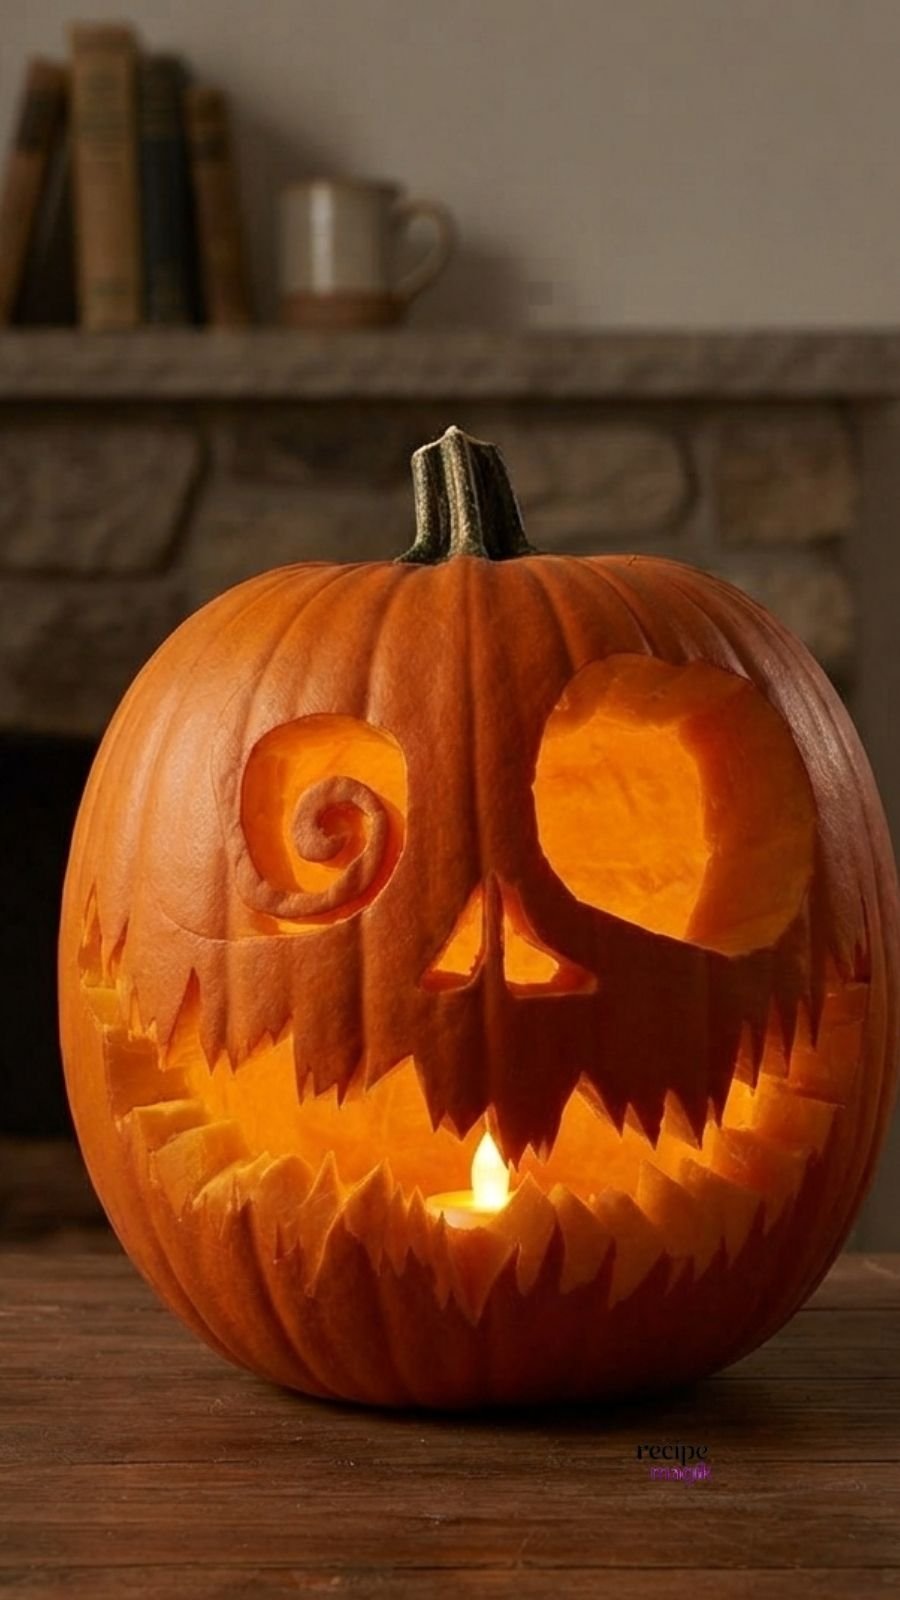
To create this whimsical yet spooky, deep-carved asymmetrical pumpkin masterpiece, follow these detailed steps:
Gather Your Supplies
- A large, round, unblemished orange pumpkin.
- A carving saw, a fine-point X-Acto knife, and a set of clay loop tools (linoleum cutter or gouges) for shaving and depth work.
- A marker for sketching the freehand design.
- An LED tealight or flameless candle.
Prepare the Pumpkin
- Cut a clean opening at the bottom of the pumpkin rather than the top to preserve the structural integrity of the upper face and stem.
- Scoop out all the interior seeds and pulp cleanly.
- Shave down the front interior wall to roughly 1/2-inch thickness so the light can diffuse warmly and allow for safe surface shaving.
Sketch the Asymmetrical Face
- Using your marker, draw a large, hypnotic spiral eye on the left side.
- On the right side, draw a much larger, smooth, rounded oval eye socket.
- Sketch a small, sharp triangular nose right in the center.
- Draw a wide, wicked grin stretching across the lower half, packed with jagged, interlocking triangular teeth.
Carve and Layer (The Depth Technique)
- Use your small carving saw to cut completely through the pumpkin wall only for the key open areas: the center of the spiral eye, the nose cavity, and parts of the gaping mouth to allow airflow and a brilliant glow.
- Use your clay loop tools and gouges to shave away the outer rind (without cutting all the way through) around the rest of the spiral eye and the large right eye socket, creating sunken, multi-level depth.
Detail the Jagged Teeth
- Use your X-Acto knife or a fine-v-tool to carefully notch out alternating, jagged upper and lower teeth.
- Shave around the individual points of the teeth to give them a sharp, dimensional, 3D effect that protrudes from the shadowed background.
Final Polish and Display
- Wipe away any loose debris or marker lines with a damp cloth.
- Place your LED tealight inside the pumpkin and position it straight-on on a wooden mantel or tabletop in a cozy indoor home setting.
There is something deeply rewarding about stepping back to watch your finished pumpkin glow on the mantel, casting warm, intricate shadows across a quiet room at home. Whether you spent your evening perfecting a quirky, jagged grin or etching delicate gothic details into the thick rind, mastering these multi depth carving techniques transforms a simple autumn gourd into a true work of art. I hope this collection of tutorials inspires you to slow down, grab your loop tools, and enjoy the calming rhythm of creating something uniquely captivating this season. Take your time, make each design your own, and enjoy bringing a little extra handmade magic into your space.
Ask Me Anything